
이 자습서에서는 Adobe Illustrator에서 페인트 아이콘을 만드는 방법을 보여줍니다.
처음에는 기본 도구 및 효과, 기본 벡터 모양 생성 기법을 사용하는 방법을 배우게됩니다. 매우 단순한 선형 그라데이션과 몇 가지 기본 블렌딩 기술을 통해 우리는 인상적이고 멋진 아트웍을 만들려고 노력할 것입니다.
최종 이미지
언제나처럼, 이것이 우리가 만들게 될 최종 이미지입니다.![]()
자습서 세부 정보
- 프로그램 : Adobe Illustrator CS3
- 예상 완료 시간 : 45 분
- 난이도 : 초급 - 중급
1 단계
먼저 새 문서를 만듭니다. 크기를 600 x 600 픽셀 로 설정 하고 색상 모드를 RGB로 설정하십시오.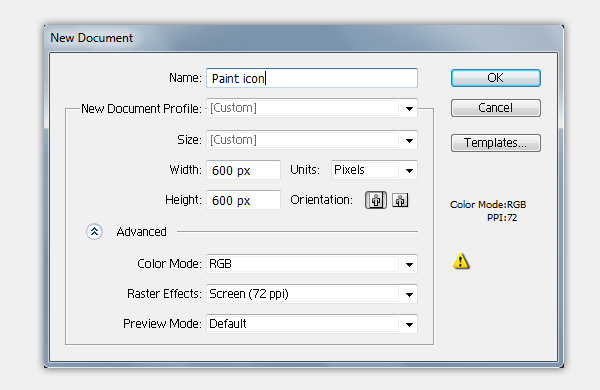
2 단계
Ellipse Tool (L) 부터 시작하겠습니다 . 도구 패널에서 선택하고 대지를 클릭하십시오. 그것은 타원 옵션 박스를 불러올 것입니다 - 너비 = 400px , 높이 = 400px 그리고 OK 버튼을 누르십시오. 채우기 색은 중요하지 않습니다.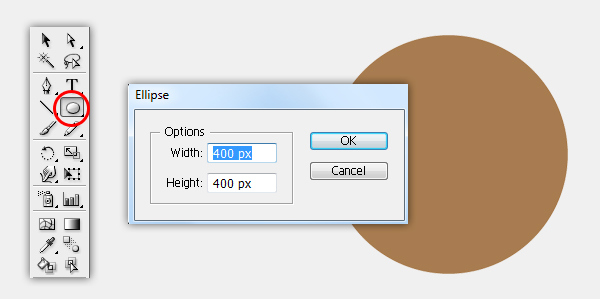
3 단계
Width = 250px , Height = 250px로 타원을 하나 더 만들고 아래 이미지와 같이 배치하십시오. 우리가 지금까지와에서 만든 모든 요소 선택 패스 파인더 패널 히트 모양 영역에서 빼기 버튼을 누릅니다. 모양을 확장해야합니다.
[ 개체]> [모양 확장]을 선택합니다 . 객체를 편집 가능한 모양으로 바꿉니다.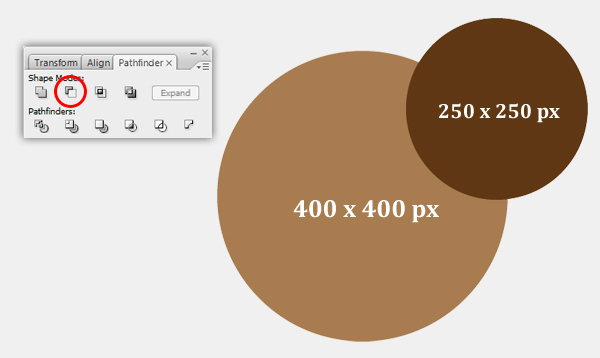
4 단계
다음으로 팔레트에 작은 구멍을 만들어야합니다. 너비 = 50px , 높이 = 50px 인 타원형 도구 (L) 를 선택하고 작은 원을 만들고 아래 이미지와 같이 배치하십시오.
이 원과 지금까지 생성 한 모양을 선택 하고 패스 파인더 패널 에서 모양 영역 빼기 버튼을 클릭합니다. 그런 다음 객체> 모양 펼치기 로 이동하여 모양 을 확장합니다. 이 레이어의 이름을 "Body_front"로 지정 합니다.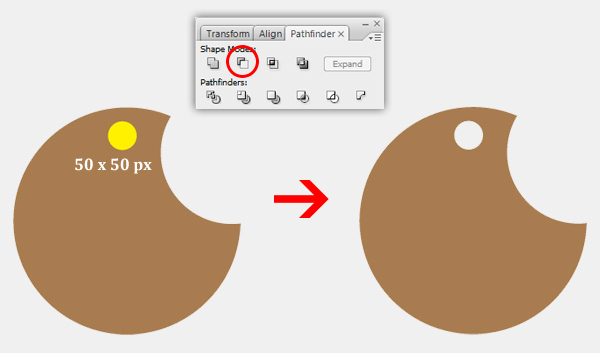
5 단계
우리가 만든 모양을 복제하고 (Ctrl / Cmd + C, Ctrl / Cmd + F) , 오른쪽 아래로 몇 픽셀 이동 한 다음 복사본의 채우기 색을 변경하십시오. 이 새 모양의 이름을 "Body_back"으로 지정 하고 "Body_front" 아래에 레이어를 배치합니다 .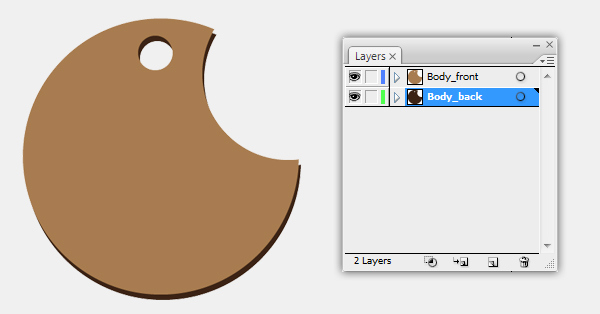
6 단계
에서는 "Body_back" 층, 픽업 펜 공구 (P)를 다음 이미지와 같이 두 개의 형상을 그린다.
"Body_back" 레이어 의 모든 요소를 선택 하고 패스 파인더 패널에서 모양 영역에 추가 버튼을 누릅니다. 모양을 확장해야합니다.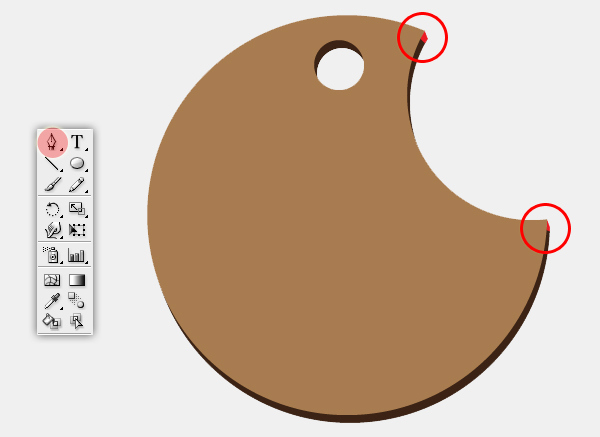
7 단계
중복 "Body_front"를 , Ctrl 키 / Cmd를 + C (복사) 한 후 클릭 "Body_back" 레이어와 Ctrl 키 / Cmd를 + B (백업 붙여 넣기) . 선택 "Body_front" 사본 및 "Body_back"을 하고 클릭 모양 영역에서 빼기 패스 파인더에서 버튼을 누릅니다. 모양을 확장해야합니다. [ 개체]> [모양 확장]을 선택합니다 . 다음 이미지와 같이 두 가지 모양이 있어야합니다.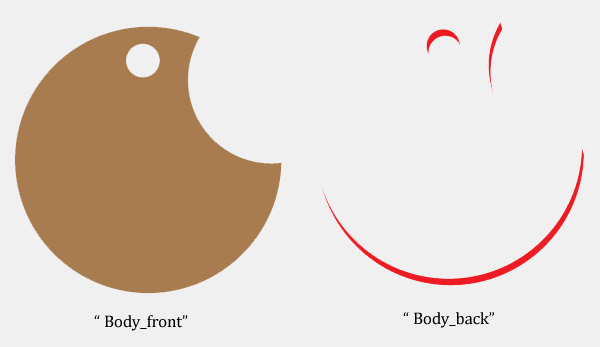
8 단계
Now we need to create highlight for the palette. First create a new layer as ” Highlight 1 ” , duplicate two copies ” Body_front” , select the top copy and move it a few pixels to the left. Next, select both copies and click on the Subtract from shape area button from the Pathfidner. Then go to Object > Expand Appearance .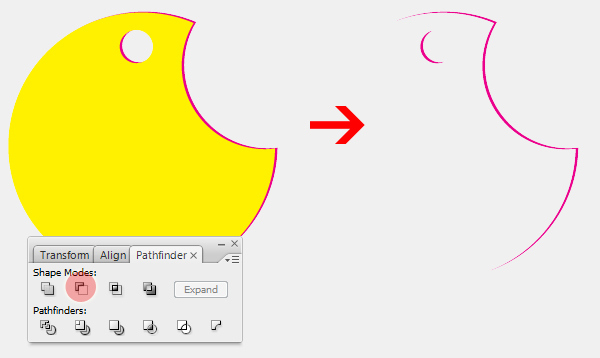
Then Ungroup the new shape we have created so far and remove the unwanted small half circle.
Step 9
Next, we create one more highlight for the palette. Create a new layer named ” Highlight 2 “ ,we are going to repeat the previous step, but select the top copy move it a few pixels to the top. And you should get the shape as shown in the following image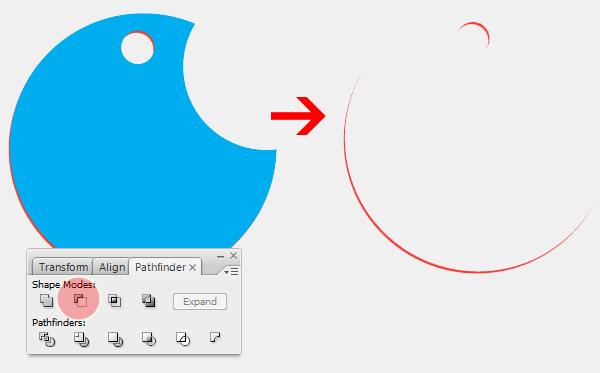
Step 10
이제 팔레트 모양이 완성되었습니다. 어떻게 보일 것입니다.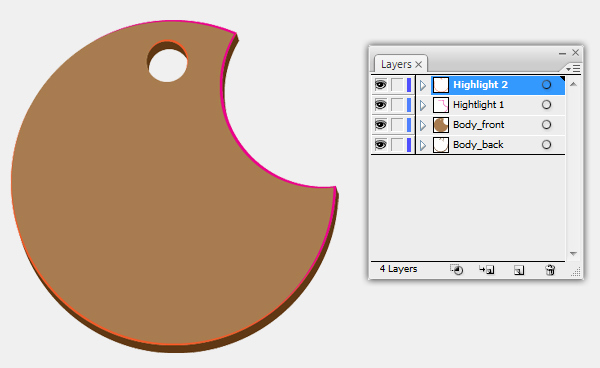
11 단계
이 단계에서는 "Body_front"에 그라디언트를 적용합니다 . 다음 이미지와 같이 선형 그래디언트를 추가하십시오.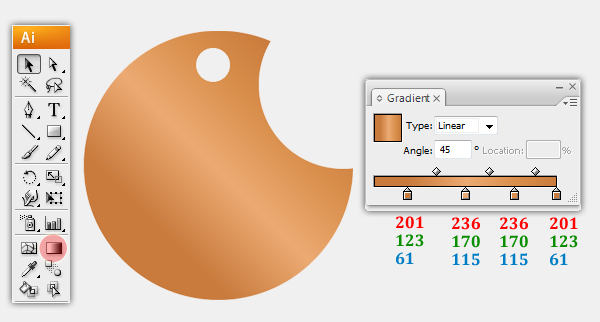
우리는 "Body_front"가 훨씬 가벼운 것을 원합니다 . 따라서 "Body_front" 사본을 위해 Blending 모드 를 Soft light 로 변경하십시오 .
12 단계
우리의 "Body_back" 은 이제 좋은 색 그라디언트를 얻을 준비가되었습니다. 다음 이미지와 같이 선형 그라디언트를 사용하게 될 것입니다.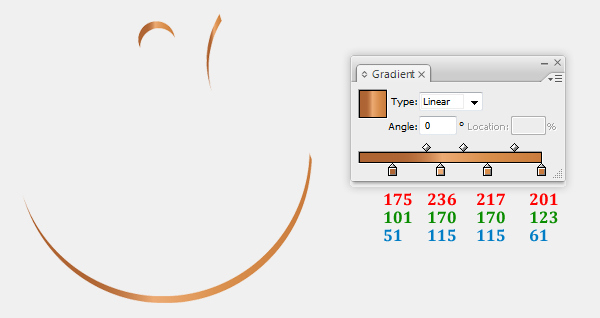
그런 다음 "Body_back" 복사본에 대해 혼합 모드 를 복사 하여 오버레이 로 변경합니다 .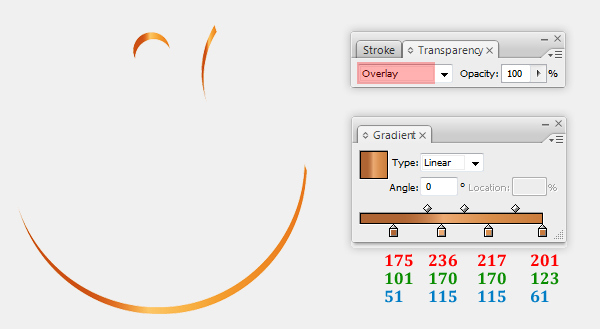
이제 이런 팔레트를 가져야합니다.
13 단계
In this step, we work with “Highlight 1 ” . Fill it with the linear color gradient as shown in the following image.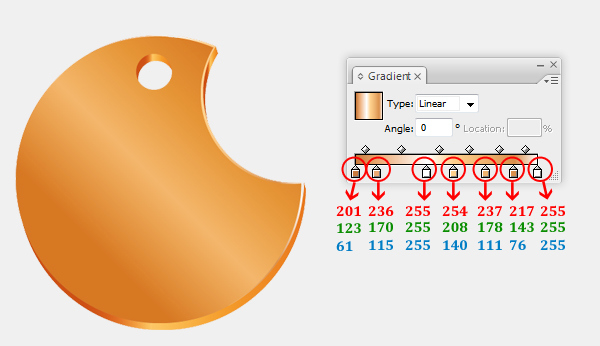
Step 14
Apply the same linear color gradient for ” Highlight 2″ and you will get the result like this image below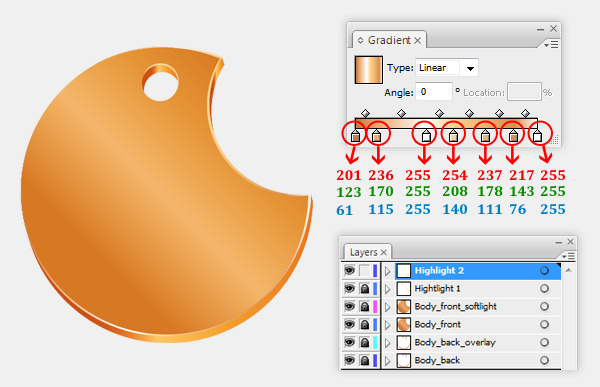
Step 15
We are going to create the wooden texture for the palette. Create a new layer and name it “Wooden texture”. Select the Ellipse Tool (L), create a squeezed shape, fill it with no color but stroke = 2px , then go to Object > Expand.
Duplicate the shape we have created and resize the copy as shown below. Then select both these object and go to Object > Blend > Blend option > Spacing: Specified step =2 > OK.
Make sure to expand the shape. Select Object > Expand .Then apply a radial gradient to them with black in the middle and white on the edges.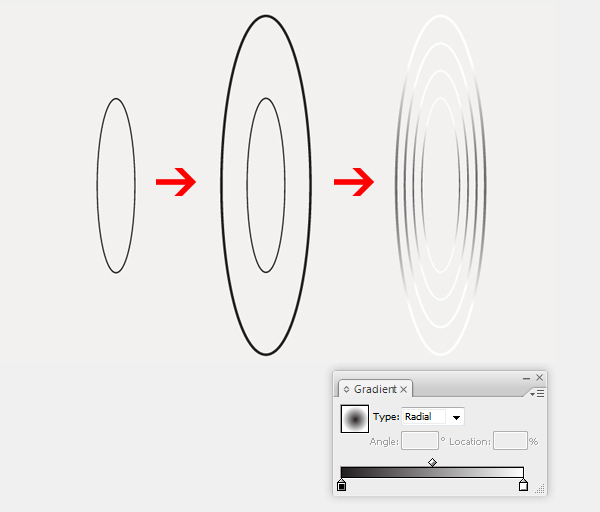
Step 16
Double click on the Warp Tool (shift + R) in the Tools Panel to bring up the Warp Tools Options dialog. They are probably on the default settings, but if they are not, press the reset button on the right of the dialog. Change the settings as shown in the following image and click OK .
이제 "나무 질감"을 원하는대로 변형하십시오 . 방금 변형시킨 객체를 선택하고 Object> Transform> Rotate : Angle = 90으로 이동하여 Blending 모드 를 Soft light로 변경하십시오 .
객체를 복제하고 크기를 더 크게 조정하고 원하는만큼 작게 조정하십시오. 내 예가 여기있다.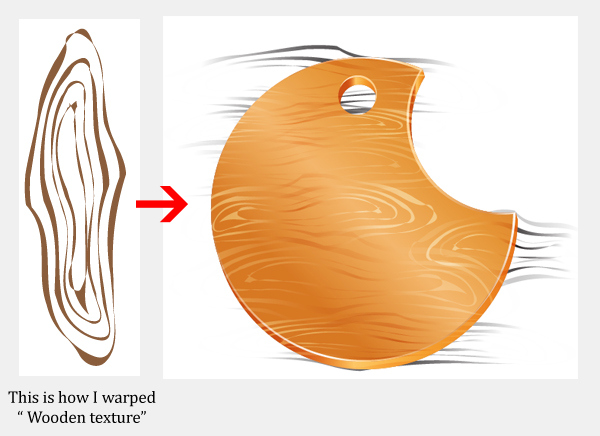
17 단계
다음, 복제 "Body_front"를 선택, "Body_front" 사본과의 전면에 넣어 "나무 질감" . 모든 요소를 선택하고 [ 오브젝트]> [클리핑 마스크]> [만들기] 로 이동하십시오 .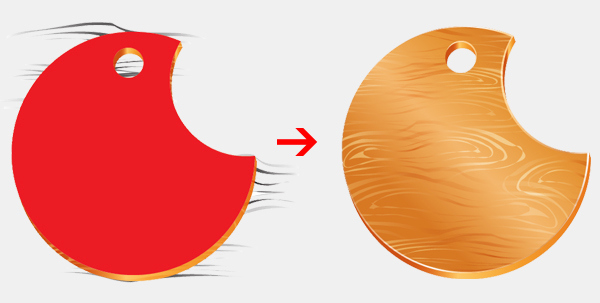
18 단계
이제 우리는 거의 팔레트를 완성하고, 한 단계 더 나아가서 새 레이어를 만들고 "그림자" 라는 이름을 붙이고 "Body_back"레이어 아래에 넣습니다 . "Body_front"를 복제하고 사본을 선택하여 "Shadow"에 붙여 넣은 다음 색 # 000000으로 채 웁니다 . 그런 다음 효과> 흐리게 효과> 가우시안 흐림 효과 로 이동하여 반경 = 6px로 설정 합니다. 그러면 아래 이미지와 같은 결과가 표시됩니다.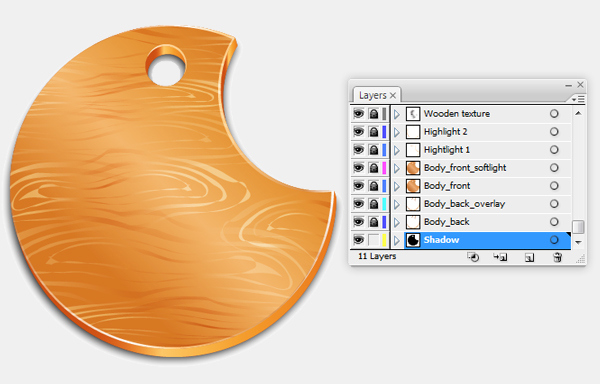
19 단계
팔레트로 끝냈습니다. 페인트 끈을 지금 추가하십시오. 새 레이어를 만들고 "Orange_paint 덩어리"라고이름을 지정합니다 .
타원형 도구 (L)를 선택하고 작은 원을 만들어 아래 그림과 같이 배치합니다. 그런 다음 모든 요소를 선택 하고 Pathfidner에서 모양 영역 추가 버튼을 클릭하십시오 . 오브젝트> 모양 확장으로 이동하여 모양 을 확장하십시오.
Orange_paint 덩어리를 두 번 복제하십시오 . 두 사본을 모두 선택하고 다음 그림과 같이 배치하십시오.
그런 다음 Pathfidner 에서 모양 영역 빼기 단추로 이동하십시오. 그리고 Object> Expand Appearance를 사용 하여 오브젝트를 확장해야합니다 .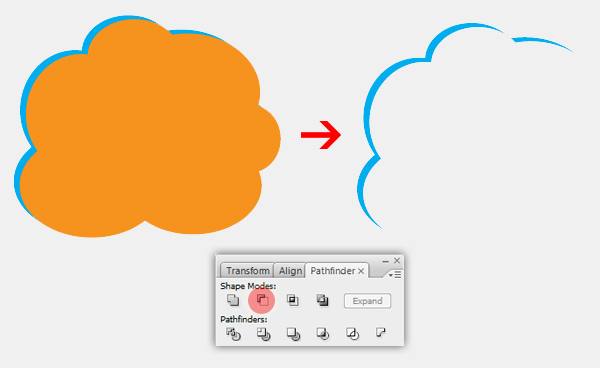
이전 단계를 반복하면 아래와 같은 이미지가 하나 더 생깁니다.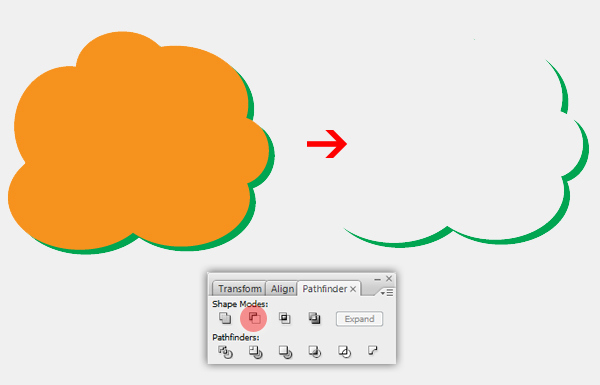
20 단계
Now we will be using linear color gradients for ” Orange_paint dollop “. After applying the gradient,Ctrl/Cmd + C (Copy) ” Orange_paint dollop ” then Ctrl/Cmd + F (Paste in front), and change theBlending Mode to Darken for the copy.
Next ,fill the color # FAAF40 to the blue shape and change the Blending Mode to Overlay with Opacity = 70%.
Then select the green shape, apply the same gradient as we did for ” Orange_paint dollop “ , but set gradient type to Radial and change the Blending Mode to Multiply = 70% . We get the result like this image below.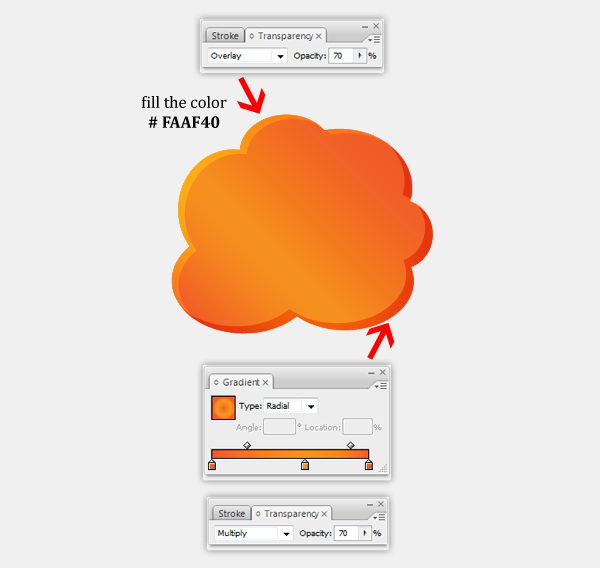
Step 21
Let’s create a highlight for this dollop. Now duplicate ” Orange_paint dollop “ , and select the Ellipse Tool(L), create a circle then place it as shown in the following image. Select both and click on theSubtract from shape area button from the Pathfidner.
Go to Object > Expand Appearance to expand the shape. Fill the new shape with color #FFFFFF and change the Blending Mode to Softlight with Opacity = 40%.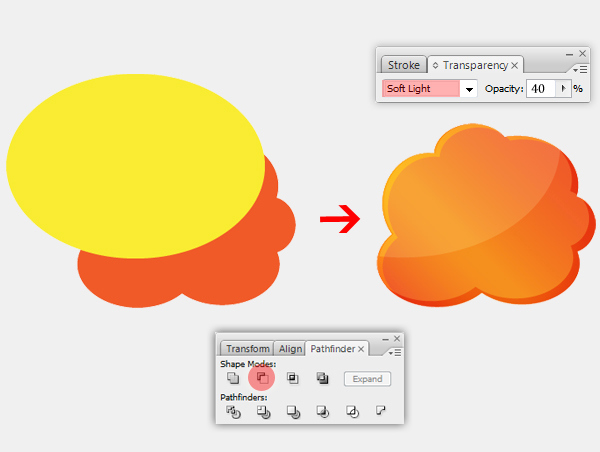
Step 22
The dollop now looks much better but it’s not finished yet. Now we will add the shadow to make it looks more realistic. Duplicate the ” Orange_paint dollop “ , fill the copy with color #000000 and go to Effect > Blur > Gaussian Blur , set Radius = 3px. Then change Blending Mode to Multiply with Opacity = 80% . And you will get the result like this image below.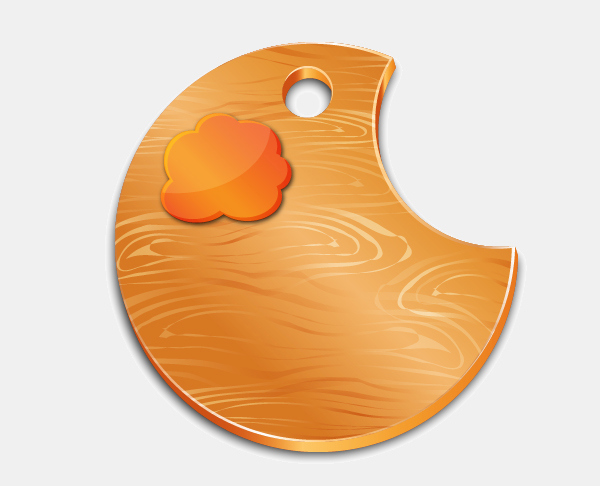
Step 23
We need two more paint dollops with blue and green color. Now duplicate ” Orange_paint dollop “ and change the name to ” Green_paint dollop ” then click on Object > Transform > Rotate with Angle = – 45. Apply the new gradient as shown in image below.
After applying the gradient, Ctrl/Cmd + C (Copy) ” Orange_paint dollop ” then Ctrl/Cmd + F (Paste in front) , and change the Blending Mode to Multiply with Opacity = 70% for the copy.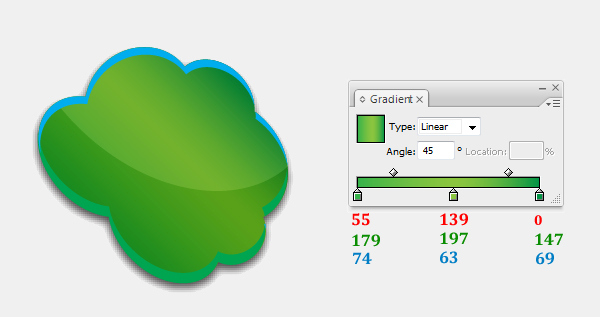
다음으로 파란색 # FFF100 색상을 채우고 혼합 모드 를 Opacity = 40 % 인 Overlay 로 변경하십시오 .
그런 다음 녹색 모양을 선택하고 "Green_paint dollop" 과 같은 그라디언트를 적용하고 그래디언트 각도 = - 90을 설정 하고 혼합 모드 를 곱하기 = 70 %로 변경 합니다.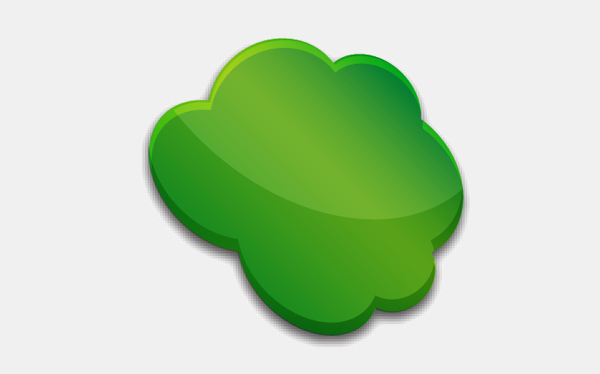
24 단계
파란 페인트 덩어리로 계속합시다. 이제 "Orange_paint 덩어리"를 복제 하고 이름을 "Blue_paint 덩어리"로 변경하십시오 . 아래 그림과 같이 새 그라디언트를 적용하십시오.
그라디언트를 적용한 후 Ctrl / Cmd + C (복사) "Blue_paint dollop"을 누른 다음 Ctrl / Cmd + F (앞에 붙이기) 를 선택하고 블렌딩 모드 를 곱하기 로 변경합니다 .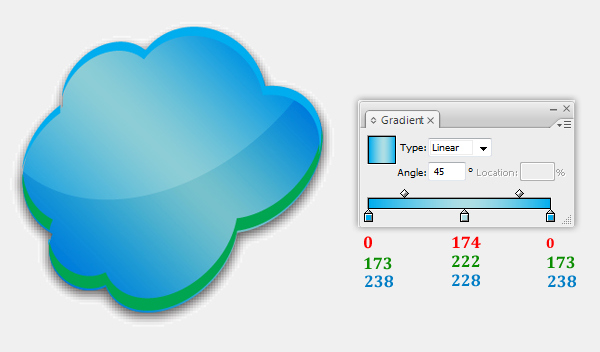
다음으로 파란색 # FFF100 색상을 채우고 혼합 모드 를 Opacity = 40 % 인 Overlay 로 변경하십시오 .
그런 다음 녹색 모양을 선택하고 "Green_paint 덩어리" 와 같은 그라디언트를 적용하고 그래디언트 각도를 0으로 설정 하고 혼합 모드 를 곱하기 = 100 % 로 변경합니다 .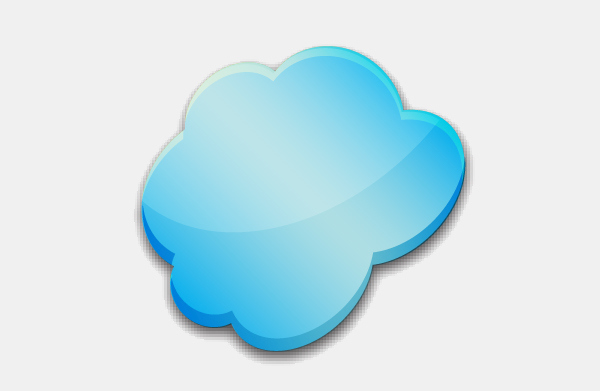
25 단계
결국에는 이와 같은 것이 있어야합니다.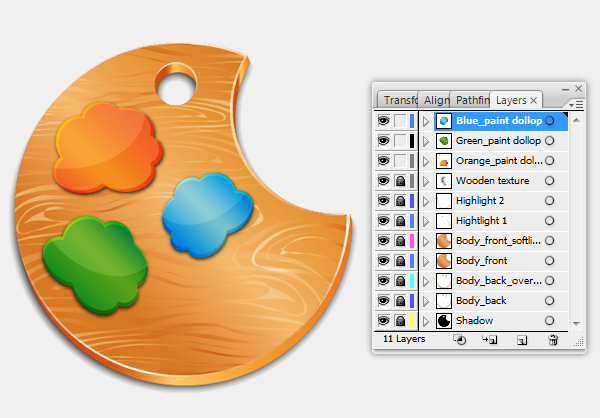
26 단계
In this step, we’re going to create a paint brush. First we create a new layer then select the Rounded rectangle (M) and click on the Artboard. It will bring up the Rounded rectangle Option box, set Width = 20px, Height = 200px, Corner Radius = 120px. Fill it with any color you want, we will change the color later. Name the layer “Paint brush “.
Next, select the shape we have created so far, go to Effects > Warp > Arc, change the settings as shown in the image below. Make sure to expand the shape, go to Object > Expand Appearance.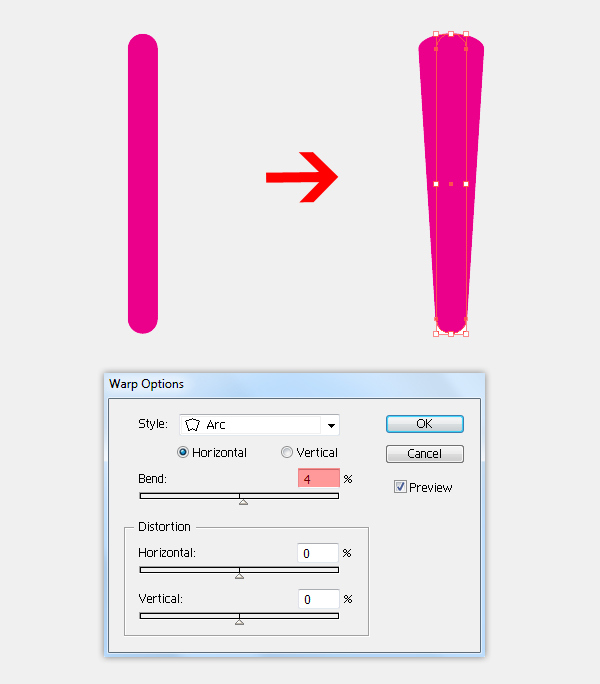
Step 27
Next, we will create metal grip base shape for this paint brush. Select Rectangle Tool (M) to draw a rectangle with Width = 50px , Height = 50px. Then duplicate “Paint brush “ shape. Select the “Paint brush “ copy and the rectangle, put them as shown in the image below, then click the Intersect shape area button from the Pathfinder panel. Then go to Object > Expand Appearance to expand the shape.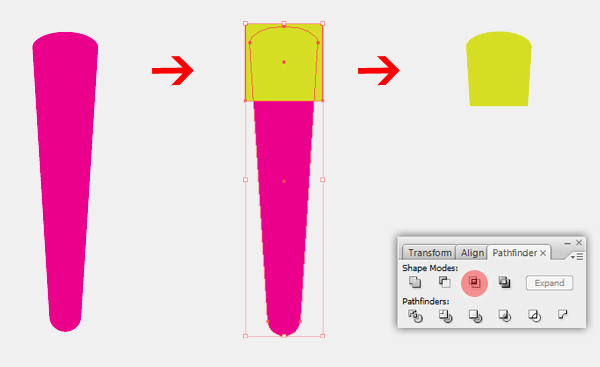
Step 28
Next, we will create the bristles base shape. Select the Ellipse Tool (L) to draw an ellipse with Width = 90px , Height = 90px. Then go to Effects > Warp > Arc Upper , change the settings as shown in the image below. Make sure to expand the shape, go to Object > Expand Appearance .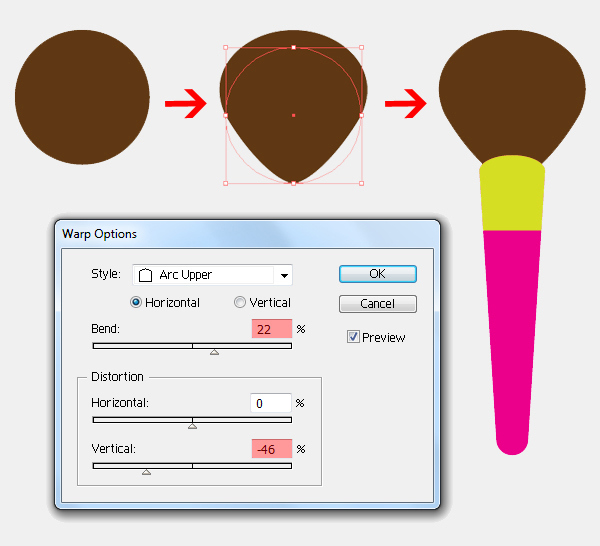
Pick the Pen tool (P) to create some cut lines as shown in the image below. Select the bristle shape and the cut lines we have created, go to Subtract from shape area button from the Pathfidner. And expand the object with Object > Expand Appearance .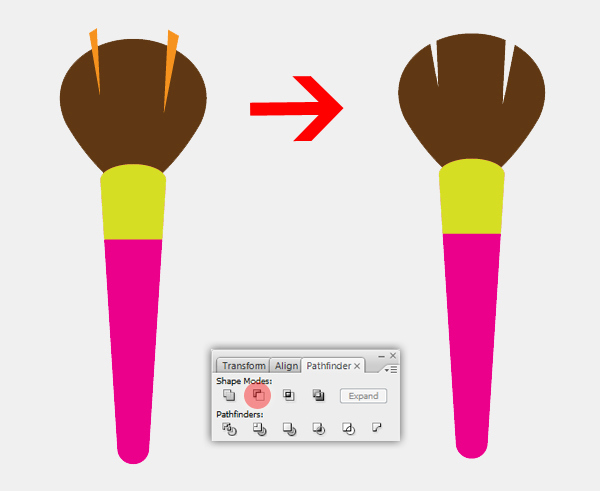
사용 타원 도구 (L)를 작은 원을 그립니다. 그런 다음 강모 모양을 복제하십시오. 원과 털 모양 복사본을 선택하고 아래 그림과 같이 모은 후 Pathfidner에서 교차 모양 영역 버튼으로 이동하십시오. 그리고 Object> Expand Appearance를 사용하여 오브젝트를 확장하십시오 .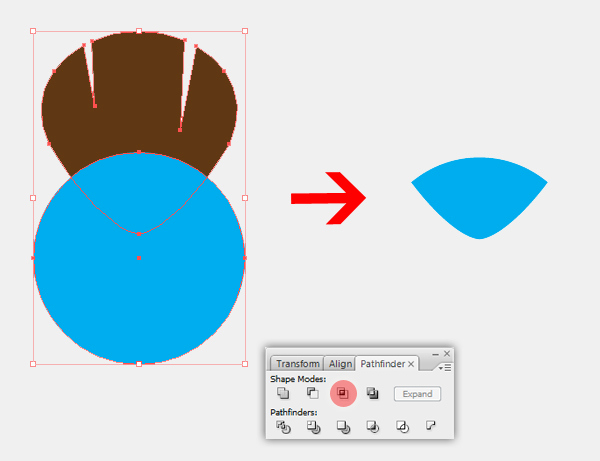
29 단계
이제 우리는 페인트 브러시의 기본 모양을 갖게되었습니다. 아래 그림과 같이 결과를 얻어야합니다.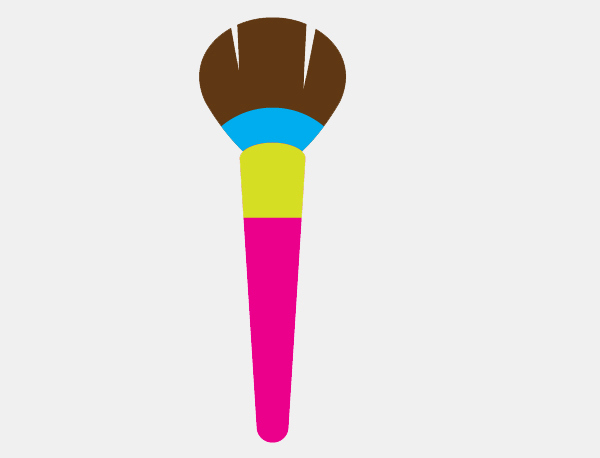
30 단계
이 단계에서는 브러시 핸들에 선형 그래디언트를 추가합니다. 다음 그림과 같이 그라디언트를 설정하십시오.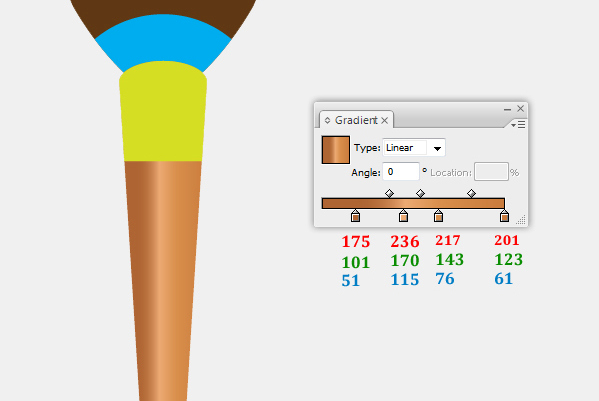
브러시 핸들을 복제하고 곱하기 혼합 모드를 복사 모양에 적용합니다 .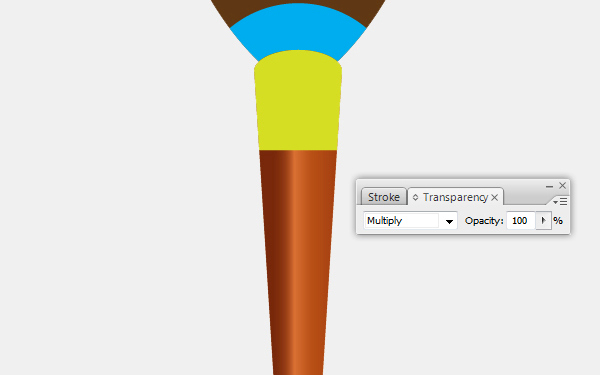
31 단계
대부분의지도 붓에는 브러시 털을 함께 잡고있는 다른 기능을하는 일종의 금속 그립이 있습니다. 다음으로 금속 그립에 그라디언트를 추가합니다.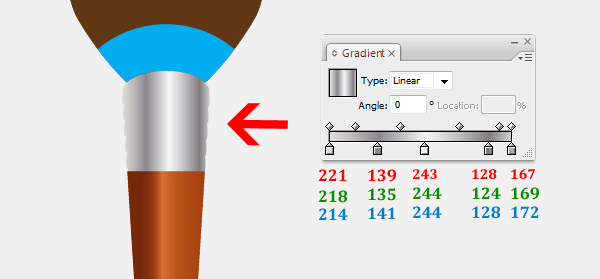
우리는 금속 그립을 복제 하고 복사 모양에 오버레이 혼합 모드를 적용하는 것보다 훨씬 가벼운 금속을 원합니다 .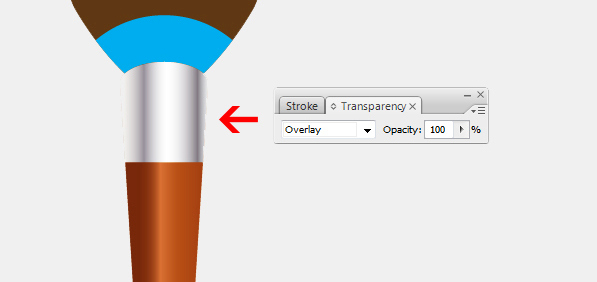
32 단계
강모 모양을 선택하고 다음 그림과 같이 그라디언트를 적용하십시오.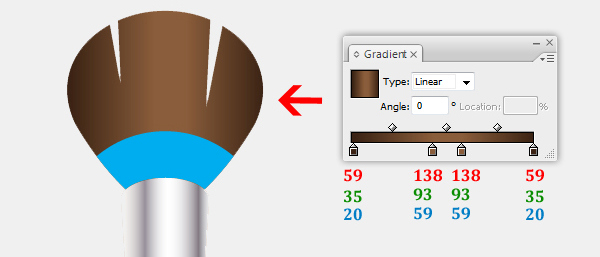
강모를 복제하고 복사 모양에 Softlight 혼합 모드를 적용하십시오 . 이런 결과가 나옵니다.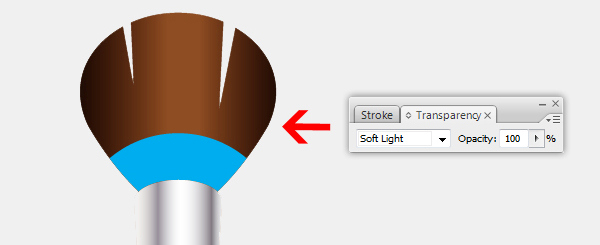
33 단계
Apply the gradient to the blue shape on the bottom of the bristle to represent a subtle dark reflection on the bristle. Fill it with the gradient as shown in the following image, then apply the Multiply blending mode to it with Opacity = 50%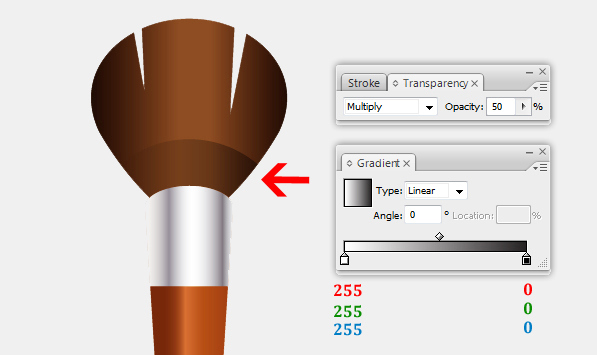
Step 34
Pick the Pen tool (P) to draw some lines and fill no color but stroke = 0,5pt, to represent strands on the bristle.
Open Window > Brushes. This will bring up the Brushes Options box, then we apply the Charcoalbrush for the lines we have created. In the end you should have something like this.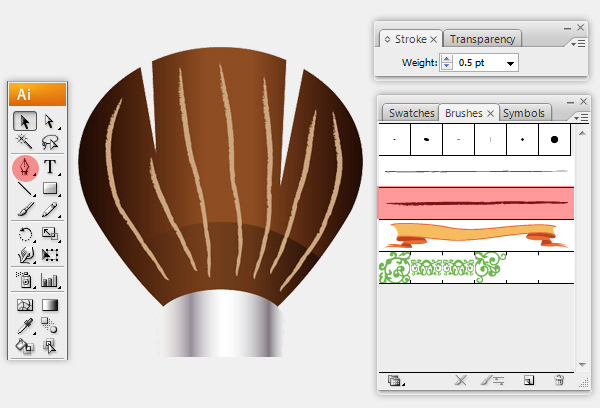
모든 가닥을 확장하려면 Object> Expand Appearance 로 이동 하십시오 . 이제 색상 # C3996B로 스트랜드를 채우고 Opacity = 50 % 인 스트랜드에 오버레이 혼합 모드를 적용하십시오 .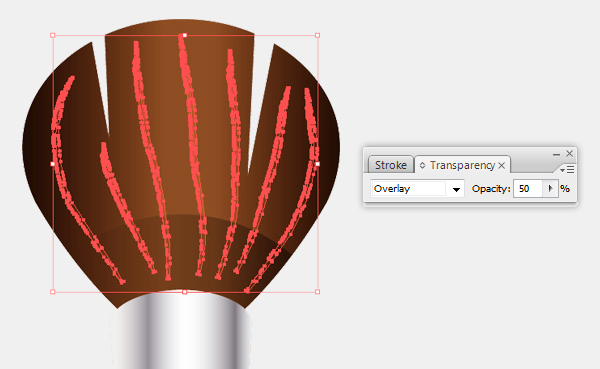
이제 우리는 페인트 브러시로 작업했습니다. 이 결과가 있어야합니다.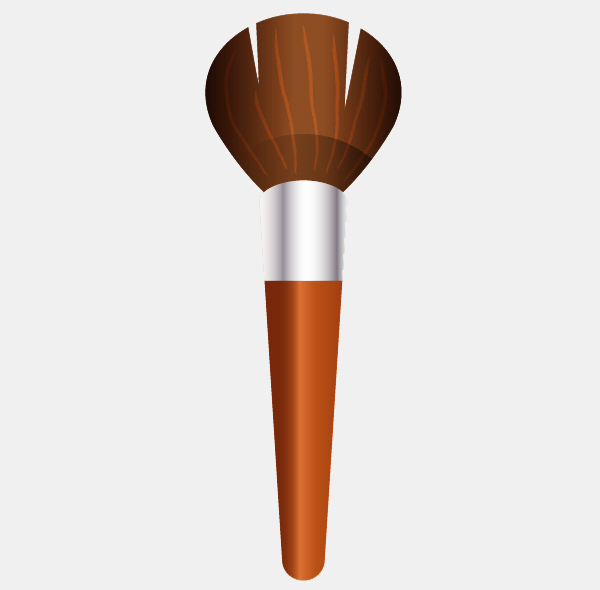
35 단계
페인트 브러시를 선택하고 오브젝트> 변형> 회전으로 이동 하여 각도 = 135를 변경하십시오 .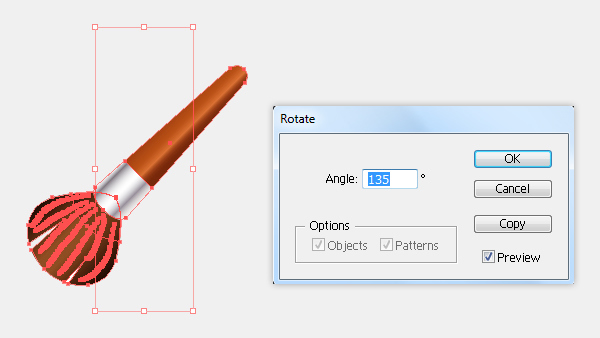
아래 그림과 같이 위치 시키십시오.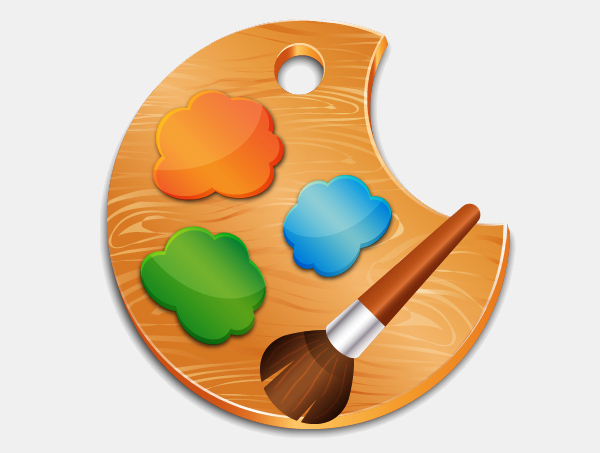
36 단계
다음으로 페인트 브러시의 그림자를 만듭니다. 이제 페인트 브러시를 복제하십시오 . 단단 하고 페인트 브러시 핸들 이외의 모든 것을 제거한 복사본에 추가하십시오 . 그런 다음 Pathfidner에서 모양 영역 버튼 에 추가로 이동 하십시오 . 그리고 Object> Expand Appearance를 사용하여 오브젝트를 확장하십시오 .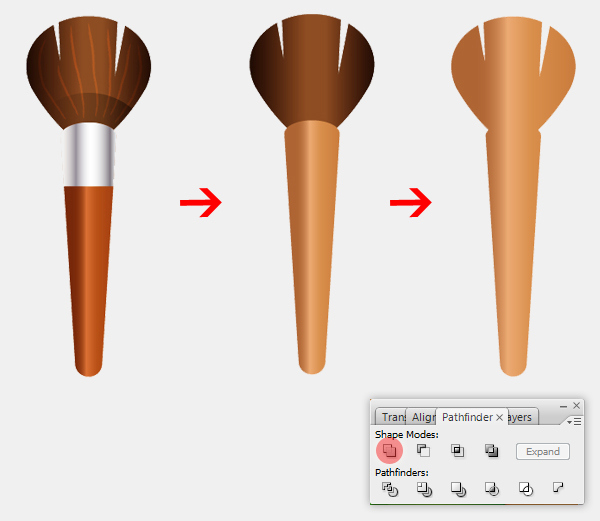
37 단계
페인트 브러시 복사를 위해 # 000000 색상으로 채우고 효과> 흐리게> 가우시안 흐림 으로 이동하고 반경 = 3px로 설정 합니다.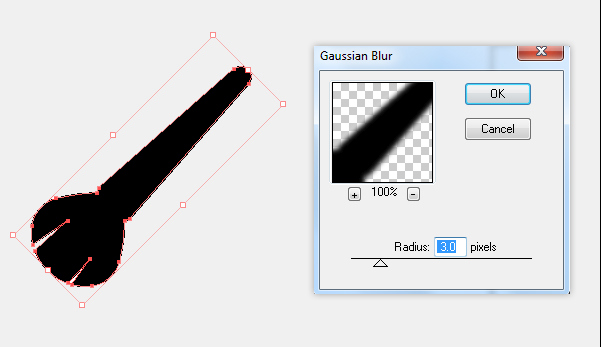
지금까지 생성 한 그림자를 선택하고 페인트 브러시 아래에 놓습니다. 그런 다음 블렌딩 모드 를 섀도우의 Opacity = 80 % 로 곱하기 로 변경하십시오 . 아래 이미지와 같은 결과가 표시됩니다.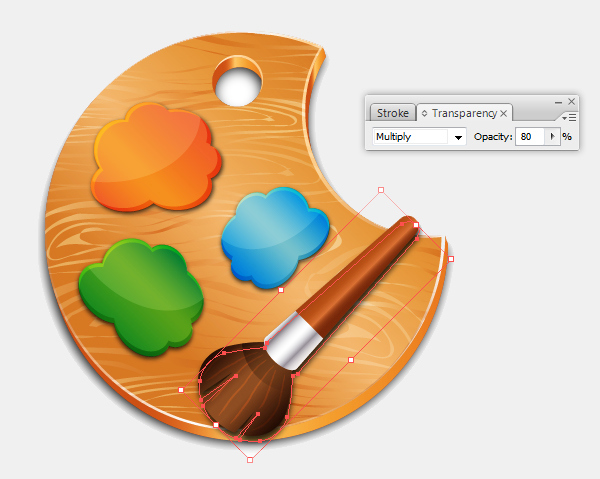
38 단계
최종 디자인을위한 배경을 설정합시다. 도구 패널에서 직사각형 도구 (M) 를 잡고 대지에서 아무 곳이나 클릭하십시오. 사각형 옵션 상자가 나타납니다. 크기를 600 x 600 픽셀 로 설정하십시오 . 아래 이미지와 같이 그라디언트를 적용하십시오.
그리고 우리는 완료되었습니다!
여기 그것이 어떻게 보일 것입니다. 이 튜토리얼을 마음껏 즐기시고 앞으로의 프로젝트에서 이러한 기술을 적용 해 주시길 바랍니다.
![]()
'디자인 > 무료 디자인 자습서' 카테고리의 다른 글
| [일러스트] 간단한 옷걸이 일러스트레이션 만들기 (0) | 2018.06.02 |
|---|---|
| [일러스트] Google 크롬 아이콘을 만드는 방법 (0) | 2018.06.01 |
| [일러스트] 멋진 모자 일러스트를 그리는 방법 (0) | 2018.06.01 |
| [일러스트] 리본 그리는 방법 (0) | 2018.06.01 |
| [일러스트] 동전 아이콘을 그리는 방법 (0) | 2018.05.31 |
| [일러스트] 간단한 퍼즐 조각 아이콘 만들기 (0) | 2018.05.31 |
| [일러스트] 간단한 드럼 아이콘 만들기 (0) | 2018.05.30 |
| [일러스트] 맛있는 식품 아이콘 그리는 방법 (0) | 2018.05.30 |


댓글