
이 일러스트 레이터 자습서에서는 몇 가지 기본 도구와 효과를 사용하여 비행기 그림을 만드는 방법을 보여 드리겠습니다.
최종 이미지
언제나처럼, 이것이 우리가 만들게 될 최종 이미지입니다.

자습서 세부 정보
- 프로그램 : Adobe Illustrator CS6
- 예상 완료 시간 : 120 분
- 난이도 : 초급 - 중급
1 단계
Illustrator를 실행 한 다음 (Ctrl + N )을 눌러 새 문서 를 만듭니다 . 단위 드롭 다운 메뉴 에서 픽셀 을 선택 하고 폭 상자에 800 을 입력 하고 높이 상자에 600 을 입력 한 다음 고급 버튼 을 클릭하십시오 . 선택 RGB , 화면 (72ppi) 와 있는지 확인 정렬 새로운 픽셀 격자에 개체 를 클릭하기 전에 선택하지 않은 상자 확인을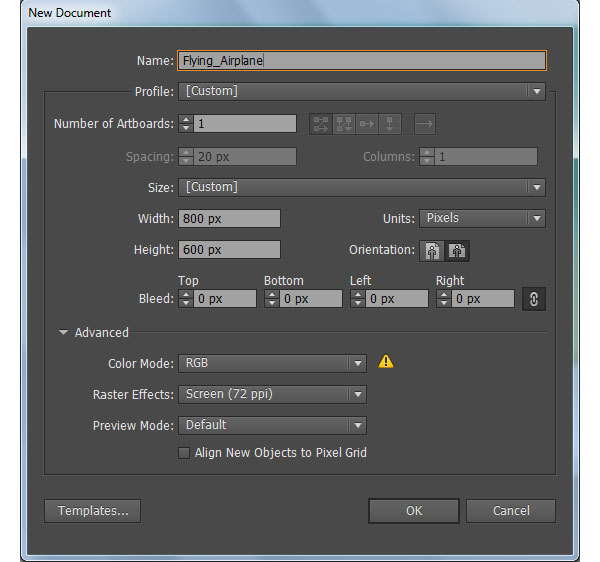
2 단계
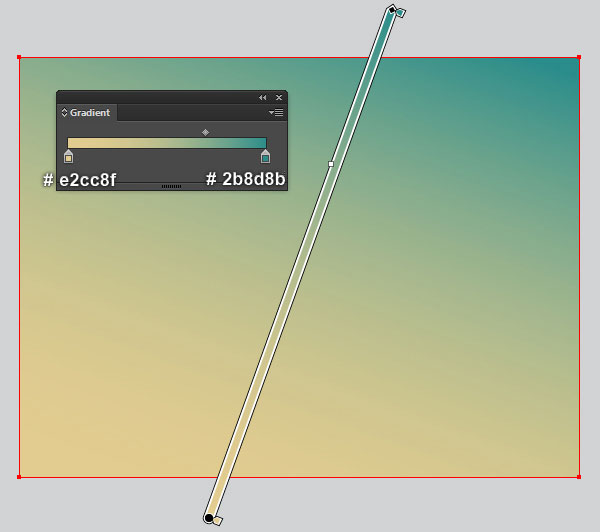
우선, 배경을 만듭니다. 사각형 도구 (M)를 선택하고 800 x 600 픽셀의 직사각형을 만듭니다 . 그런 다음 새로 생성 된 직사각형의 획을 제거하고 두 번째 이미지에 표시된대로 선형 그래디언트로 채 웁니다.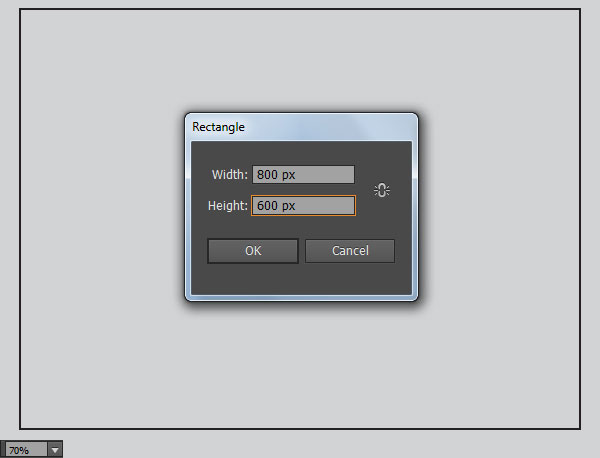
3 단계
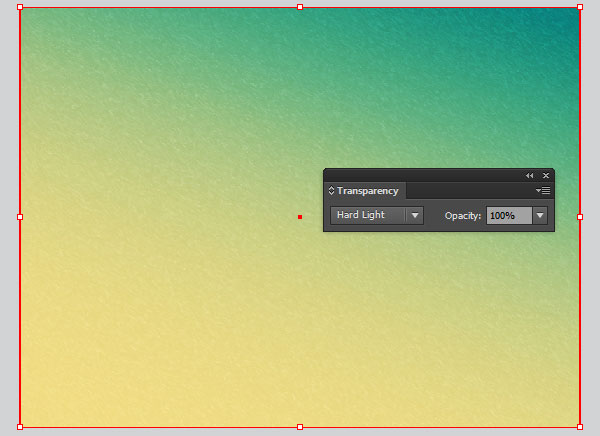
2 단계 에서 만든 사각형을 다시 선택하고 복사 ( Ctrl + C, Ctrl + F )합니다. 이 사본을 선택한 상태로 유지하고 효과> 예술적> 스머지 스틱으로 이동 하십시오. 첫 번째 이미지에서 보는 것과 같은 데이터를 따르고 확인을 클릭하십시오 .
결과로 선택된 사각형을 선택하고 투명도 패널 ( 윈도우> 투명도 )을 연 다음 블렌딩 모드 를 하드 라이트로 변경합니다 .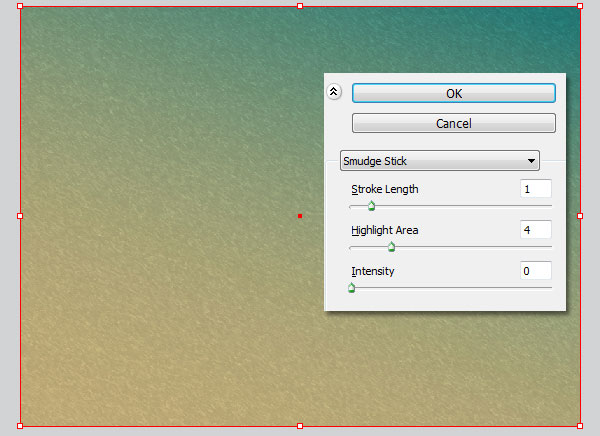
4 단계
We will continue with the clouds. Pick the Ellipse Tool (L) and create two ellipses with dimensions: 297 by 297px and 273 by 273px. Then place these ellipses in the positions like you see in the first image.
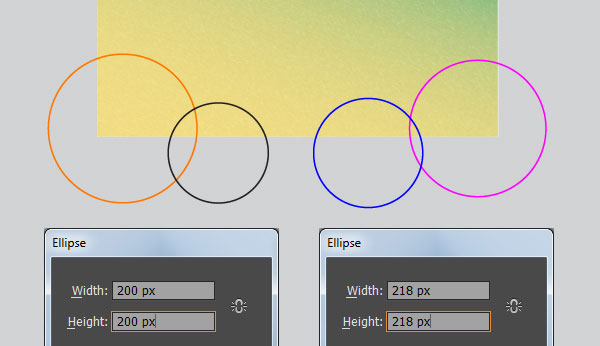
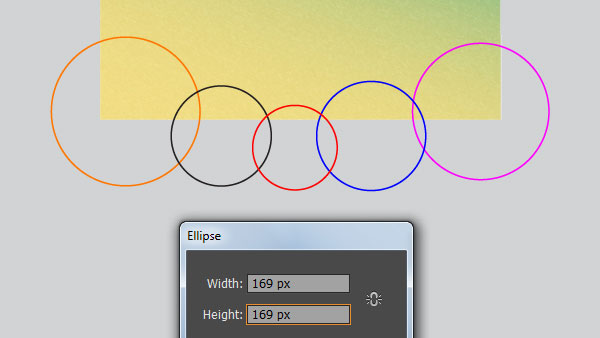
Now, follow the sequence of images and create some other ellipses similar to the ones from below.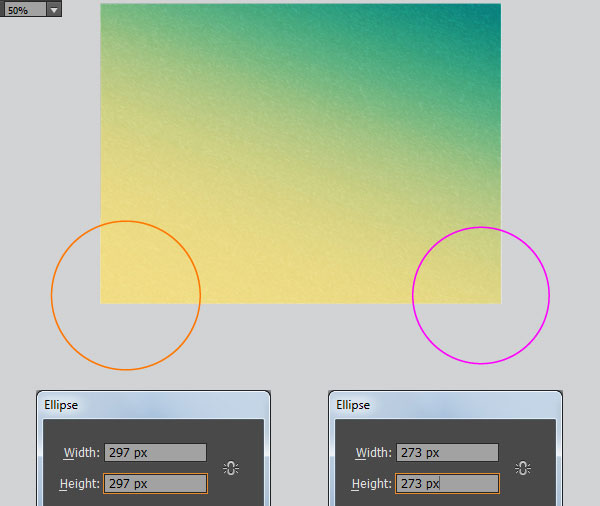
Step 5
Select the orange ellipse created in step 4, remove its stroke and then fill this object with the radial gradient as shown below. Next reselect remaining four ellipses, pick the Eyedropper Tool (I) and click on the white ellipse created in this step. The resulting ellipses should look like the second image below.
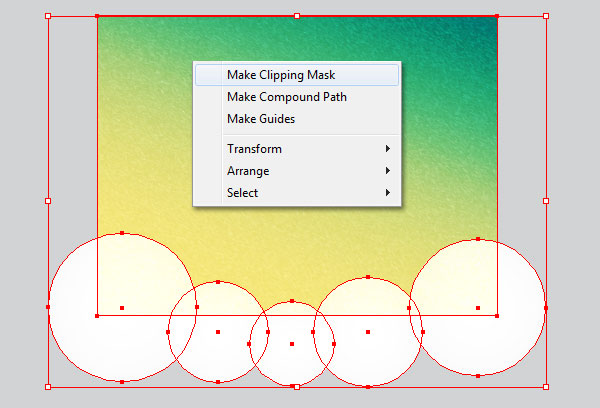
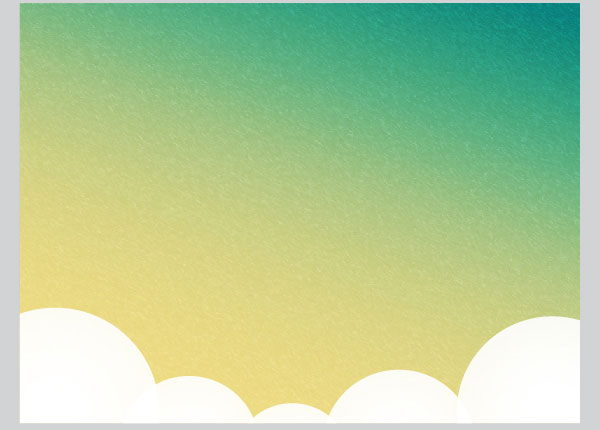
계속하기 전에이 단계에서 작성된 다섯 개의 흰색 타원을 모두 다시 선택하고 그룹화하십시오 ( Ctrl + G ). 3 단계 에서 적용된 얼룩 지팡이 효과가 적용된 직사각형을 선택하고 복사 ( Ctrl + C, Ctrl + F ) 한 다음 사본을 앞으로 가져옵니다 ( Ctrl + Shift + 오른쪽 대괄호 ). 이 사본을 선택한 상태에서 Shift 키를 누른 상태 에서이 단계에서 생성 된 그룹을 클릭하십시오. 대지를 마우스 오른쪽 버튼으로 클릭 한 다음 드롭 다운 메뉴에서 클리핑 마스크 만들기 섹션 을 선택 합니다. 배경은 준비가되어 있으며 마지막 이미지처럼 보입니다.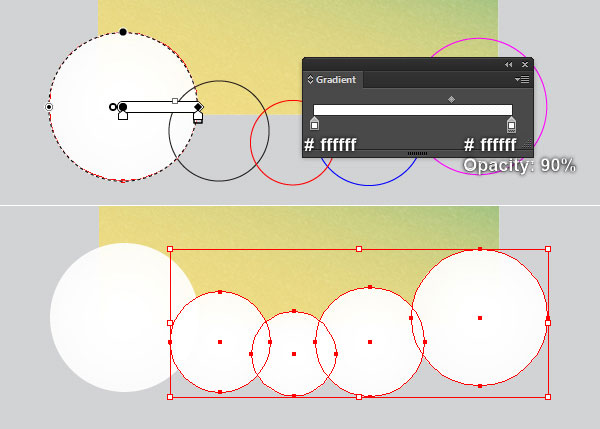
6 단계
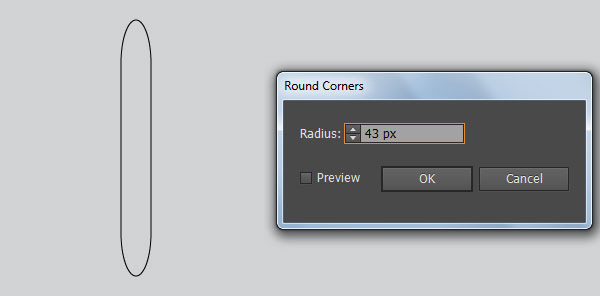
비행기를 그릴 시간입니다. 우선, 우리는 시체를 만들 것입니다. 픽 사각형 도구 (M)를 하고 생성 (30) 256px로 검은 사각형을.
새로 만든 사각형을 선택한 상태에서 효과> 스타일> 둥근 모서리 ... 43px 반경을 입력하고 확인을 클릭 한 다음 객체> 모양 확장으로 이동 하십시오 .
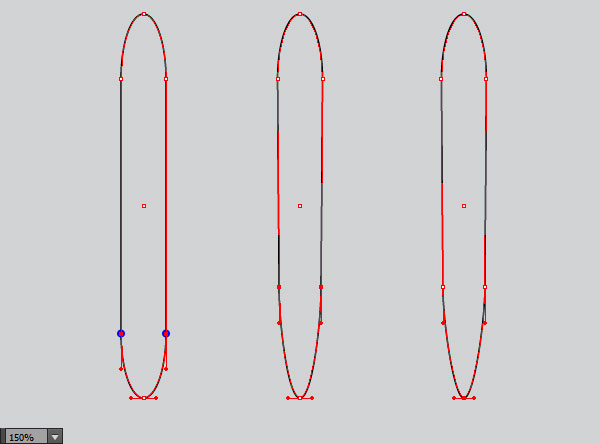
세 번째 이미지에 초점을두고 파란색으로 강조 표시된 왼쪽 앵커 포인트를 선택 하고 오른쪽으로 1 픽셀이동합니다 . 그런 다음 파란색으로 강조 표시된 오른쪽 앵커 포인트를 선택 하고 왼쪽으로 1 픽셀 이동합니다 . 이제 방금 이동 한 두 앵커 포인트를 다시 선택하고 최대 31pt 까지 이동하십시오 .
Pick the Direct Selection Tool (A) along with the Shift, shorten the handles of the bottom anchor point of the black object.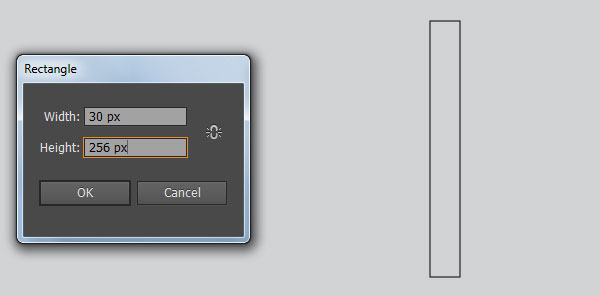
Step 7
Select the black object created in step 6 and make a copy (Ctrl +C, Ctrl +F) of it, then replace the existing stroke color of the copy with red. With the Direct Selection Tool (A), select the two anchor points highlighted with blue of the res object and remove them.
Next, pick the Convert Anchor Point Tool (Shift +C), click on the left handle of the top anchor point, then hold the mouse and drag it to the right. Click on the left handle of the bottom anchor point, hold the mouse, then drag it to the right and up.
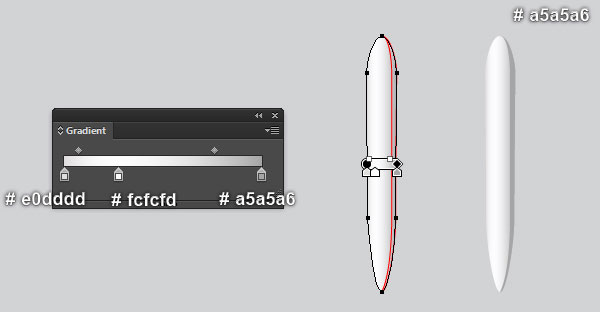
Now reselect the black object created in step 6, remove its stroke and fill this object with the linear gradient as shown in the next to last image. Select the red object created in this step, then remove its stroke and fill this object with dark grayish blue (#a5a5a6).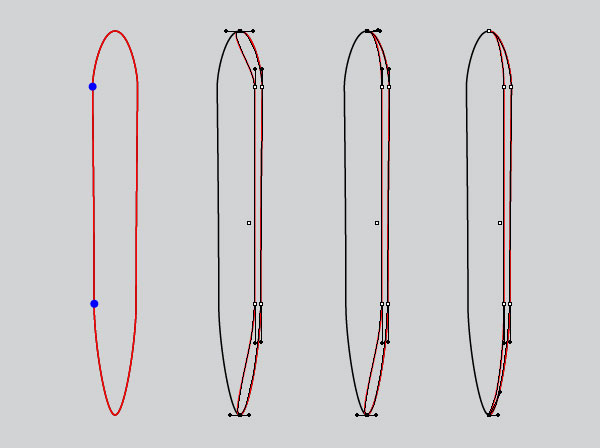
Step 8
Next comes the cockpit. Pick the Ellipse Tool (L) and create a 22.5 by 22.5px blue ellipse. Keep this blue ellipse selected and make a copy (Ctrl +C, Ctrl +F) of it, then replace the existing stroke color of the copy with black.
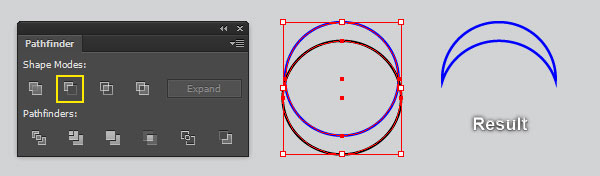
Still having the black ellipse selected, open the Transform panel (Window > Transform) and change Wto 23.5px. Then move the resulting ellipse 4px down. Now reselect the two ellipses created in this step, then open the Pathfinder panel (Window > Pathfinder) and click on the Minus Front button. The resulting object should look like the last image below.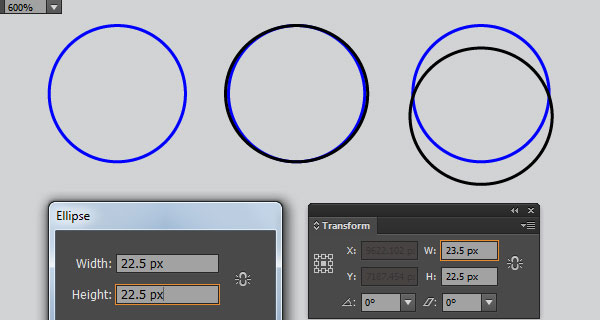
Step 9
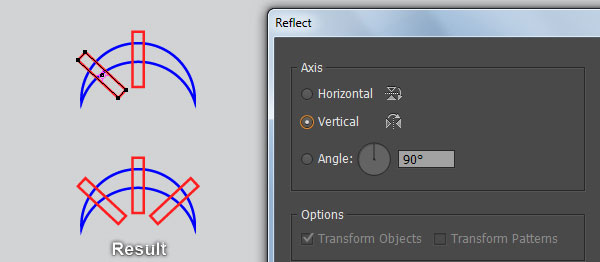
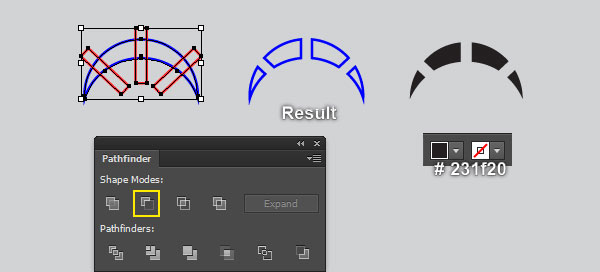
Pick the Rectangle Tool (M) and create a 2 by 11px red rectangle, then place it in the position as shown in the first image. Still having the newly created rectangle selected and go to the Object > Transform > Rotate… Enter a 47 degrees Angle and click Copy. Then drag the resulting rectangle to the left and place it as shown in the third image. Keep the newly created rectangle selected and go to the Object > Transform > Reflect… Check the Vertical and click Copy. Drag the copy we have just created to the right. Don’t forget to hold the Shift key on the keyboard for straight dragging.
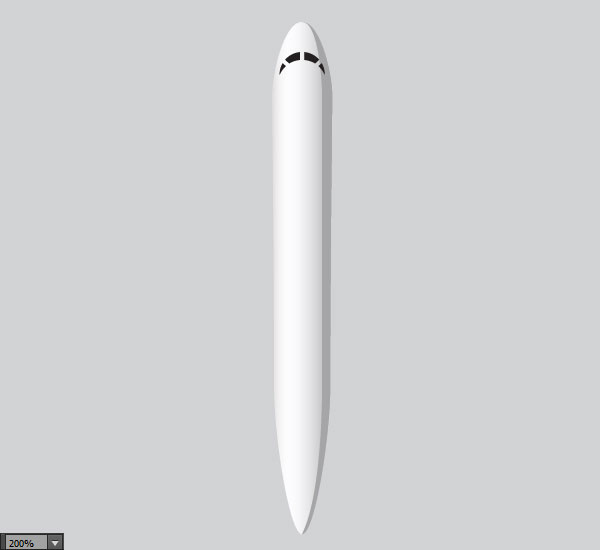
Now reselect the blue object created in step 8 and three red rectangles created in this step. Then open the Pathfinder panel (Window > Pathfinder) and click on the Minus Front button. Remove the stroke of the resulting group and fill it with black (#231f20). Place the resulting group to the position like you see in the last image.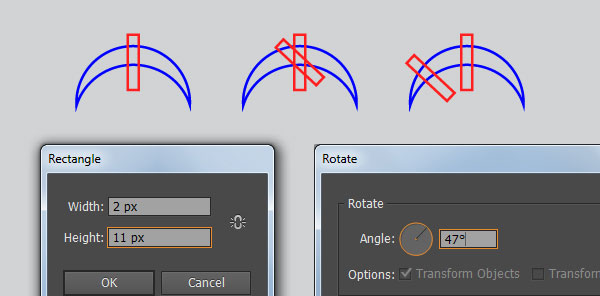
Step 10
Pick the Rectangle Tool (M) and create a 2.5 by 2.5px very dark grayish violet rectangle (#414042). Keep the newly created rectangle selected and go to the Object > Transform > Move… Enter a 5px in the Vertical box and click Copy. Then press (Ctrl +D) until you will get the results as shown in the second image.
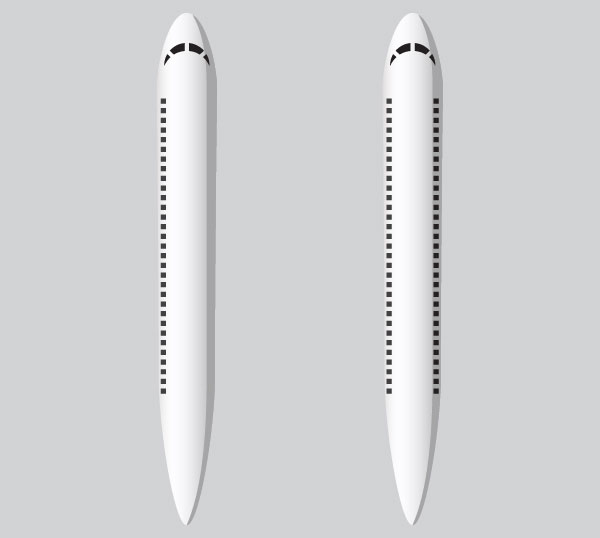
Reselect and group (Ctrl +G) all rectangles created in this step, then place the newly created group to the position like you see in the next to last image. Make a copy (Ctrl +C, Ctrl +F) of this group and then drag the copy we have just created to the right. Don’t forget to hold the Shift key on the keyboard for straight dragging.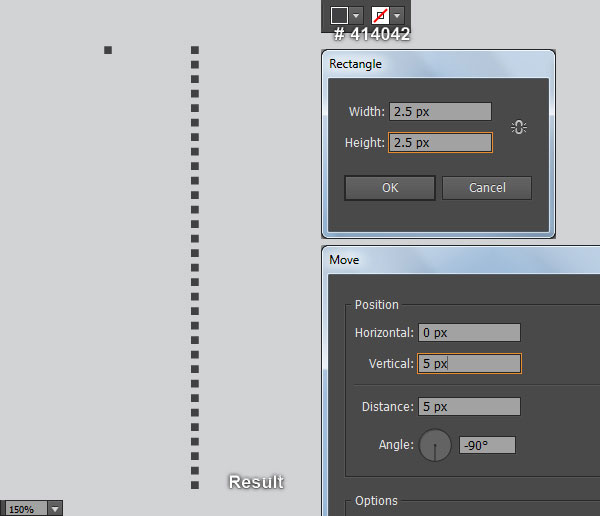
Step 11
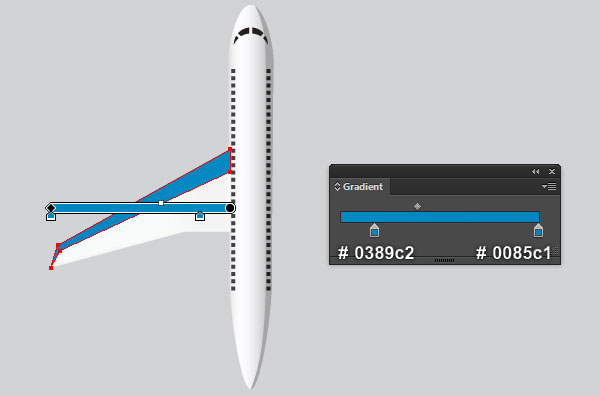
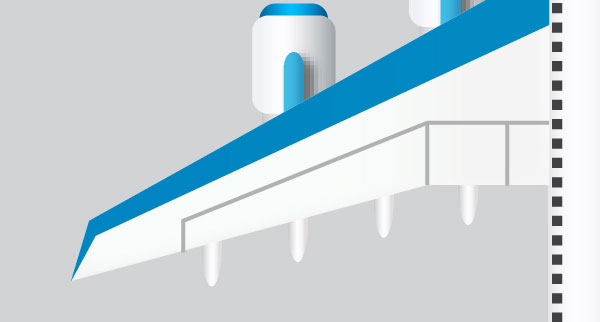
We will continue with the airplane wing. Pick the Pen Tool (P) and create a blue object like you see in the first image. Make a copy (Ctrl +C, Ctrl +F) of the blue object, then replace the existing stroke color of the copy with red.
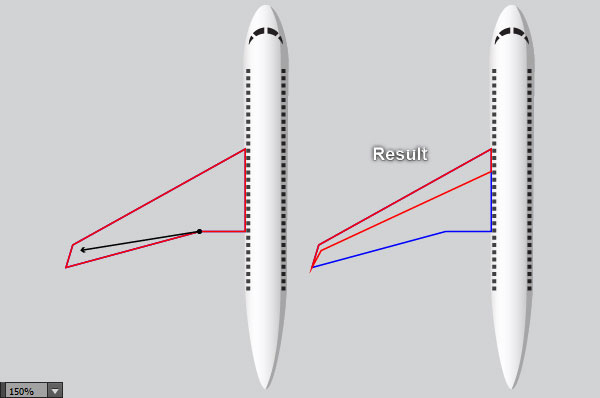
Focus on the second image, pick the Direct Selection Tool (A), click on the anchor point highlighted with black, then hold the mouse and drag it to the left. Now reselect the blue object created in this step, remove its stroke and fill this object with the linear gradient as shown in the fourth image.
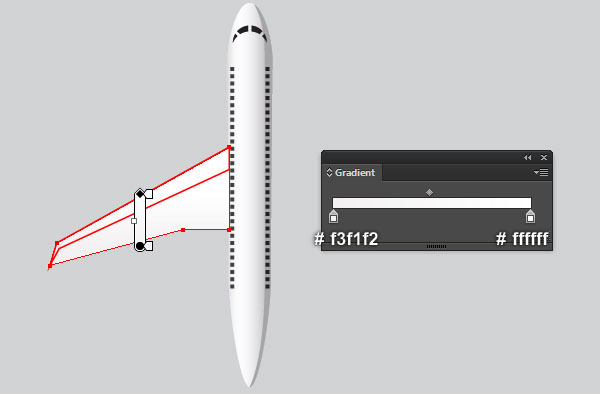
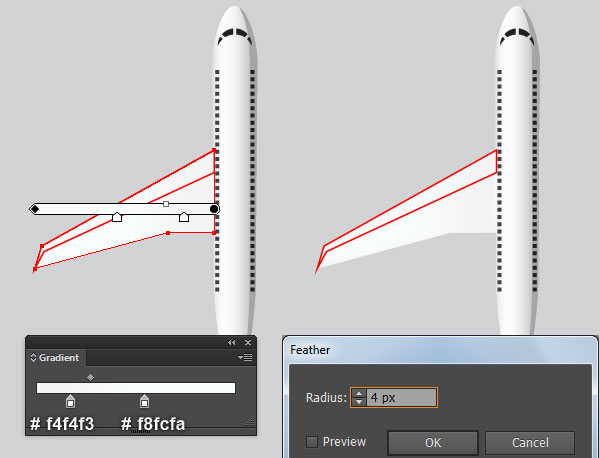
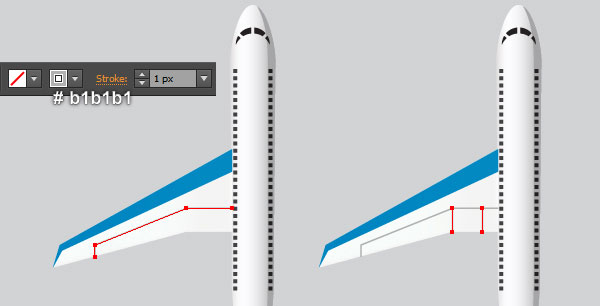
Make a copy (Ctrl +C, Ctrl +F) of the resulting shape and replace the existing fill color of the copy with the new linear gradient as shown in the fifth image. Then apply a 4px Feather effect for the resulting shape. Select the red object, remove its stroke and fill this object with the linear gradient as shown in the seventh image. Focus on the last two images, draw three paths with the Pen Tool (P) and give them a 1px gray stroke (#b1b1b1) for the moment.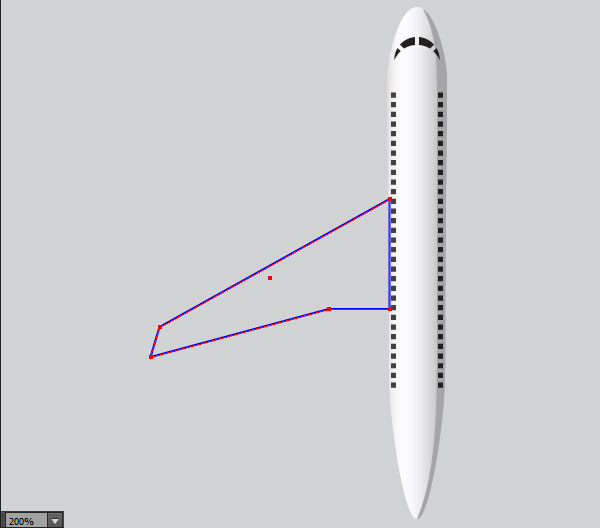
Step 12
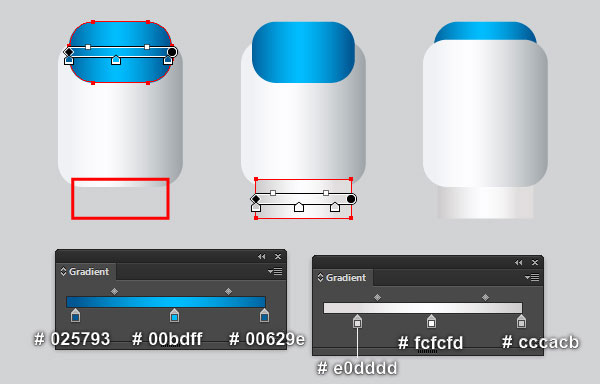
Next comes the jet engine. Pick the Rounded Rectangle Tool from the Toolbox and simply click on the artboard. In the Rounded Rectangle dialog box, enter the data like you see in the first image and click OK. Remove the stroke of the newly created rectangle and then fill it with the linear gradient as shown in the second image.
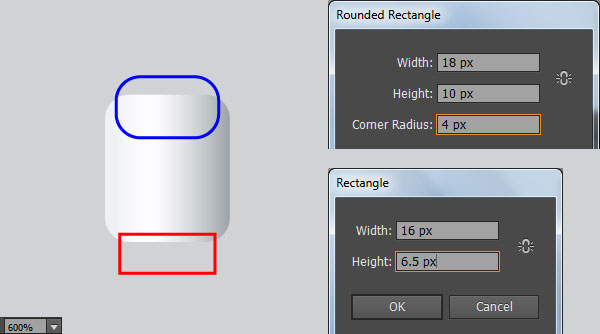
With the help of the Rounded Rectangle Tool and the Rectangle Tool (M), create two rectangles, then place them in the positions as shown in the third image. Reselect the two newly created rectangles and remove their strokes. Then fill these rectangles with the linear gradients as shown in the two next-to-last images.
이 단계에서 생성 된 첫 번째 사각형을 선택하고 앞으로 가져옵니다 ( Ctrl + Shift + 오른쪽 대괄호 ).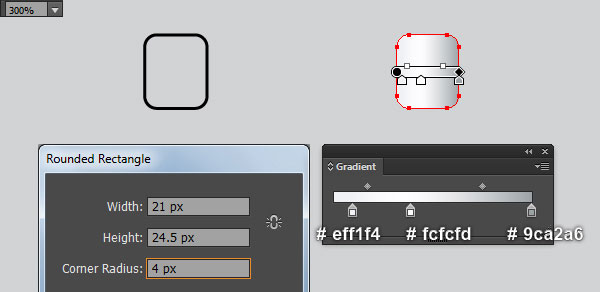
13 단계
직사각형 도구 (M)를 선택하고 5x20x 크기의 빨간색 직사각형을 작성한 다음 첫 번째 이미지에 표시된 위치에 배치하십시오. 새로 생성 된 사각형을 선택한 채로 두고 효과> 스타일> 둥근 모서리 ... 로 이동 한 다음 4x 반경을 입력하고 확인을 클릭 한 다음 객체> 모양 확장으로 이동 하십시오 .
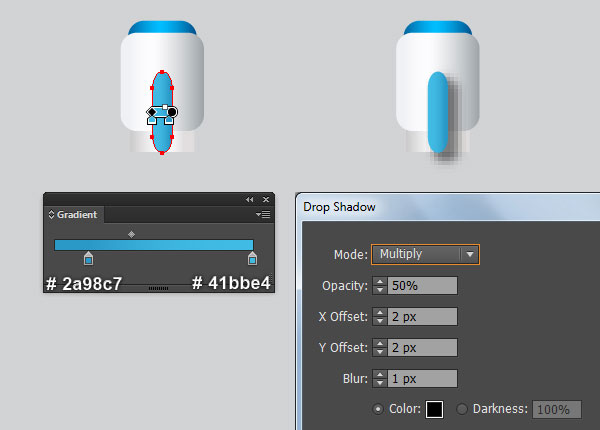
결과 객체를 선택한 상태로 유지하고 획을 제거한 다음 세 번째 이미지에서와 같이 선형 그래디언트로 객체를 채 웁니다. 결과 모양이 선택되어 있는지 확인하고 [ 효과]> [스타일]> [그림자] 로 이동 합니다. 네 번째 이미지에 표시된 것과 같이 데이터를 따른 다음 [ 확인]을 클릭 합니다.
S 차기 기 ( Ctrl + G ) 시작에서 생성 된 모든 객체 스텝 (12) 이 시간이.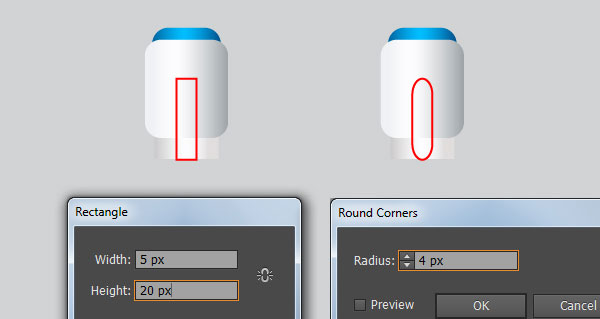
14 단계
단계 13 에서 만든 그룹을 첫 번째 이미지에서 보는 것과 같은 위치에 놓습니다. 이 그룹을 복사 ( Ctrl + C, Ctrl + F ) 한 다음 두 번째 이미지에 표시된 위치에 복사를 놓습니다. R은 이 두 그룹을 eselect와 날개 뒤에 숨길.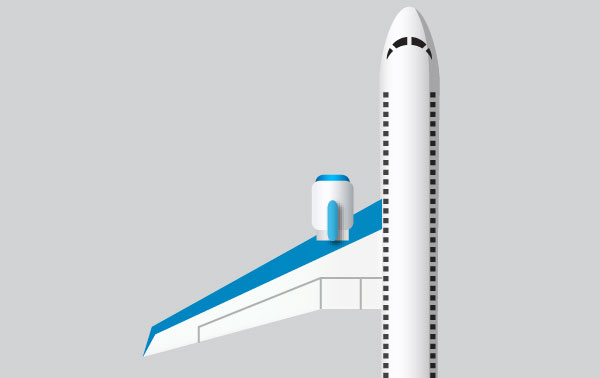
15 단계
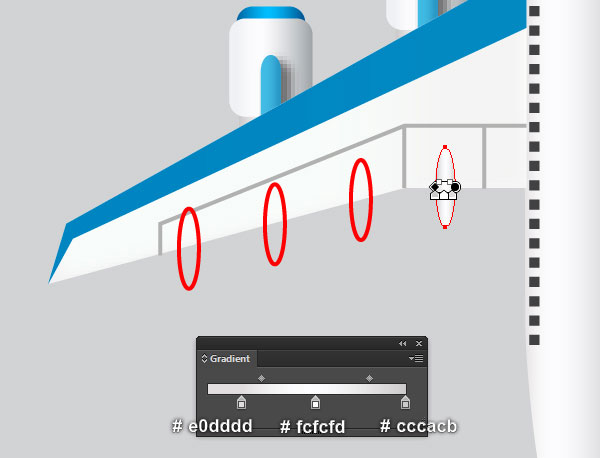
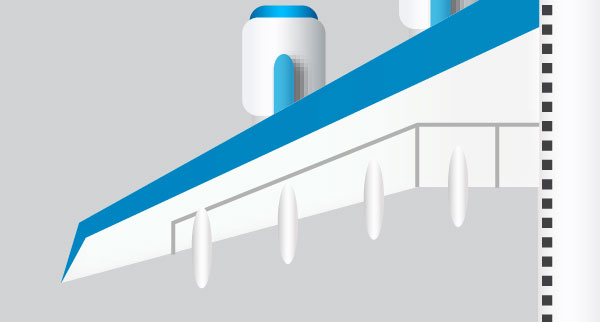
Pick the Ellipse Tool (L) and create a 5 by 20px red ellipse. Make three copies of the newly created ellipse, then place them in the positions as shown in the first and the second images. Select the right ellipse, remove its stroke and fill this object with the linear gradient as shown in the third image. Now reselect the remaining three ellipses, then pick the Eyedropper Tool (I) and click on the right ellipse. Select four ellipses created in this step and hide them behind the wing.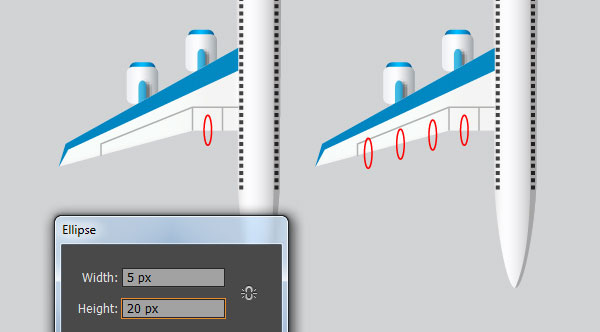
Step 16
Select and group (Ctrl +G) all objects of the left wing. Keep this group selected and go to the Object > Transform > Reflect… Check the Vertical and click Copy, then
drag the copy we have just created to the right. Don’t forget to hold the Shift key on the keyboard for straight dragging.
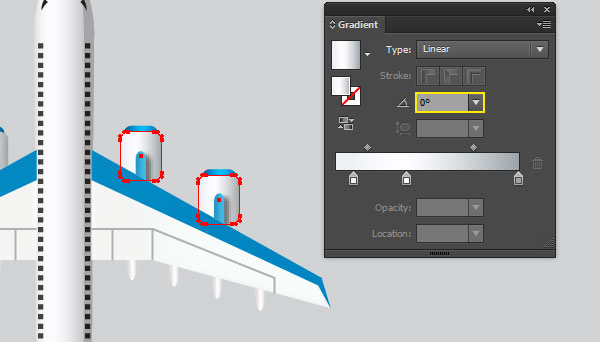
Before you continue, select the two wings and hide them behind the body of the airplane. Now focus on the last image, pick the Direct Selection Tool (A), select two biggest rectangles of the two right jet engines. Open the Gradient panel (Window > Gradient) and change the Angle to 0 degrees.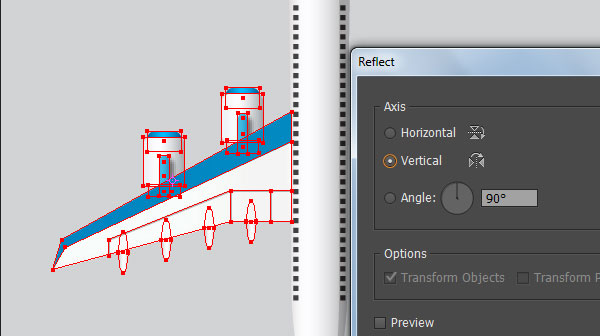

Step 17
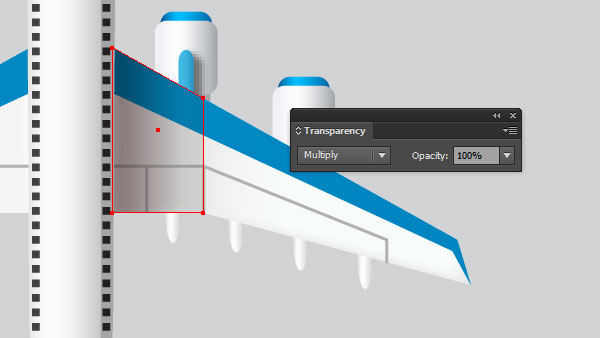
To give a more realistic look I’m going to be adding a shadow on the right wing. With the help of the Pen Tool (P) and the Gradient Tool (G), create a shape like you see in the first and the second images. Reselect the newly created shape and then change the Blending Mode to Multiply.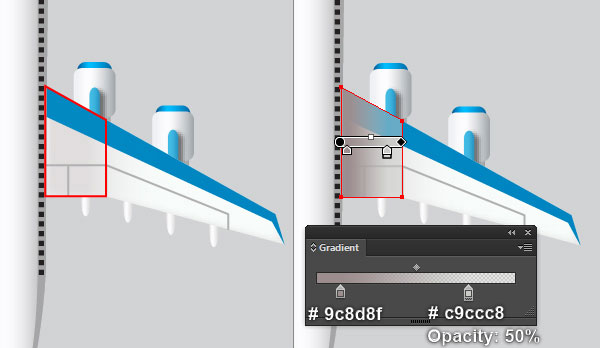
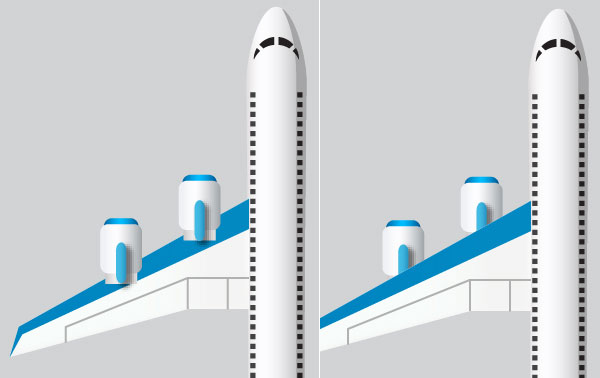
Step 18
At this point your airplane should look like this: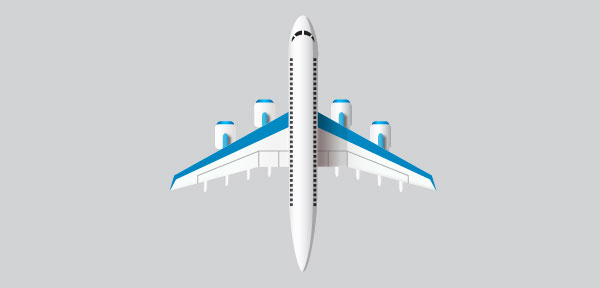
Step 19
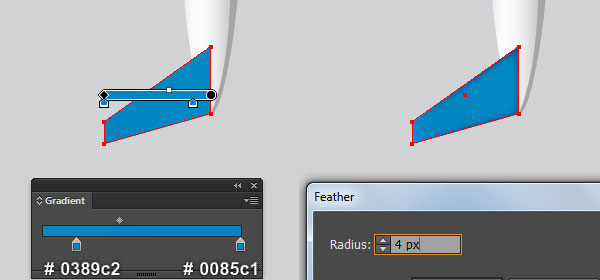
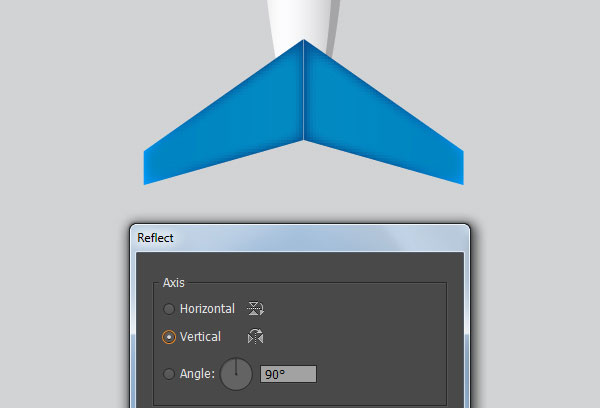
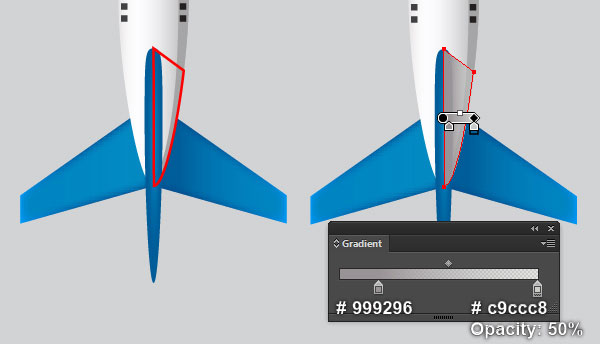
We will continue with the airplane tail. With the help of the Pen Tool (P) and the Gradient Tool (G), create a shape like you see in the first and the second images. Make a copy (Ctrl +C, Ctrl +F) of the newly created shape, then replace the existing fill color of the copy with the new linear gradient. Keep the resulting shape selected and apply a 4px Feather effect for it.
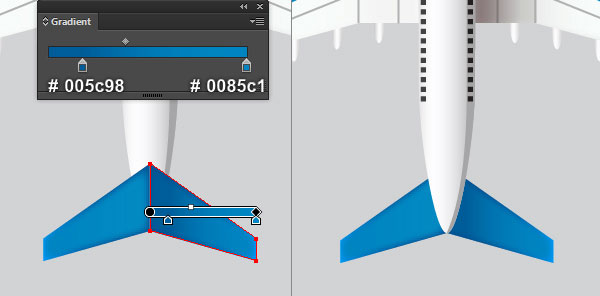
Now reselect the two shapes created in this step and double-click on the Reflect Tool icon from the Toolbox. In the Reflect dialog box, check the Vertical and click Copy. Then drag the copies we have just created to the right. Don’t forget to hold the Shift key on the keyboard for straight dragging. Focus on the right tail, select the shape with feather effect applied in this step.
Then replace the existing fill color of this shape with the new linear gradient as shown in the next to last image. Reselect all shapes created in this step and hide them behind the body.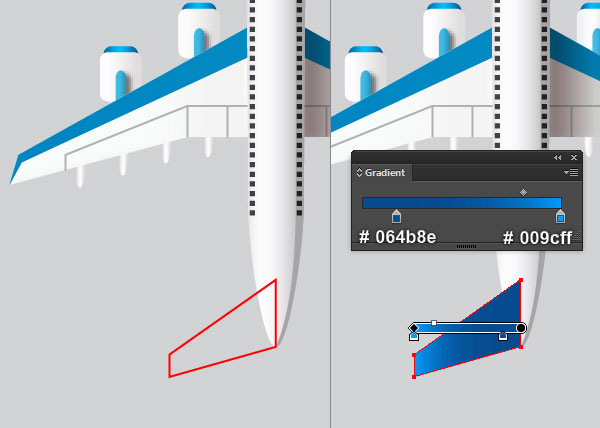
Step 20
Pick the Ellipse Tool (L) and create a 7 by 94px red ellipse, then place it in the position as shown in the first image. With the help of the Direct Selection Tool (A) and the Shift, select the right and the left anchor points of the red ellipse, then move them 17px up.
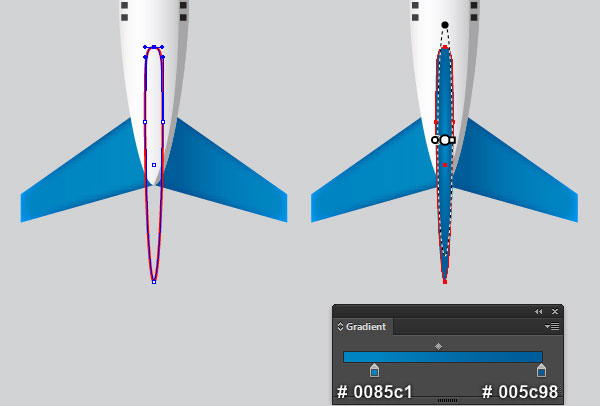
Keep working with the Direct Selection Tool (A), extend the handles of the top anchor point of the red ellipse. After you are done adjusting the shape of the red object, remove its stroke and then fill this object with the radial gradient as shown in the fourth image. Now with the help of the Pen Tool (P) and the Gradient Tool (G), create a shape like you see in the two next-to-last images.
Change the Blending Mode of the newly created shape to Multiply and then hide it behind the first shape created in this step.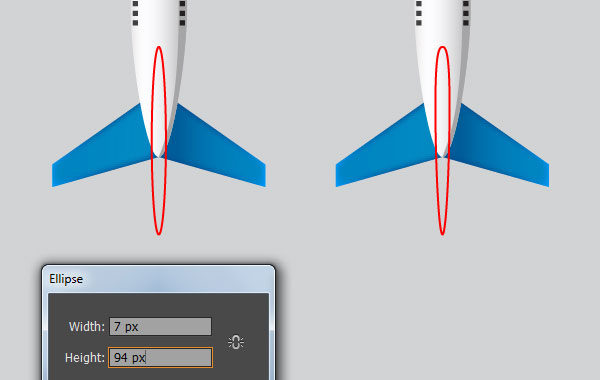

Step 21
Now select and group (Ctrl +G) all objects created from beginning step 6 to this time. We are done with the airplane for the moment.
Next place the airplane into the background like you see in the second image.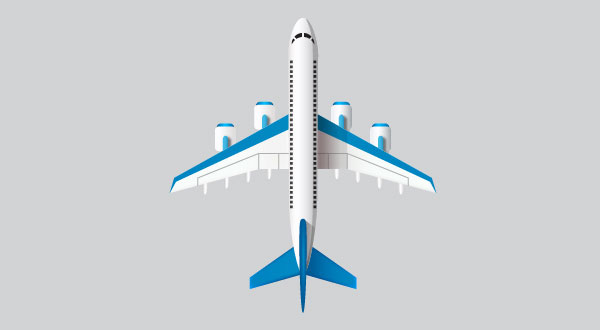

Step 22
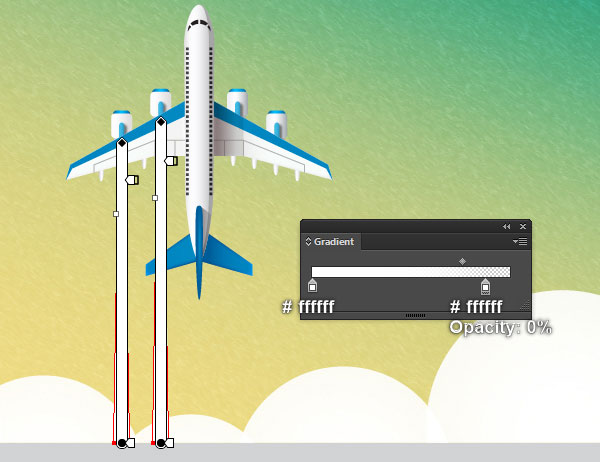
It’s time to draw the white smoke traces. Pick the Rectangle Tool (M) and create a 16 by 300px red rectangle, then place it in the position as shown in the first image. With the help of the Direct Selection Tool (A), select the top-left anchor point of the newly created rectangle and move it 5px to the right.
Select the top-right anchor point and move it 5px to the left. Make a copy (Ctrl +C, Ctrl +F) of the red object, then drag the copy to the right and place it as shown in the third image. Next pick the Direct Selection Tool (A) along with the Shift, select the two top anchor points of the newly created object, then move them 22px up.
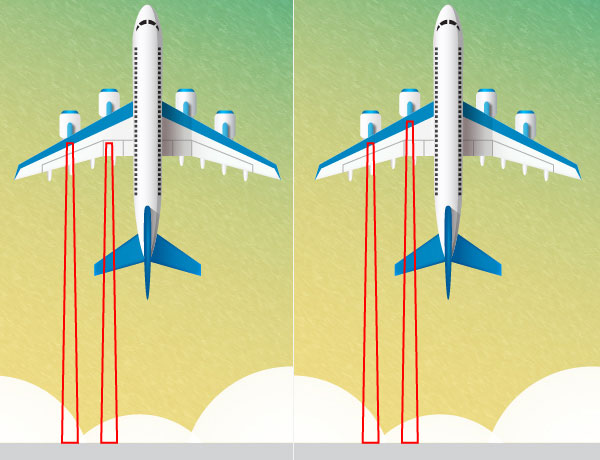
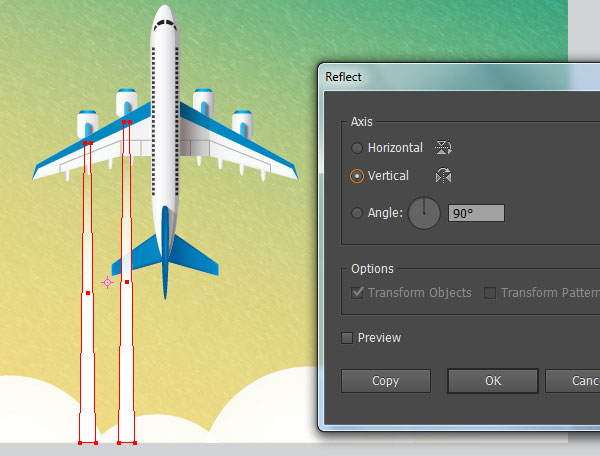
이제이 단계에서 생성 된 두 개의 빨간색 객체를 다시 선택하고 다섯 번째 이미지에서와 같이 선을 제거하고 선형 그라디언트로 객체를 채 웁니다. 결과 모양을 선택한 상태로 유지하고 Object> Transform> Reflect ... 로 이동 한 후 Vertical을 선택 하고 Copy를 클릭한다 . 사본을 선택한 채로 오른쪽으로 드래그하고 마지막 이미지 옆에 표시된대로이 모양을 배치합니다.
S는 이 단계에서 만든 네 개의 모양을 선출하고 비행기 뒤에 숨길.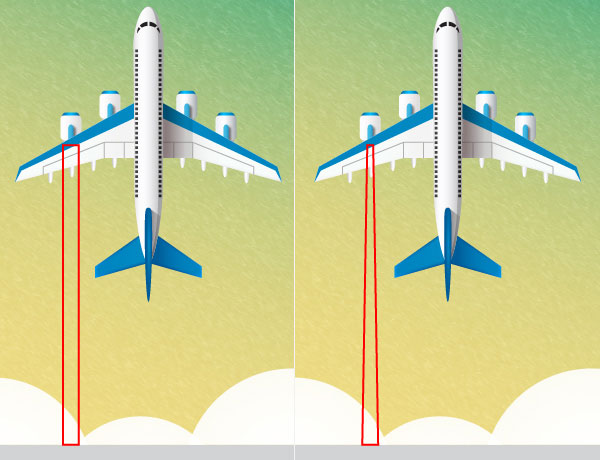
23 단계
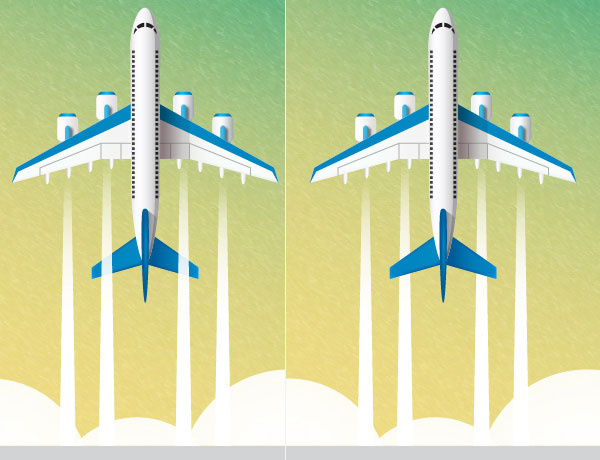
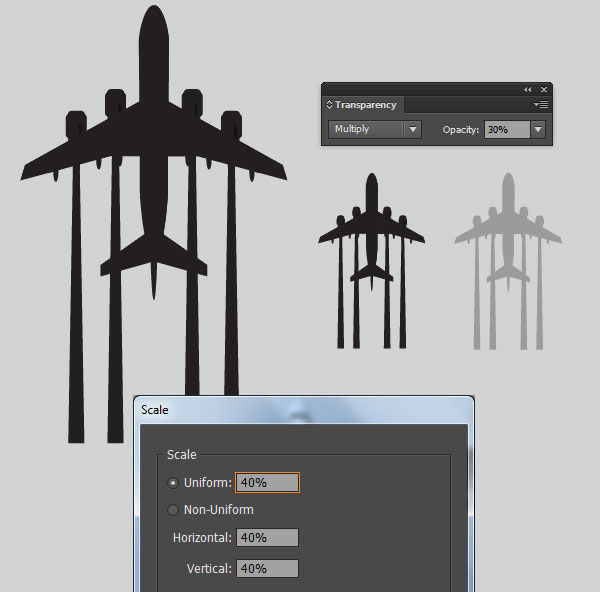
We are going to create the shadow of the airplane. Before you continue, select the airplane and the white smoke traces, then make a copy (Ctrl +C, Ctrl +F) of them. Keep these copies selected and press (Ctrl +G) to group them, then place the newly created group to the new position.
Still having this group selected, remove its stroke and then replace the existing fill color with black (#231f20). Make sure that the resulting group is still selected and go to the Object > Transform > Scale… Check the Uniform and enter a 40% in the Scale box, then click OK.
결과 그룹 의 혼합 모드 를 곱하기로 변경 하고 불투명도 를 30 %로 줄 입니다. 다음으로 마지막 이미지 옆에 보이는 것처럼이 그룹을 위치에 놓습니다. H ide 구름 뒤의 그림자.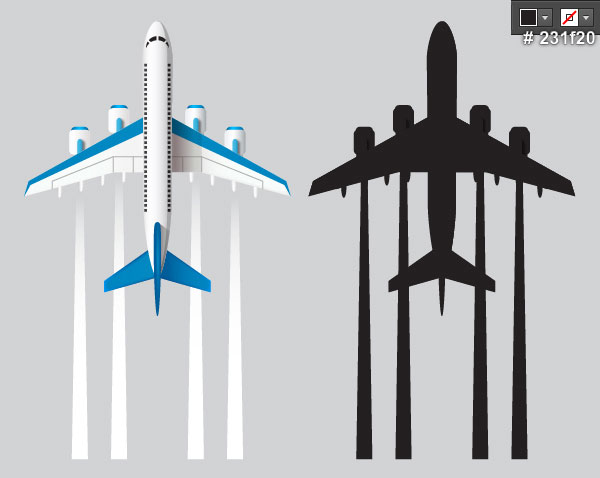


그리고 우리는 완료되었습니다!

'디자인 > 무료 디자인 자습서' 카테고리의 다른 글
| [일러스트] 수채화 꽃 화환 만들기 (0) | 2018.06.03 |
|---|---|
| [일러스트] 립스틱 화장품 일러스트 그리는 방법 (1) | 2018.06.03 |
| [일러스트] 선풍기 그리는 방법 (0) | 2018.06.03 |
| [일러스트] 프라이팬 일러스트레이션을 그리는 방법 (0) | 2018.06.02 |
| [일러스트] 간단한 옷걸이 일러스트레이션 만들기 (0) | 2018.06.02 |
| [일러스트] Google 크롬 아이콘을 만드는 방법 (0) | 2018.06.01 |
| [일러스트] 멋진 모자 일러스트를 그리는 방법 (0) | 2018.06.01 |
| [일러스트] 리본 그리는 방법 (0) | 2018.06.01 |


댓글