
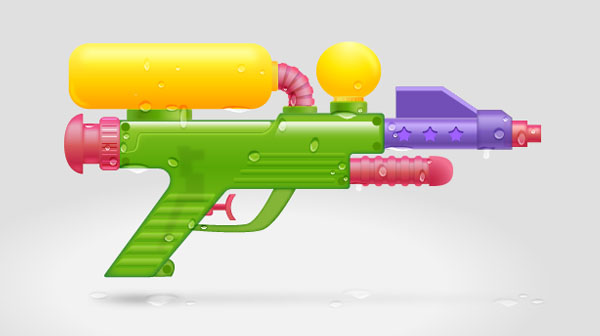
이 자습서에서는 Adobe Illustrator에서 상세한 수중 그림을 만드는 방법을 배웁니다.
전체 디자인은 Illustrator의 기본 도구 및 효과와 일부 그라디언트로 만들어집니다.
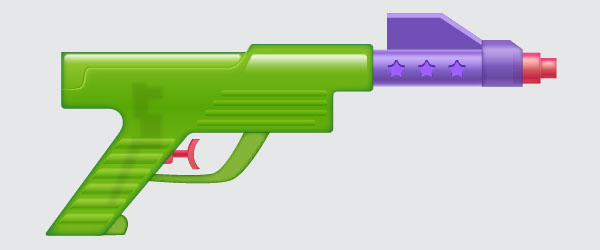
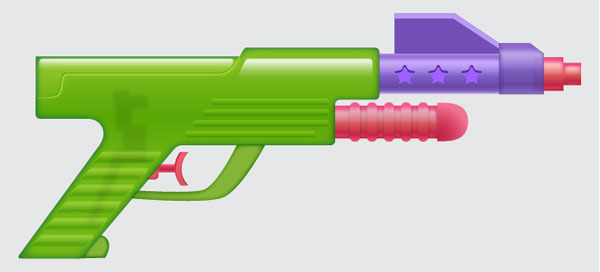
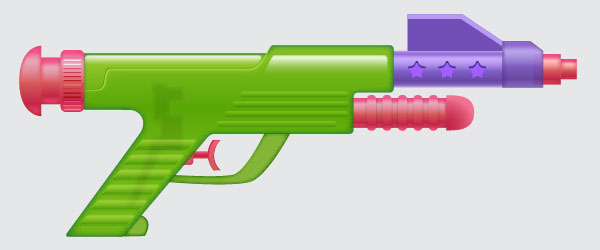
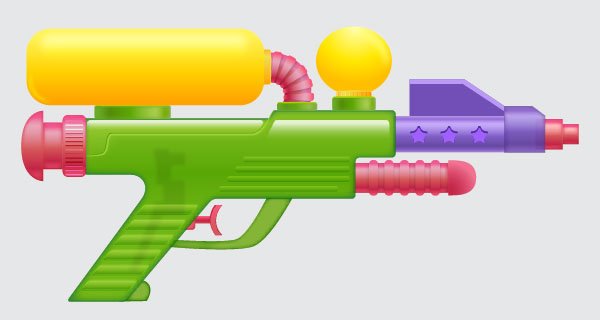
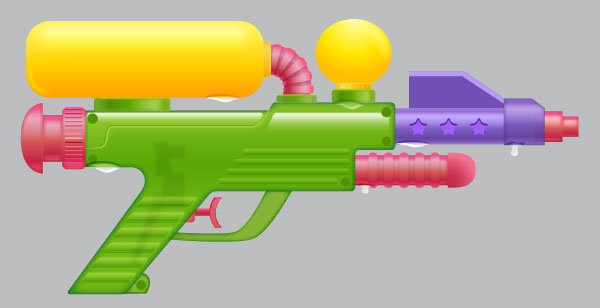
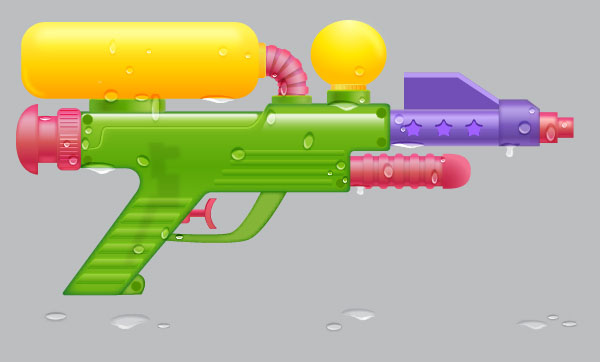
최종 이미지
언제나처럼, 이것이 우리가 만들게 될 최종 이미지입니다.
자습서 세부 정보
- 프로그램 : Adobe Illustrator CS6
- 예상 완료 시간 : 120 분
- 난이도 : 초급 - 중급
1 단계
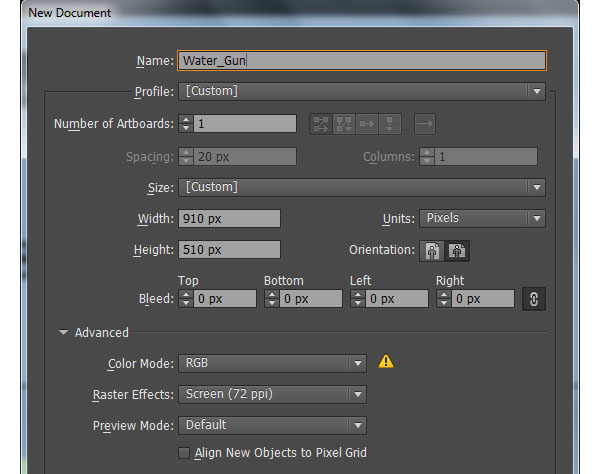
Illustrator를 실행 한 다음 (Ctrl + N )을 눌러 새 문서 를 만듭니다 .
단위 드롭 다운 메뉴 에서 픽셀 을 선택 하고 폭 상자에 910 을 입력 하고 높이 상자에 510 을 입력 한 다음 고급 버튼 을 클릭하십시오 .
RGB , Screen (72ppi)을 선택 하고 [ OK] 를 클릭하기 전에 [ 픽셀 격자에 새 객체 정렬] 상자가 선택 해제 되어 있는지 확인하십시오 .
2 단계
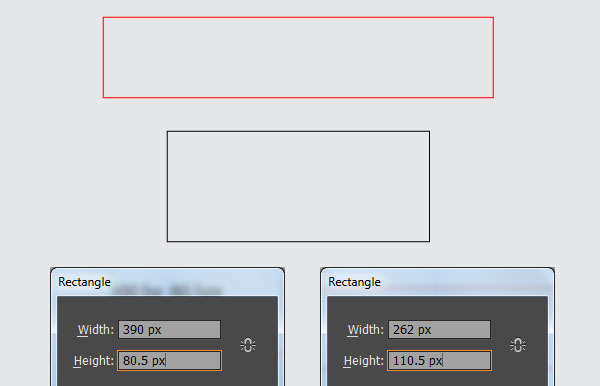
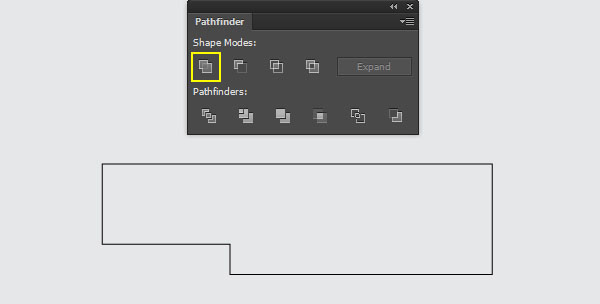
우선, 우리는 물총의 몸체와 손잡이를 만들 것입니다.
직사각형 도구 (M)를 선택하고 크기가 390 x 80.5px 및 262 x 110.5px 인 두 개의 직사각형을 만듭니다 .
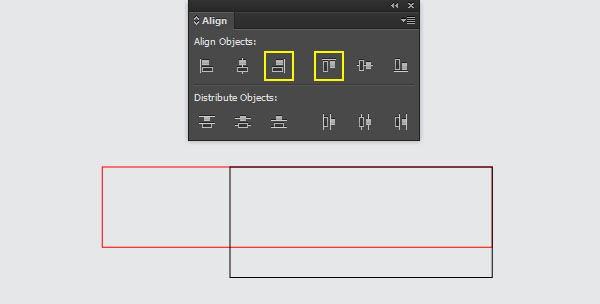
새로 생성 된 두 개의 사각형을 다시 선택하고 정렬 팔레트 ([ 윈도우]> [정렬] )를 열고 [ 수평 정렬] 버튼을 클릭 한 다음 [ 수직 정렬] 단추를 클릭합니다.
이 두 개의 직사각형을 선택한 상태로 유지하고 패스 파인더 팔레트 ( 창> 패스 파인더 )를 열고 유니트 단추를 클릭하십시오 .
결과 객체는 아래의 세 번째 이미지처럼 보입니다.
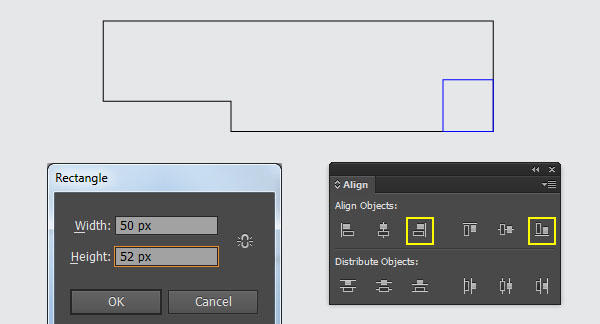
의 도움으로 사각형 도구 (M) 는 크리에이트 (50) 145 픽셀로 파란색 사각형을.
새로 생성 된 사각형이 선택되어 있는지 확인하고, Shift 키를 누른 상태에서이 단계에서 생성 된 검은 색 객체를 클릭 한 다음 Shift 키를 놓고 검은 색 객체를 다시 클릭하여 위치를 고정합니다.
그런 다음 Align 팔레트 에서 Horizontal Align Right 버튼을 클릭하고 Vertical Align Bottom 버튼을 클릭하십시오. 이 두 개의 오브젝트를 선택하고, 패스 파인더 팔레트 에서 마이너스 프런트 버튼을 클릭하십시오 .
결국 객체는 대략 마지막 이미지처럼 보일 것입니다.
3 단계
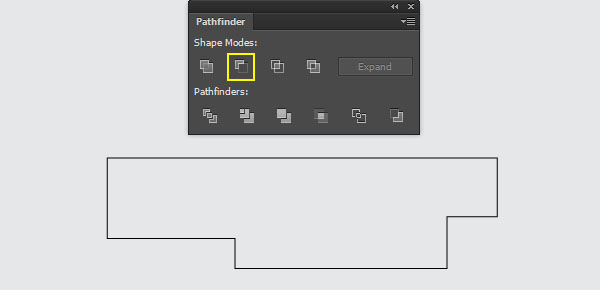
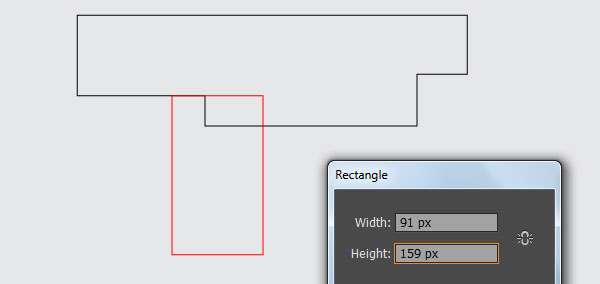
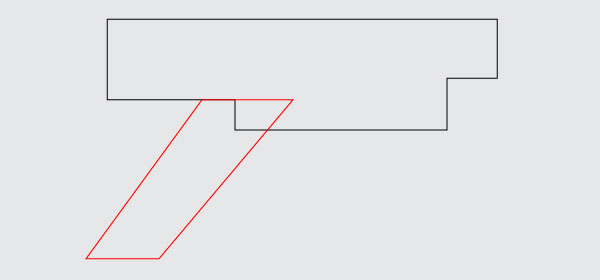
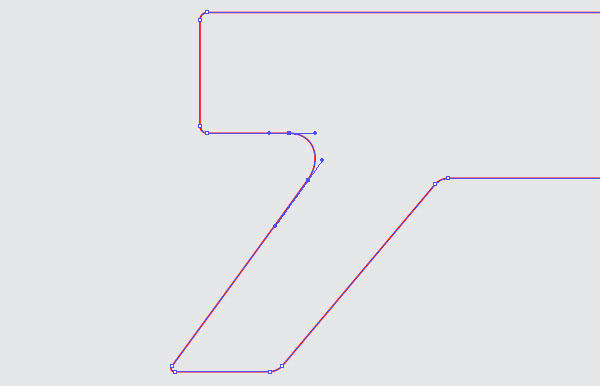
픽 사각형 도구 (M)를 하고 생성 (91) 159px로 빨간색 사각형을 클릭하고 아래에 표시된 위치에 놓습니다.
With the help of the Direct Selection Tool (A), select the bottom-left anchor point of the newly created rectangle and move it 116px to the left.
Next select the bottom-right anchor point and move it 134px to the left.
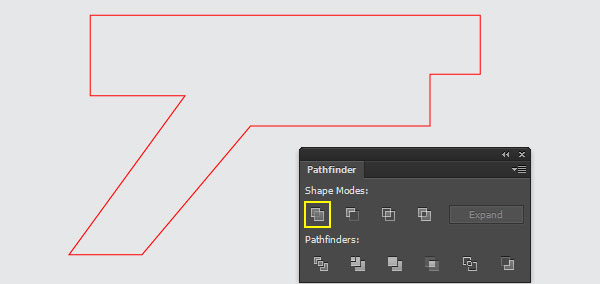
Now reselect the red object created in this step and the black object created in step 2, then open the Pathfinder palette (Window > Pathfinder) and click on the Unite button.
The resulting object should look like the last image below.
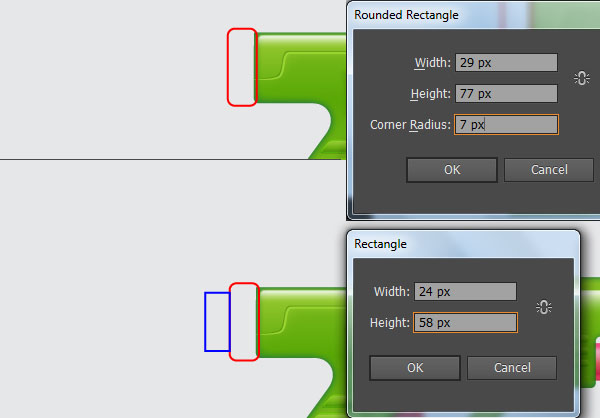
Step 4
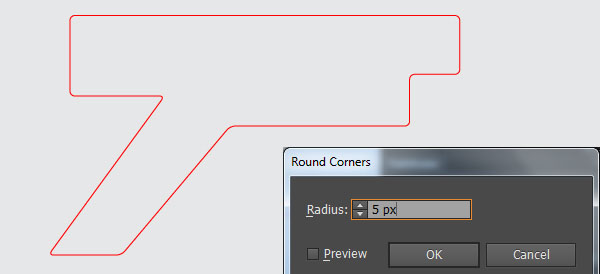
에서 만든 빨간색 객체 선택 3 단계 와로 이동합니다 ...> 스타일 화> 둥근 모서리에 영향을 Enter를 누르 5px 반경을 클릭 OK . 오브젝트> 모양 확장으로 이동 하십시오 .
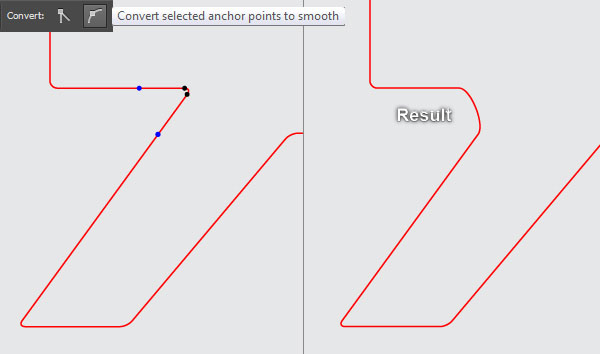
이제 두 번째 이미지에 초점을 맞추고 앵커 포인트 추가 도구 (+)를 선택하고 파란색으로 강조 표시된 두 점을 클릭하여 두 개의 새 앵커 포인트를 추가합니다.
그런 다음 직접 선택 도구 (A) 를 선택하고 검은 색으로 강조 표시된 두 개의 앵커 포인트를 선택하여 제거합니다. 직접 선택 도구 (A) 가 여전히 활성 상태 인지 확인
하고이 단계에서 생성 된 두 개의 앵커 포인트 핸들을 확장합니다 .
마지막 이미지에서와 같이 끝내야합니다.
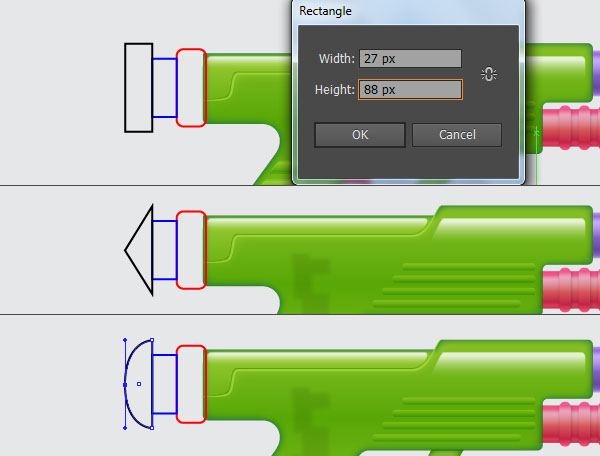
5 단계
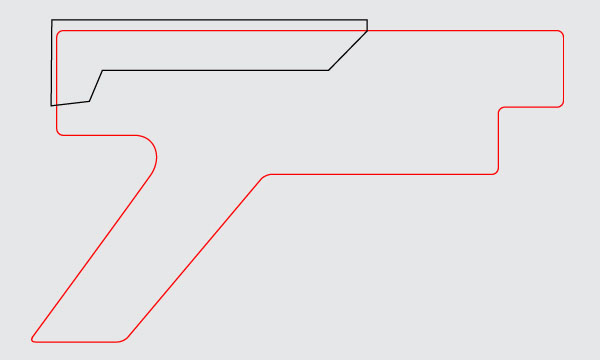
펜 도구 (P)를 선택하고 아래 이미지에서 볼 수있는 것처럼 검은 색 오브젝트를 만듭니다.
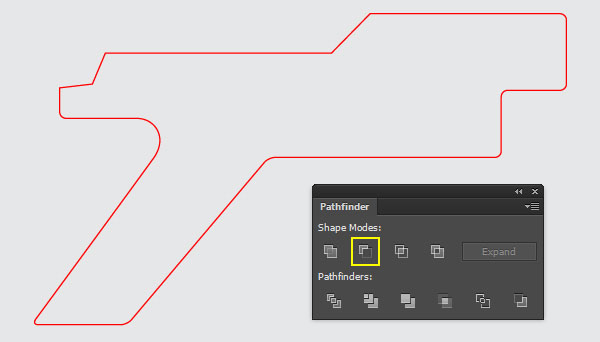
오브젝트가 그려지면 빨간색 오브젝트와 오브젝트를 다시 선택한 다음 패스 파인더 팔레트 ( 윈도우> 패스 파인더 )를 열고 마이너스 프론트 버튼을 클릭하십시오 .
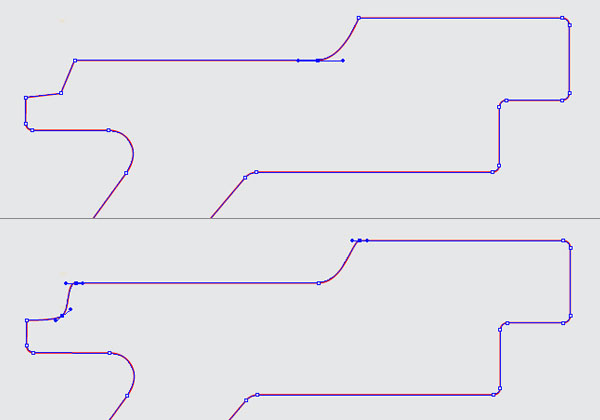
이제 세 번째 이미지에 초점을 맞추고 [ 앵커 포인트 변환 도구] (Shift + C) 를 선택한 다음 파란색으로 강조 표시된 앵커 포인트를 클릭하고 마우스 버튼을 누른 상태에서 왼쪽으로 드래그합니다.
파란색으로 강조 표시된 앵커 포인트를 사용하여 동일한 작업을 계속 수행하면 아래 마지막 이미지에서 볼 수있는 결과가 표시됩니다.
6 단계
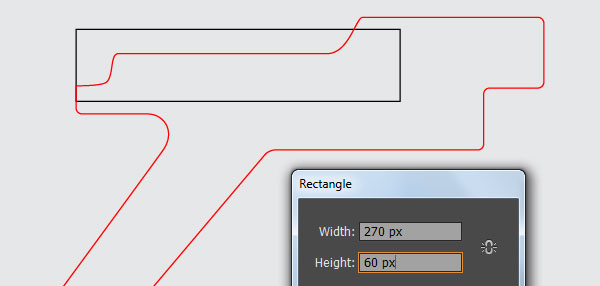
직사각형 도구 (M)를 선택하고 270 x 60px 검정색 직사각형을 작성한 다음 아래 표시된 위치에 배치하십시오.
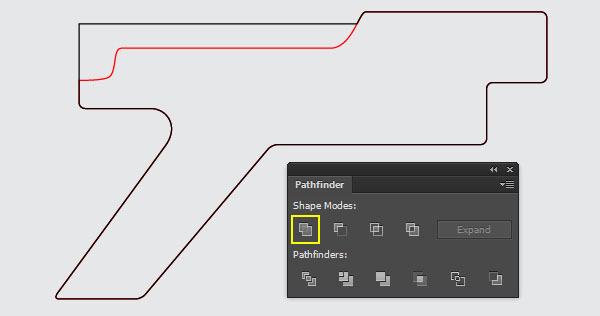
Select the red object created in step 5 and make a copy (Ctrl +C, Ctrl +F) of it.
Keep this copy selected, hold down the Shift key and click on the black rectangle created in this step. Next open the Pathfinder palette (Window > Pathfinder) and click on the Unite button.
Then replace the existing stroke color of the resulting object with black and hide it behind the red object.
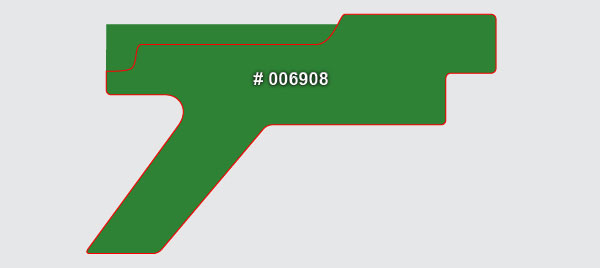
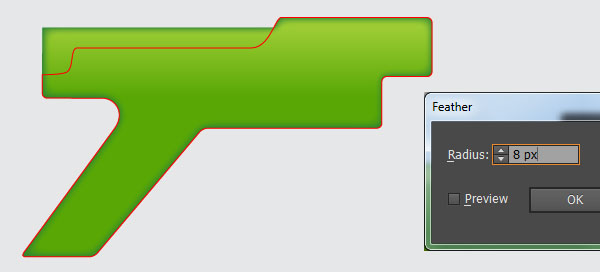
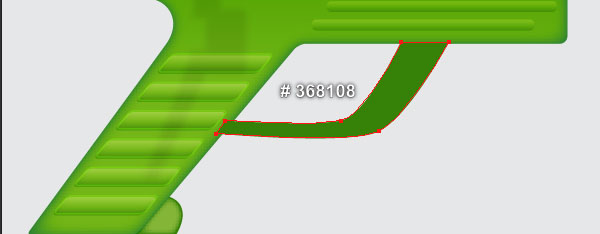
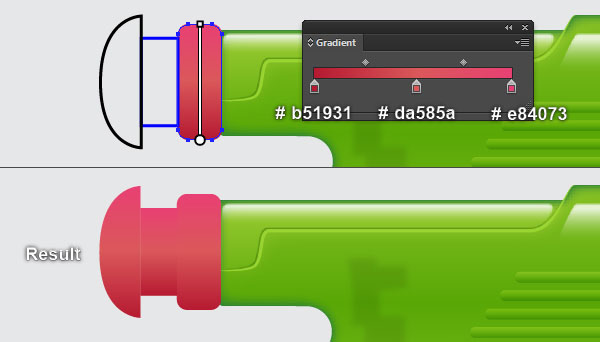
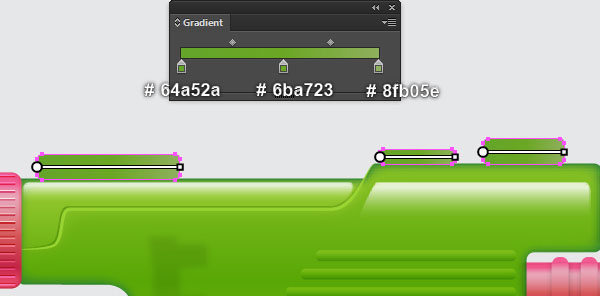
Now select the black object, remove its stroke and fill this object with dark green (# 006908).
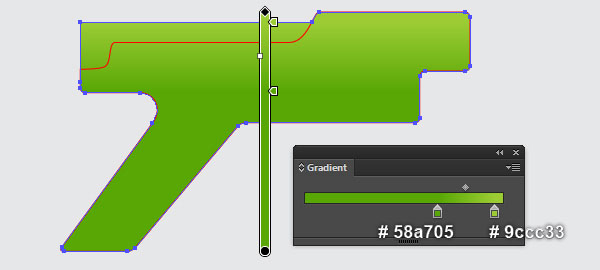
Still having the dark green shape selected, make a copy (Ctrl +C, Ctrl +F) of it, then replace the existing color of the copy with the linear gradient shown in the fourth image.
Keep the resulting shape selected and go to Effect > Stylize > Feather… Enter a 8px Radius and click OK.
Step 7
Before you continue, select the red object and make a copy (Ctrl +C, Ctrl +F) of it, then press (Ctrl +3) to hide the copy.
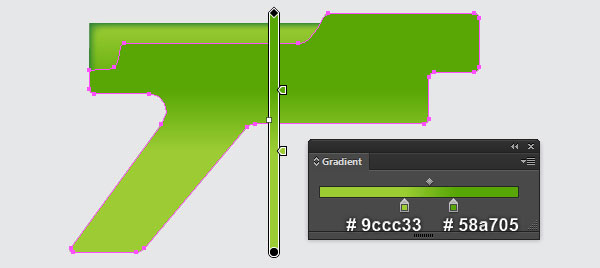
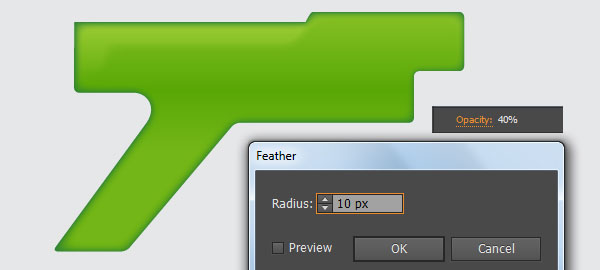
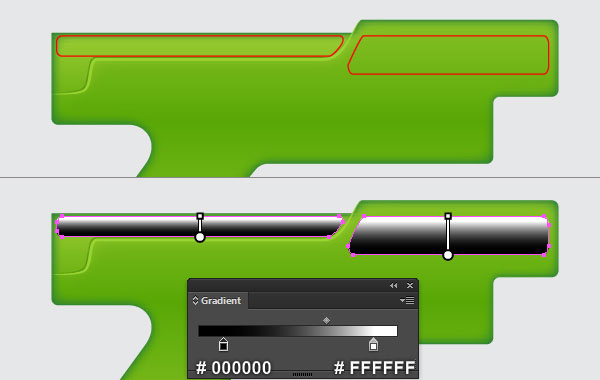
Reselect the red original object, remove its stroke and fill this object with the linear gradient you see in the image below.
Keep the resulting shape selected, reduce the Opacity to 40% and then apply a 10px Feather effect to it.
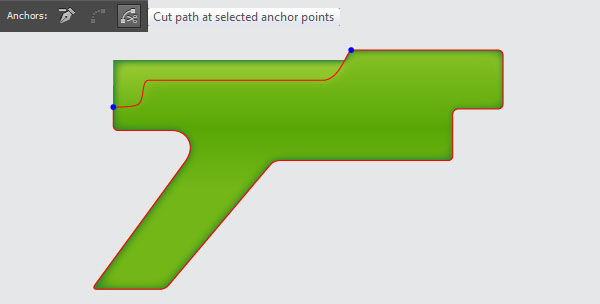
Now press (Ctrl +Alt +3) to show the red object hidden in this step. With the help of the Direct Selection Tool (A) and the Shift key, select the two anchor points highlighted with blue of the red object and click on the "Cut path at selected anchor points" button from the Properties bar. This makes the red object become two paths.
Select and remove the longer path.
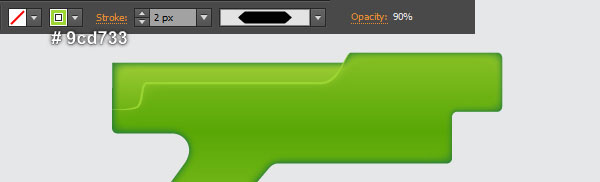
Reselect the remaining path, change the stroke weight to 2px and replace the existing stroke color with light green (# 9CD733). Then reduce the Opacity of the resulting path to 90% and apply the Width Profile 3 to it.
Keep the resulting path selected and make a copy (Ctrl +C, Ctrl +F) of it. Replace the existing stroke color of the copy with darker green (# 3a7800) and reduce its Opacity to 80%.
Next move the resulting path 1px up and 1px to the left.
Finally apply a 2px Feather effect to this path and then hide it behind the light green path created in this step.

Step 8
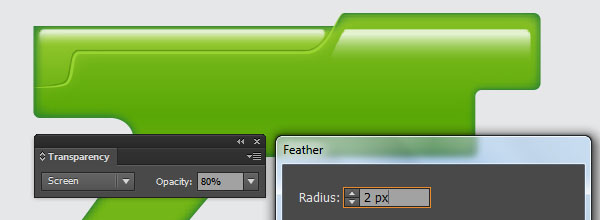
With the Pen Tool (P) create two red objects as you see in the image below.
Once your objects are drawn, remove their strokes and then fill them with the linear gradient shown in the second image.
Keep the resulting shapes selected, apply a 2px Feather effect then set it to Blending Mode Screen and reduce the Opacity to 80%.
Step 9
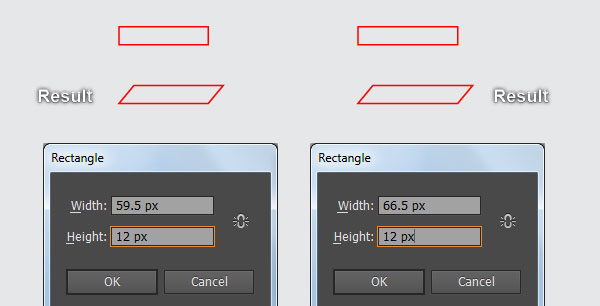
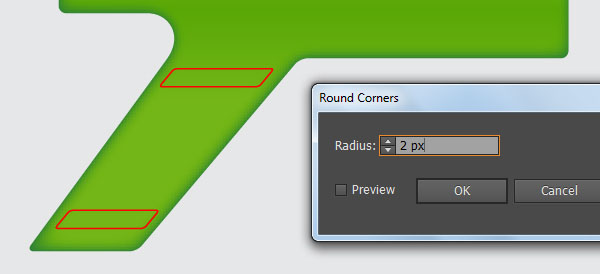
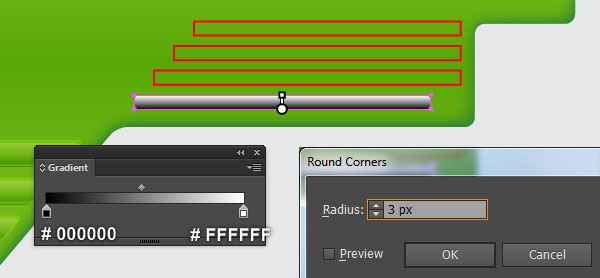
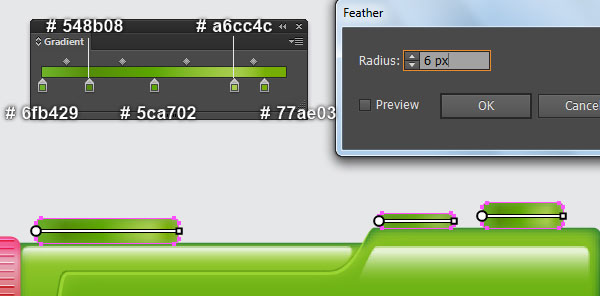
Pick the Rectangle Tool (M) and create two red rectangles with dimensions: 59.5 by 12px and 66.5 by 12px.
With the Direct Selection Tool (A) and the Shift key, select the four top anchor points of the two newly created rectangles and move them 10px to the right.
Reselect the two red objects and go to Effect > Stylize > Round Corners… Enter a 2px Radius and click OK, then go to the Object > Expand Appearance.
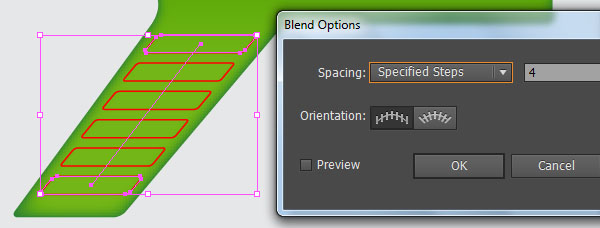
Place the two resulting objects to the positions as you see in the next to last image.
Still having these objects selected, go to Object > Blend > Blend Options… Follow the data shown in the last image and click OK, then go to Object > Blend > Make (Ctrl +Alt +B).
Keep the resulting objects selected and go to Object > Blend > Expand.
Step 10
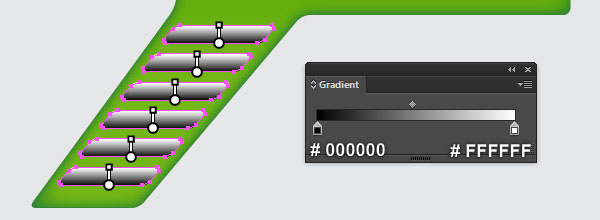
9 단계 에서 만든 그룹을 선택 하고 획을 제거한 다음이 그룹에 아래의 선형 그래디언트를 채 웁니다.
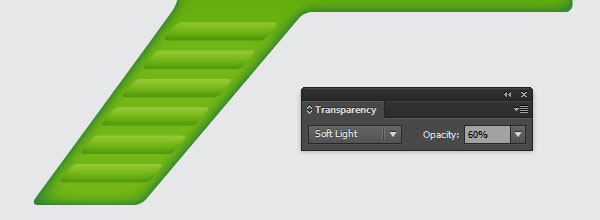
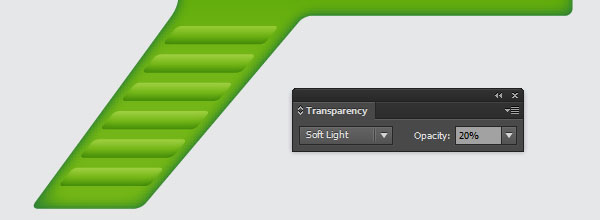
결과 그룹을 선택된 상태로 유지하고 혼합 모드 를 Soft Light로 변경 하고 Opacity 를 60 %로 줄 입니다.
결과 그룹을 복사 ( Ctrl + C, Ctrl + F ) 한 다음 이 복사본 의 불투명도 를 20 %로 줄 입니다.
새로 생성 된 그룹을 선택한 채로 복사본을 만듭니다.
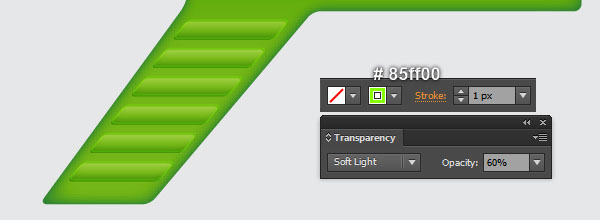
새로 만든 그룹에 1px 연한 녹색 선 ( # 85ff00 )을 추가 하고 채우기 색상을 제거한 다음 불투명도 를 60 %로 변경하십시오 .
마지막으로 결과 그룹을 1px 위로 이동 하고 1px 를 오른쪽 으로 이동합니다 .
11 단계
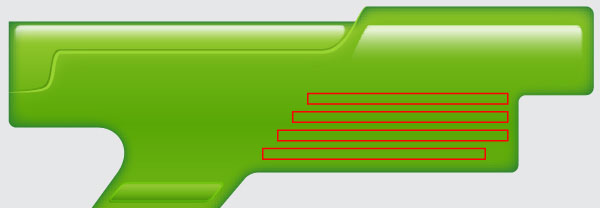
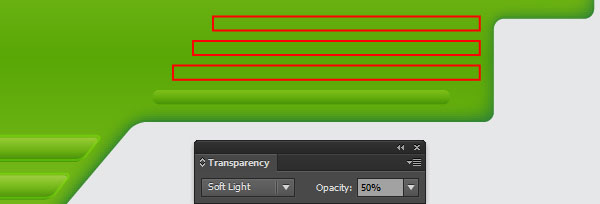
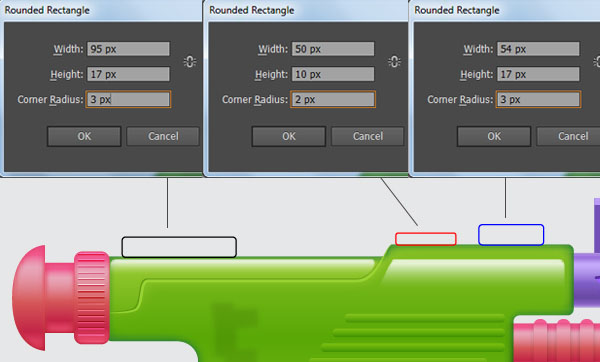
Rectangle Tool (M)을 선택하고 아래와 같이 네 개의 직사각형을 만듭니다.
새로 만든 사각형을 선택하고 이동 ...> 스타일 화> 둥근 모서리에 영향을 입력하고 Enter를 3px의 반경을클릭 OK .
결과 직사각형을 선택된 상태로 유지하고 획을 제거하고 두 번째 이미지에 표시된 선형 그래디언트로이 직사각형을 채 웁니다.
그런 다음 결과 사각형 의 블렌드 모드 를 Soft Light로 변경 하고 불투명도 를 50 %로 낮 춥니 다 .
Finally select the remaining three rectangles created in this step, then pick the Eyedropper Tool (I) and click on the rectangle edited in this step. The resulting rectangles should look like the last image below.

Step 12
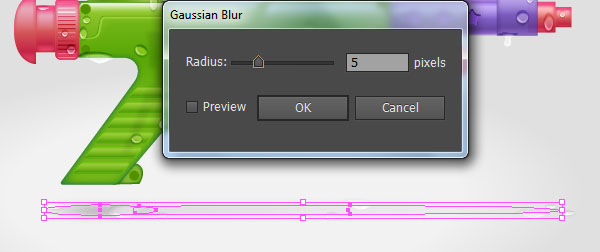
Pick the Pen Tool (P) and create a black shape as shown below.
Once your shape is drawn, apply a 2px Gaussian Blur effect to it and reduce the Opacity to 15%.
Finally hide the resulting shape behind the shape created in step 7.

Step 13
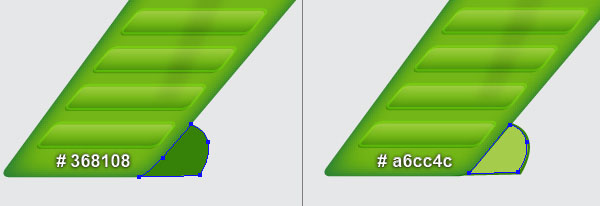
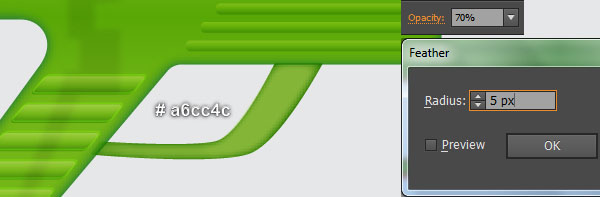
Pick the Pen Tool (P) and create two green shapes as you see in the first and the second images.
Next reselect the lighter green shape and apply a 4px Feather effect to it, then reduce the Opacity to 70%.
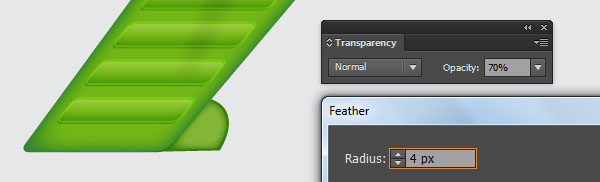
Continue with the Pen Tool (P), create two green shapes as shown in the last two images.
Once your shapes are drawn, reselect the lighter green shape and apply a 5px Feather effect to it, then reduce the Opacity to 70%.
Step 14
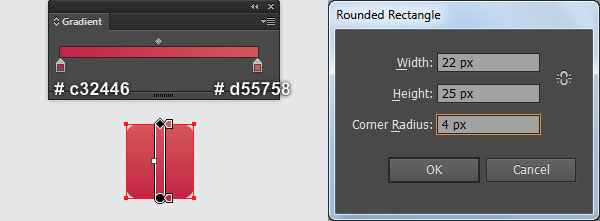
Next comes the trigger.
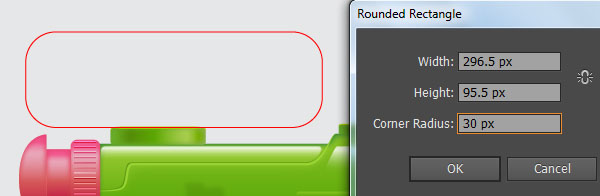
Pick the Rounded Rectangle Tool, simply click on your artboard to bring up its options, then enter the data as shown below and click OK.
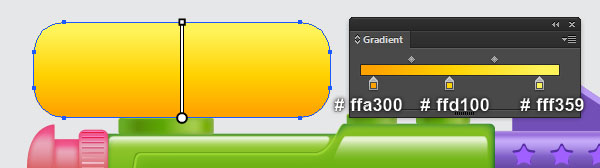
Fill the newly created rectangle with the linear gradient you see in the first image.
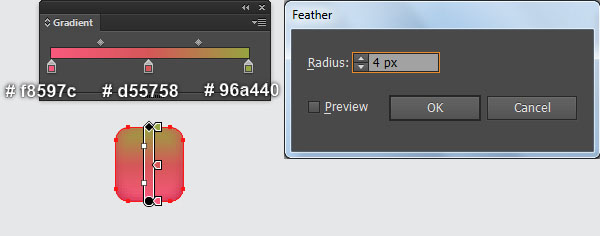
Keep the resulting rectangle selected and make a copy (Ctrl +C, Ctrl +F) of it, then replace the existing color of the copy with the new linear gradient shown in the second image.
Still having the resulting rectangle selected, go to Effect > Stylize > Feather… Enter a 4px Radius and click OK.
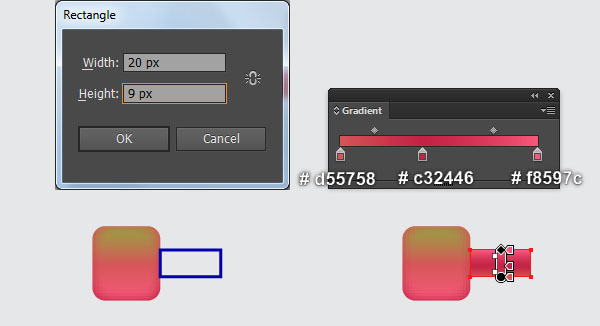
With the Rectangle Tool (M), create a 20 by 9px blue rectangle, then place it in the position shown in the third image.
Remove the stroke of the newly created rectangle and then fill it with the linear gradient shown in the fourth image.
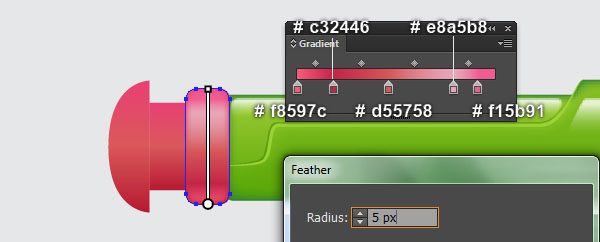
Continue with the Pen Tool (P), create a red shape (# c32446) as you see in the next to last image.
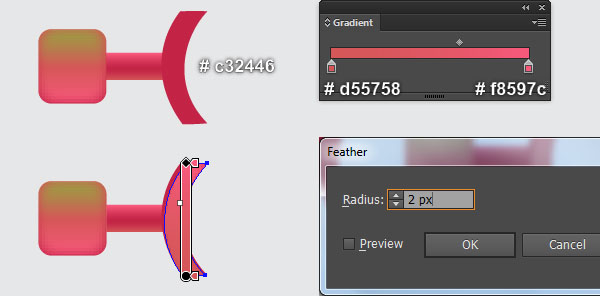
Make a copy of the newly created shape and then replace the existing color of the copy with the linear gradient as shown in the last image.
Now with the Direct Selection Tool (A), select the top-left anchor point of the newly created shape and move it 1px to the right.
Next select the bottom-right anchor point and move it 1px to the left.
Finally reselect the shape you just edited and apply a 2px Feather effect to it.
Step 15
Select and group (Ctrl + G) all objects created in step 14, then place this group to the position shown in the first image.
Next send this newly created group to back (Ctrl +Shift +Left Square Bracket).
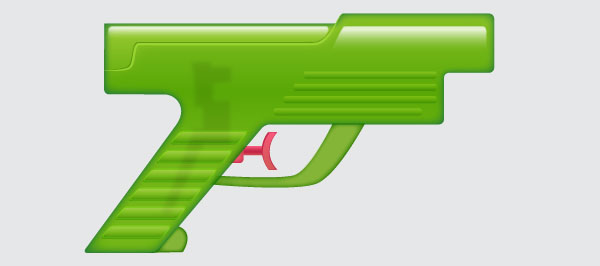
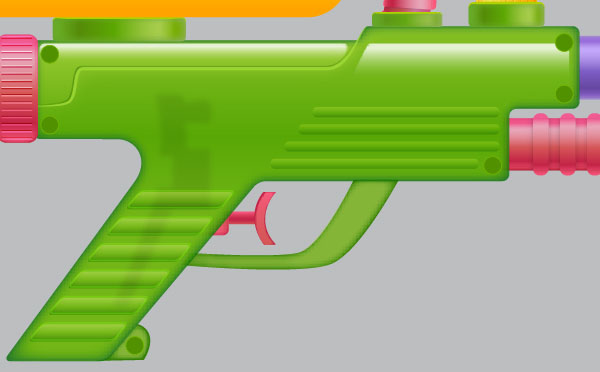
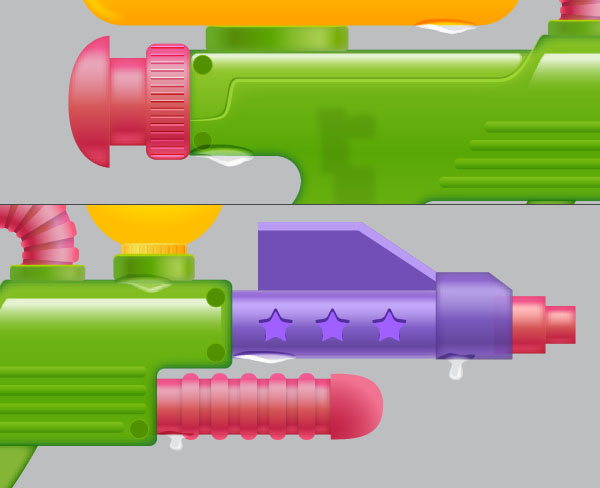
At this point your water gun should look like in the last image.

Step 16
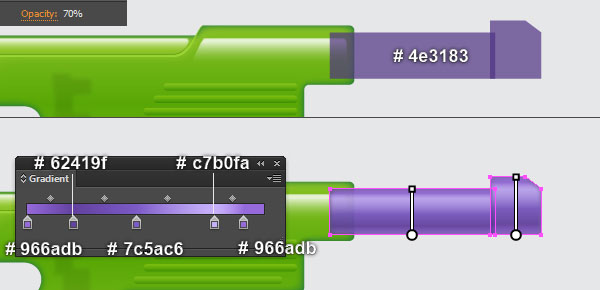
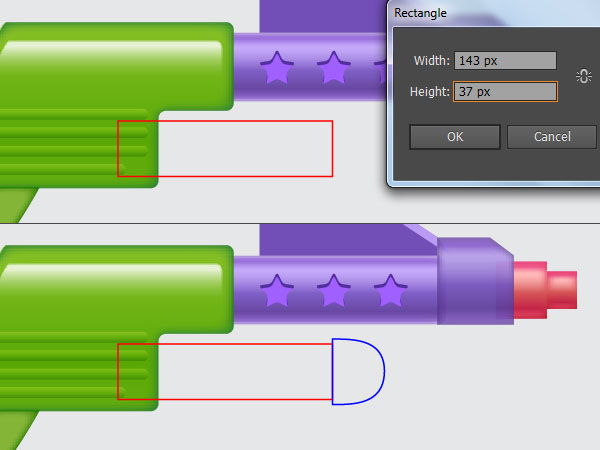
Let’s work on the creation of the nozzle.
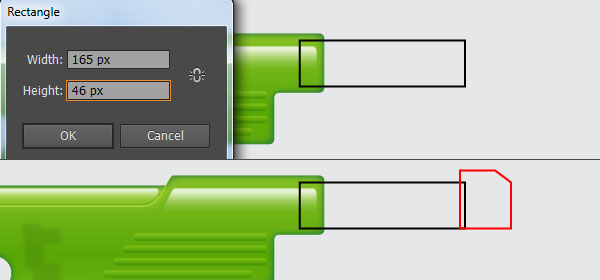
Pick the Rectangle Tool (M) and create a 165 by 46px black rectangle, then place it in the position shown below.
With the help of the Pen Tool (P) create a red object as you see in the second image.
Reselect the two newly created objects, remove their strokes and fill these objects with dark violet (# 4e3183), then reduce their Opacity to 70%.
Make a copy (Ctrl +C, Ctrl +F) of the newly created shapes and replace the existing color of these copies with the linear gradient shown in the fourth image.
Then apply a 5px Feather to the resulting shapes.
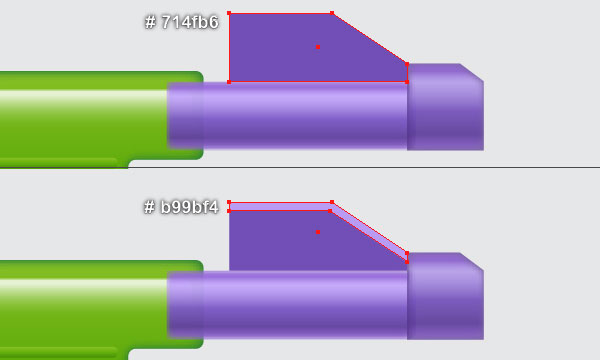
Finally, with the help of the Pen Tool (P) create two violet shapes as you see in the last two images.
Step 17
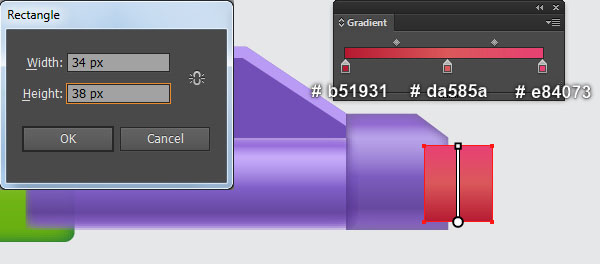
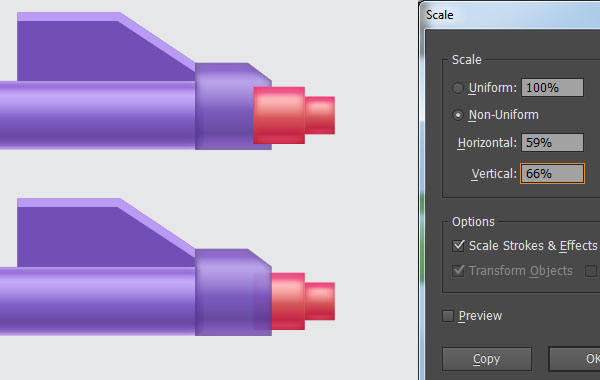
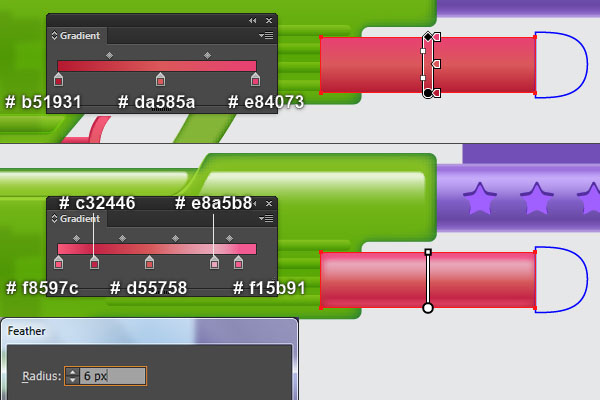
Pick the Rectangle Tool (M) and create a 34 by 38px rectangle, then fill it with the linear gradient shown below.
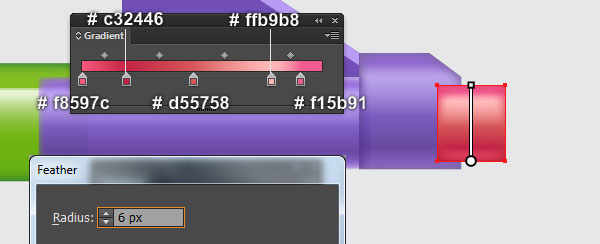
Make a copy (Ctrl +C, Ctrl +F) of the newly created rectangle and replace the existing color of the copy with the new linear gradient you see in the second image.
Then apply a 6px Feather effect to the resulting rectangle.
Now reselect the two rectangles created in this step and go to Object > Transform > Scale… Check Non-Uniform, enter 59 in the Horizontal box and 66 in the Vertical box, then click Copy.
Drag the copies to the right while holding the Shift key, and place them as shown in the next to last image.
Finally select all four rectangles created in this step and send them to back (Ctrl +Shift +Left Square Bracket).
Step 18
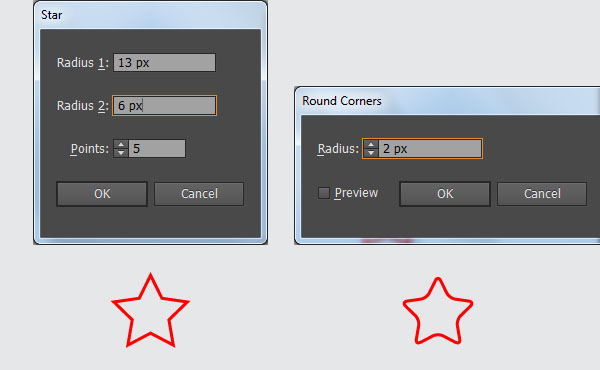
Pick the Star Tool, simply click on your artboard to bring up its options, then enter the data as shown below and click OK.
Keep this star selected and go to Effect > Stylize > Round Corners… Enter a 2px Radius and click OK, then go to the Object > Expand Appearance.
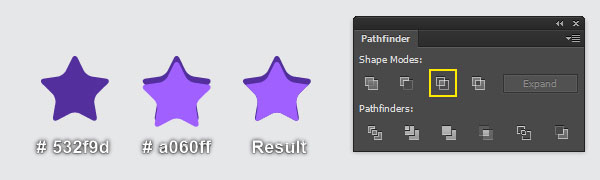
Remove the stroke of the resulting star and fill it with dark violet (# 532f9d).
Make a copy (Ctrl +C, Ctrl +F) of the dark violet star and replace the existing color of the copy with light violet (# a060ff), then move it 2px down.
진한 보라색 별을 다시 선택하고 사본을 만드십시오. 이 사본을 선택한 채로 Shift 키를 누른 상태에서 라이트 바이올렛 별을 클릭하십시오. 열린 패스 파인더 팔레트 ( 윈도우> 패스 파인더를 )하고 클릭 인터 섹트버튼을 누릅니다.
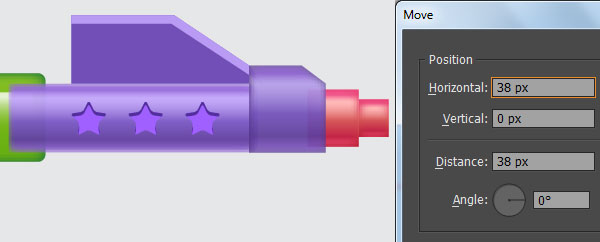
이제이 단계에서 생성 된 두 별을 선택하고 Object> Transform> Move ... Horizontal 상자에 38 을 입력 하고 Copy를 클릭 한 다음 ( Ctrl + D )를 한 번 누릅니다 .
마지막 으로이 단계에서 생성 된 모든 별을 선택하고 그룹화 ( Ctrl + G ) 한 다음이 그룹을 마지막 이미지에서 볼 수있는 위치에 배치하십시오.
19 단계
16 단계 의 시작 부분에서 생성 된 모든 객체를 선택하고 그룹화 ( Ctrl + G ) 한 다음이 그룹을 뒤로 보냅니다 ( Ctrl + Shift + 왼쪽 대괄호 ).
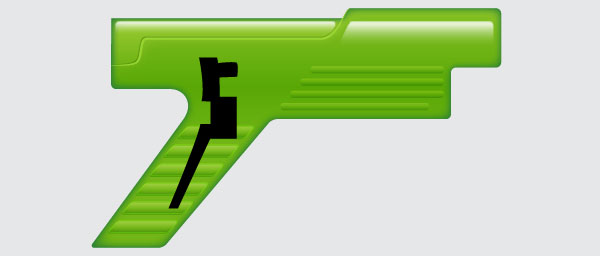
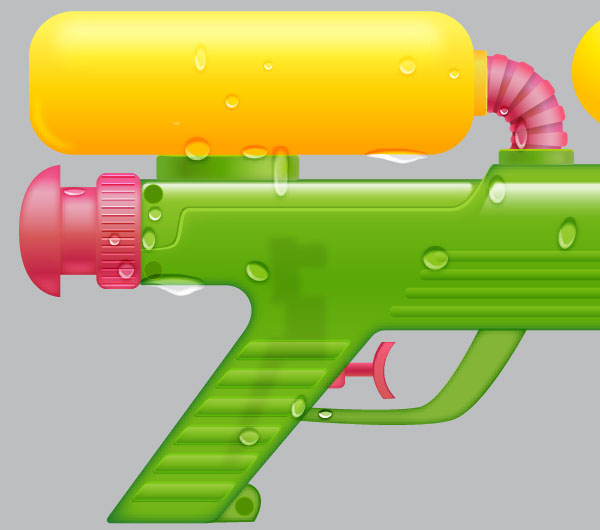
이 시점에서 귀하의 물총은 다음 이미지에서와 같이 보일 것입니다 :
20 단계
의 도움으로 사각형 도구 (M) 과 펜 도구 (P) 는 제 1 및 제 2 이미지에서 보는 바와 같이, 두 개의 객체를 생성합니다.
객체가 그려지면 직사각형을 다시 선택하고 획을 제거한 다음이 사각형을 세 번째 이미지에 표시된 선형 그래디언트로 채 웁니다.
결과 직사각형을 복사 ( Ctrl + C, Ctrl + F )하고 사본의 기존 색상을 마지막 이미지 옆에 표시되는 새로운 선형 그래디언트로 바꿉니다.
Next apply a 6px Feather effect to the resulting rectangle.
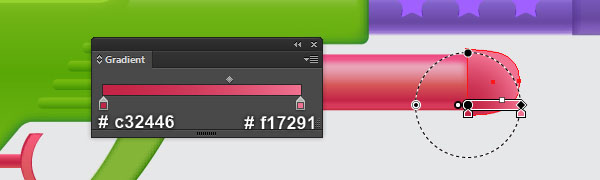
Finally select the remaining object created in this step, remove its stroke and fill this object with the radial gradient shown in the last image.
Step 21
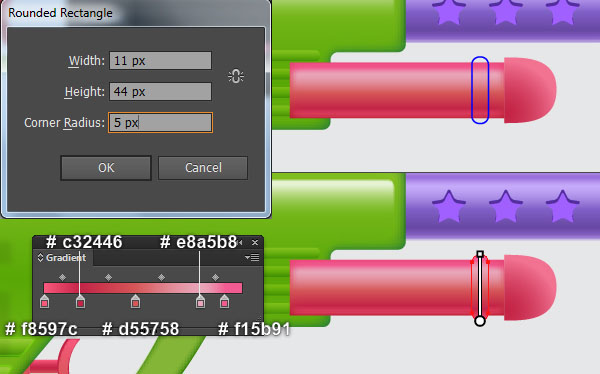
Pick the Rounded Rectangle Tool, simply click on your artboard to bring up its options, then enter the data shown below and click OK.
Remove the stroke of the newly created rectangle and fill it with the linear gradient you see in the second image.
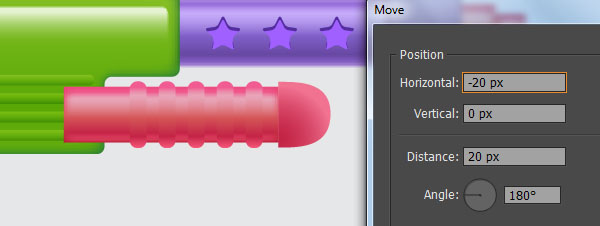
Keep the resulting rectangle selected and go to Object > Transform > Move… Enter -20 in the Horizontal box and click Copy, then press (Ctrl +D) three times to get the results shown in the third image.
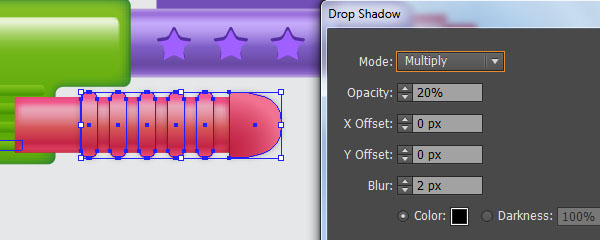
Now select the five rounded rectangles created in this step and the last shape created in step 20, then make a copy (Ctrl +C, Ctrl +F) of them.
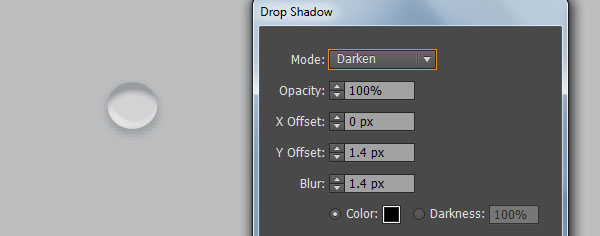
Keep these copies selected and press (Ctrl +G) to group them, then go to Effect > Stylize > Drop Shadow… Follow the data you see in the fourth image and click OK.
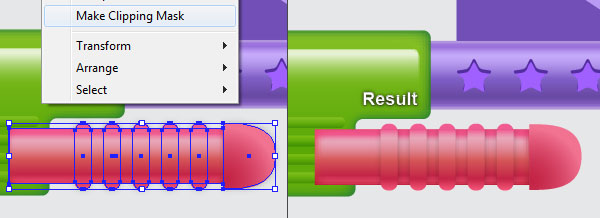
Now select the rectangle with Feather effect applied in step 20, make a copy of it and bring the copy to front (Ctrl +Shift +Right Square Bracket).
Make sure that the newly created rectangle is still selected, hold down the Shift key and click on the group with Shadow effect applied in this step.
Right click on the artboard and then select the Make Clipping Mask section from the drop-down menu.
Step 22
Select and group (Ctrl + G) all objects created from the beginning of step 20 to this time, then send this group to back (Ctrl +Shift +Left Square Bracket).
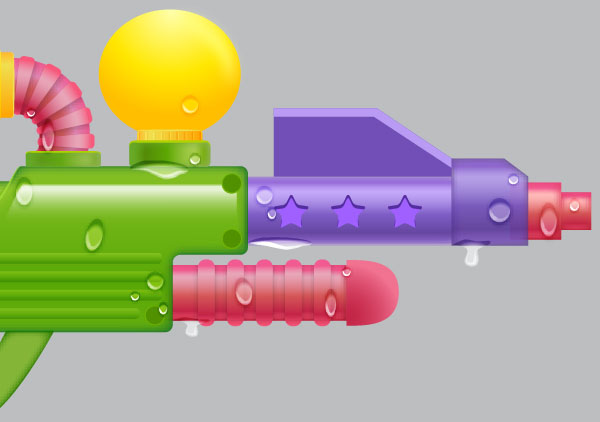
At this point your water gun should look like in the next image:
Step 23
With the help of the Rounded Rectangle Tool and the Rectangle Tool (M), create three rectangles and then place them in the positions you see in the images below.
Now focus on the next to last image, pick the Direct Selection Tool (A), select the top-left anchor point of the black rectangle and remove it.
Next select the bottom-left anchor point and move it 44px up.
Finally, with the Convert Anchor Point Tool (Shift +C), click on the anchor point just moved, hold down the mouse button and drag it down while holding the Shiftkey.
You should end up with something like in the last image.
Step 24
Select the rounded rectangle created in step 23, remove its stroke and fill this rectangle with the linear gradient shown below.
Next select the remaining two objects created in step 23, then pick the Eyedropper Tool (I) and click on the rounded rectangle you just filled with red gradient colors.
Reselect the rounded rectangle and make a copy (Ctrl +C, Ctrl +F) of it, then replace the existing color of the copy with the new linear gradient shown in the third image.
Apply a 5px Feather effect to the resulting rectangle.
Now select the remaining two shapes created in this step and make a copy of them. Having these two copies selected, pick the Eyedropper Tool (I) and then click on the rounded rectangle with Feather effect applied in this step.

Step 25
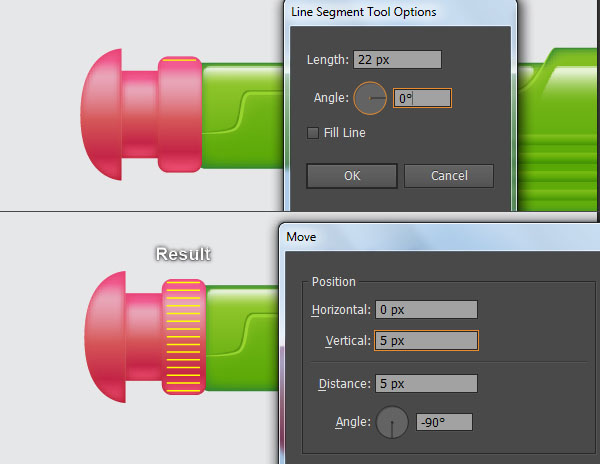
Using the Line Segment Tool (\) create a horizontal line of length 22px, with a yellow stroke and no fill, then place this line in the position shown below.
Make sure that the newly created line is still selected and go to Object > Transform > Move… Enter 5pxin the Vertical box and click Copy, then press (Ctrl +D) thirteen times to get the results you see in the second image.
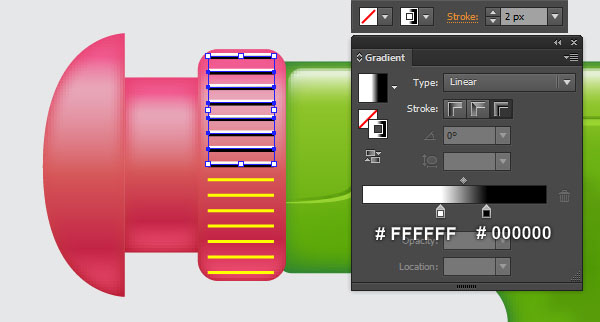
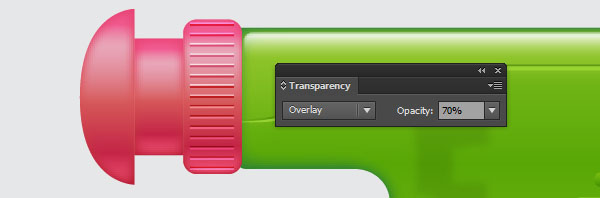
Now select eight upper lines, change the stroke weight to 2px and replace the existing stroke color with the linear gradient across stroke as shown in the third image.
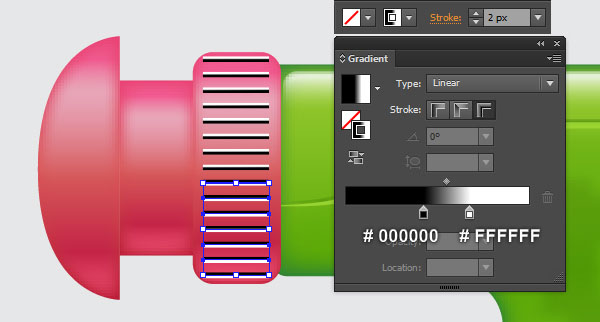
Next select the remaining lines, change the stroke weight to 2px and replace the existing stroke color with the linear gradient across stroke as shown in the next to last image.
Finally, reselect all lines created in this step, change the Blending Mode to Overlay and reduce the Opacity to 70%.
Step 26
At this point your water gun should look like in the next image:
Step 27
We will continue with the water container.
With the Rounded Rectangle Tool, create three rectangles and then place them in the positions shown below.
Reselect these rectangles, remove their strokes and fill them with the linear gradient you see in the second image.
Keep the resulting rectangles selected and make a copy (Ctrl +C, Ctrl +F) of them, then replace the existing color of the copies with the new linear gradient shown in the third image.
Next apply a 6px Feather effect to the resulting rectangles.
Now select the left rectangle with Feather effect applied in this step and make a copy of it.
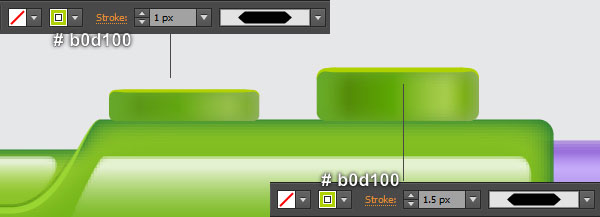
복사본을 선택한 상태에서 모양 팔레트 ( 창> 모양 )를 열고 깃털 부분을 제거 하십시오.
결과로 얻은 사각형을 선택된 상태로 유지하고 채우기 색상을 제거하고 2px 녹색 획 ( # b0d100 )을 추가 한 다음 결과 객체에 폭 프로파일 3 을 적용 합니다.
네 번째 이미지에 초점을두고 두 개의 앵커 포인트를 빨간색으로 강조 표시 하고 속성 막대 에서 " 선택한 앵커 포인트에서 패스 잘라 내기 "버튼을 클릭 합니다. 이렇게하면 녹색 오브젝트가 두 경로가됩니다. 아래쪽 경로를 선택하고 제거하십시오.
마찬가지로 마지막 이미지에서 볼 수있는 것과 동일한 과정을 반복하여 두 개의 경로를 추가로 그립니다.

28 단계
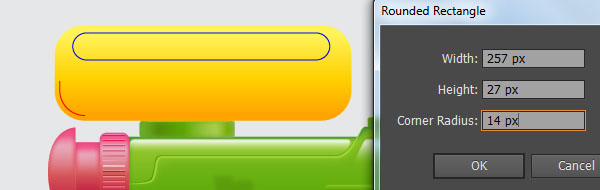
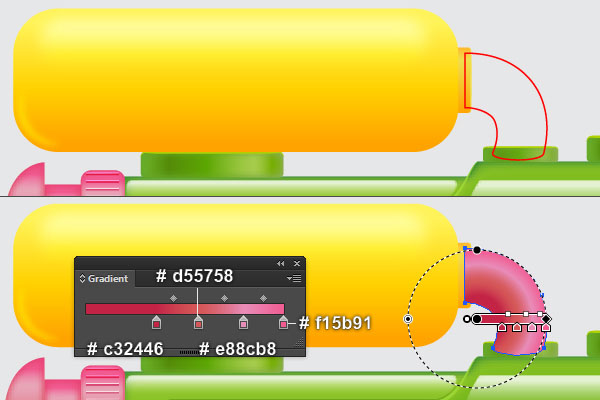
둥근 사각형 도구를 선택하고 아트 보드를 클릭하기 만하면 옵션이 표시됩니다. 아래 표시된 데이터를 입력하고 확인을 클릭 한 다음 새로 만든 사각형을 첫 번째 이미지에 표시되는 위치에 배치합니다.
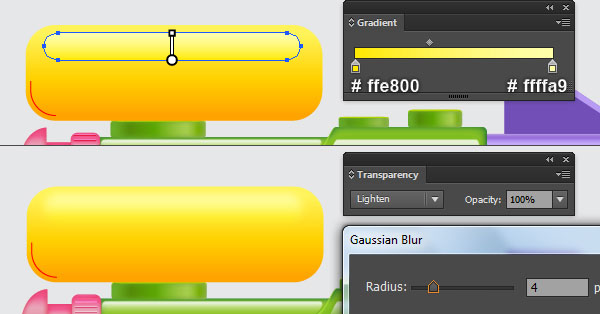
이 직사각형을 선택한 상태에서 스트로크를 제거하고 두 번째 이미지에 표시된 선형 그래디언트로이 직사각형을 채 웁니다.
다음으로 둥근 사각형 도구 와 펜 도구 (P) 를 사용하여 세 번째 이미지에서 볼 수 있듯이 직사각형과 곡선 경로를 만듭니다.
오브젝트가 그려지면 직사각형을 다시 선택하고 선을 제거하고 네 번째 이미지에 표시된 선형 그래디언트로이 직사각형을 채 웁니다.
Apply a 4px Gaussian Blur to the resulting rectangle then set it to Blending Mode Lighten.
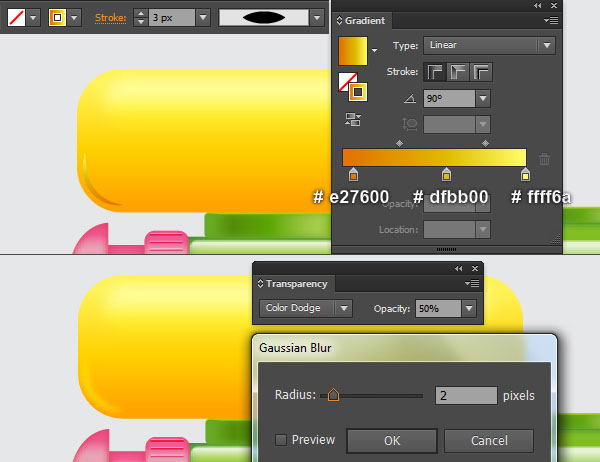
Now focus on the next to last image, select the curved path, change the stroke weight to 3px and replace the existing stroke color with the linear gradient within stroke.
Apply a 2px Gaussian Blur effect and Width Profile 1 to the resulting path, then set it to Blending Mode Color Dodge and reduce the Opacity to 50%.
Step 29
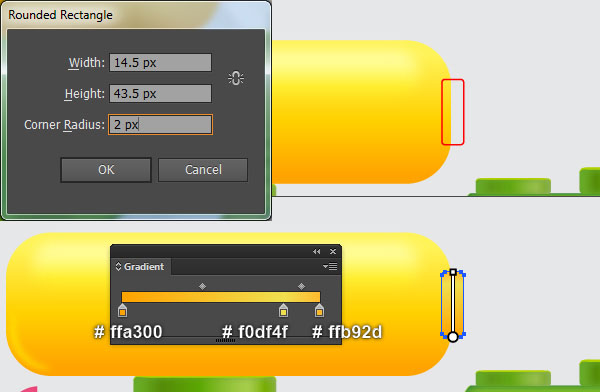
With the Rounded Rectangle Tool, create a rectangle and then place it in the position shown below.
Reselect the newly created rectangle, remove its stroke and fill this rectangle with the linear gradient shown in the second image.
Keep the resulting rectangle selected and make a copy (Ctrl +C, Ctrl +F) of it. Remove the fill color of this copy and add a 1px yellow stroke (# f0df4f), then apply Width Profile 1 to the resulting object.
Focus on the third image, select the two anchor points highlighted with red and click on the "Cut path at selected anchor points" button from the Properties bar. This makes the yellow object become two paths.
Select and remove the left path.
Finally select the two objects created in this step and send them to back (Ctrl +Shift +Left Square Bracket).

Step 30
Pick the Pen Tool (P), create an object and then fill it with the radial gradient you see in the first and the second images.
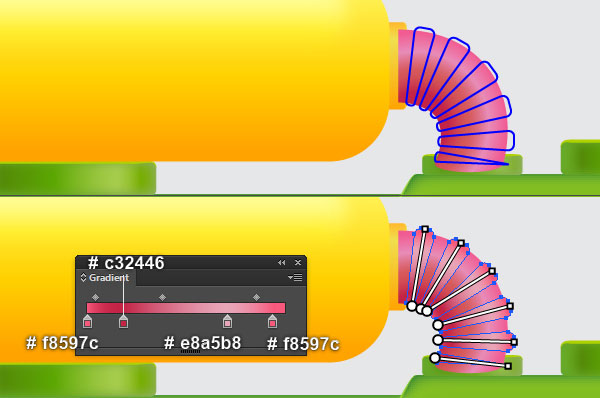
Continue with the Pen Tool (P), create six objects as shown in the third image.
Once your objects are drawn, reselect them, remove their strokes and fill these objects with the linear gradient you see in the fourth image.
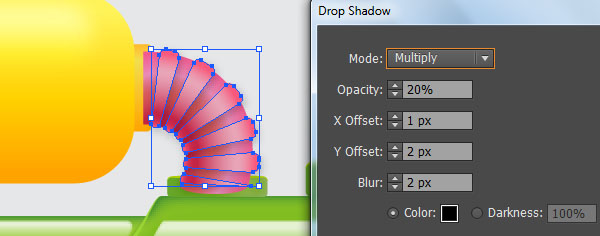
Reselect all shapes created in this step (except the biggest shape) and make a copy (Ctrl +C, Ctrl +F) of them, then press (Ctrl +G) to group the copies.
Still having the newly created group selected, go to Effect > Stylize > Drop Shadow… Follow the data shown in the fifth image and click OK.
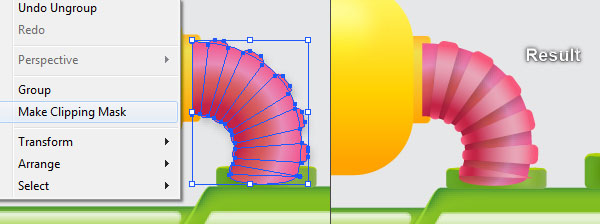
Now select the biggest shape created in this step and make a copy of it, then bring the copy to front (Ctrl +Shift +Right Square Bracket).
Keep this copy selected, hold down the Shift key and click on the group created in this step. Then right click on the artboard and select the Make Clipping Mask section from the drop-down menu.
Finally select all objects created in this step and send them to back (Ctrl +Shift +Left Square Bracket).

Step 31
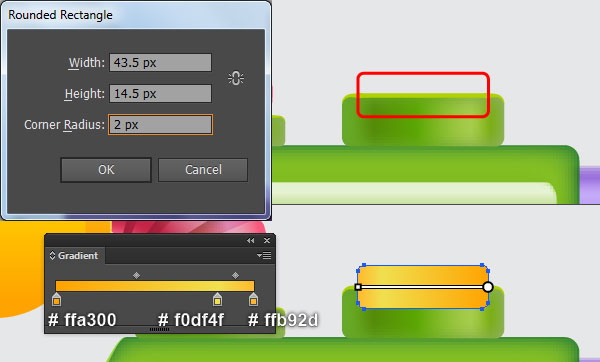
With the Rounded Rectangle Tool, create a rectangle and then place it in the position shown below.
Reselect the newly created rectangle, remove its stroke and fill this rectangle with the linear gradient shown in the second image.
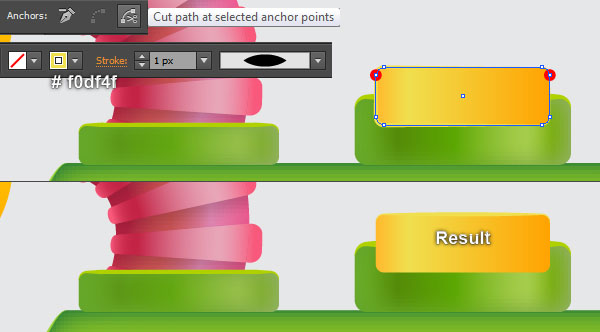
Keep the resulting rectangle selected and make a copy (Ctrl +C, Ctrl +F) of it. Remove the fill color of this copy and add a 1px yellow stroke (# f0df4f), then apply Width Profile 1 to the resulting object.
Focus on the third image, select the two anchor points highlighted with red and click on the "Cut path at selected anchor points" button from the Properties bar. This makes the yellow object become two paths.
Select and remove the lower path.
Step 32
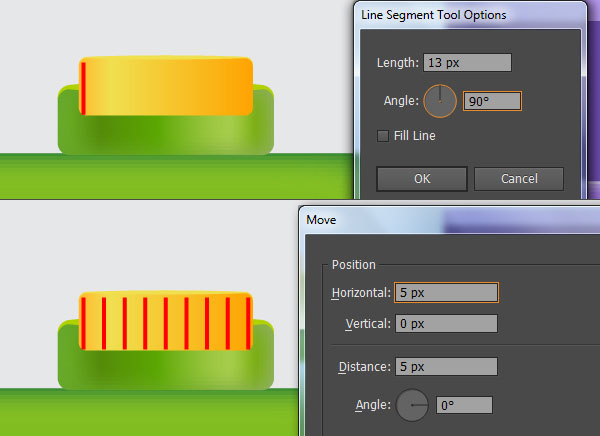
Using the Line Segment Tool (\) create a vertical line of length 13px, with a red stroke and no fill, then place this line in the position shown below.
Make sure that the newly created line is still selected and go to Object > Transform > Move… Enter 5pxin the Horizontal box and click Copy, then press (Ctrl +D) seven times to get the results you see in the second image.
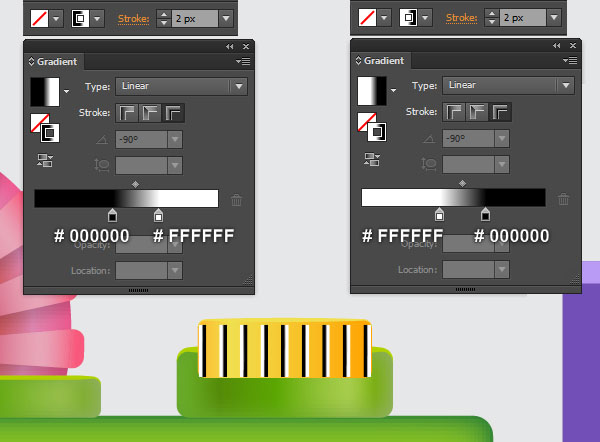
Now select the four left lines, change the stroke weight to 2px and replace the existing stroke color with the linear gradient across stroke as shown in the third image.
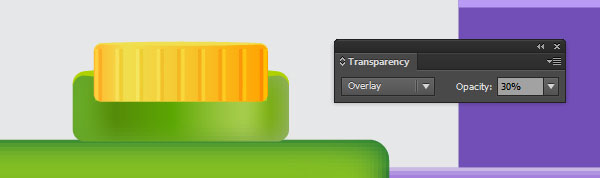
Next select the remaining lines, change the stroke weight to 2px and replace the existing stroke color with the linear gradient across stroke as shown in the third image.
Finally, reselect all lines created in this step, change the Blending Mode to Overlay and reduce the Opacity to 30%.
Step 33
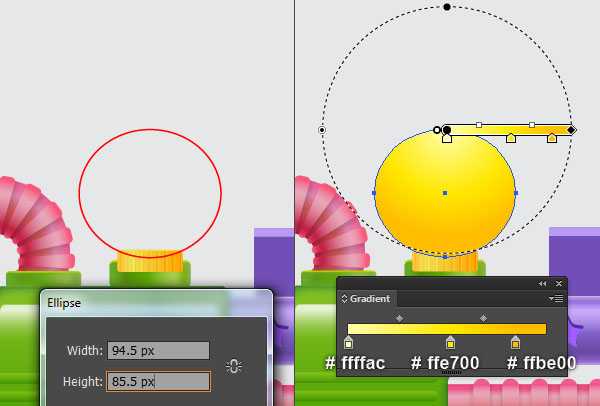
Pick the Ellipse Tool (L) and create a 94.5 by 85.5px ellipse, then place this ellipse in the position shown below.
Reselect the newly created ellipse, remove its stroke and fill this ellipse with the radial gradient you see in the second image.
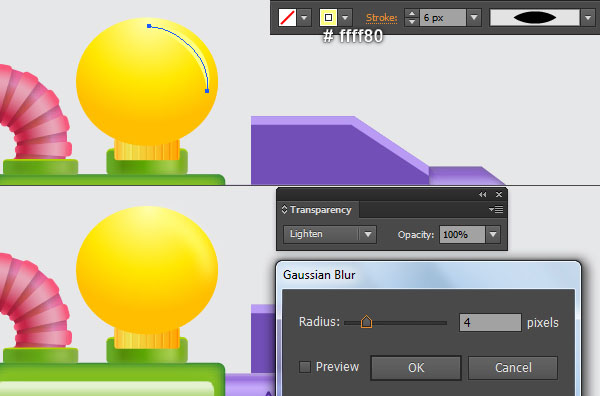
With the Pen Tool (P) create a curved path as shown in the third image.
경로가 그려지면 획 두께를 6 픽셀 로 변경하고 기존 획 색상을 연 황색 ( # ffff80 )으로 바꿉니다 .
적용 폭 프로파일 1 및 4 픽셀 가우스 블러 생성 경로 효과를, 다음으로 설정 혼합 모드 밝게 .
이제이 단계에서 생성 된 노란색 타원과 곡선 경로를 선택한 다음 뒤쪽으로 보냅니다 ( Ctrl + Shift + 왼쪽 대괄호 ).
마지막으로 31 단계 의 시작 부분에서 생성 된 모든 개체 를 이번에 선택한 다음 뒤로 보냅니다.

34 단계
이 시점에서 귀하의 물총은 다음 이미지에서와 같이 보일 것입니다 :
35 단계
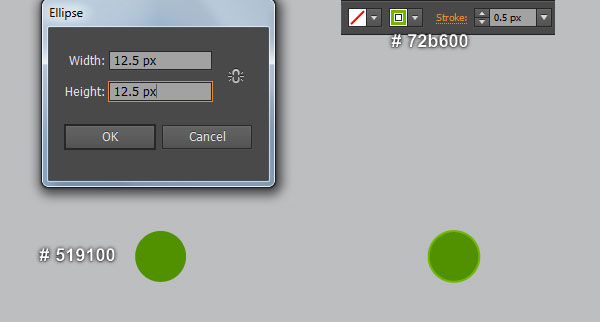
Pick the Ellipse Tool (L) and create a 12.5 by 12.5px green ellipse (# 519100).
Make a copy (Ctrl +C, Ctrl +F) of the green ellipse, then remove the fill color of the copy and add a 0.5pxlighter green stroke (# 72b600).
Reselect and group (Ctrl +G) the two ellipses created in this step.
Next make five copies of the newly created group and place them in the positions you see in the last image.
Step 36
It’s time to draw the water drops.
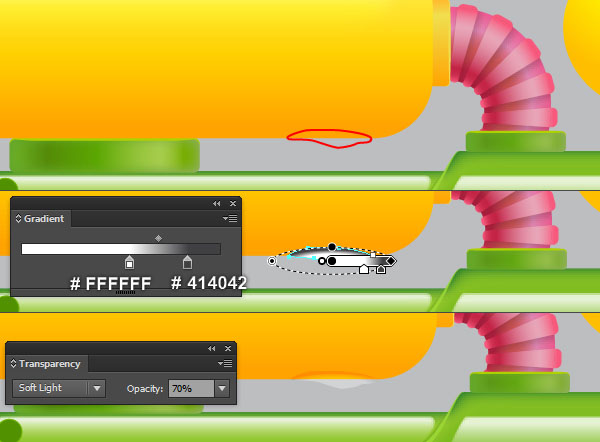
With the Pen Tool (P), create an object and then fill it with the radial gradient shown in the first and the second image.
Keep the newly created shape selected, change the Blending Mode to Soft Light and reduce the Opacity to 70%.
Now select the resulting shape and make a copy of it. Still having the copy selected, open the Transparency palette (Window > Transparency), change the Blending Mode to Normal and change the Opacity to 100%.
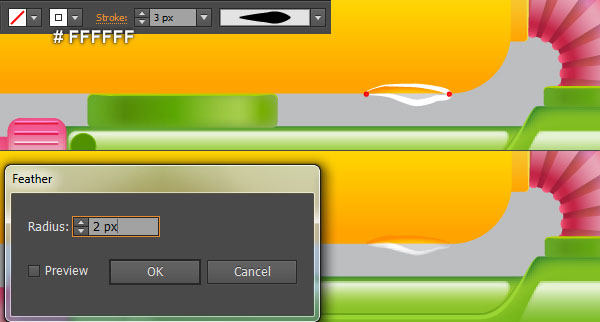
Keep the resulting shape selected, remove the fill color of it and add a 3px white stroke (# ffffff), then apply Width Profile 5 to the resulting object.
Focus on the fourth image, select the two anchor points highlighted with red and click on the "Cut path at selected anchor points" button from the Properties bar. This makes the white object become two paths.
Select and remove the upper path.
Finally reselect the remaining path and apply a 2px Feather effect to it.
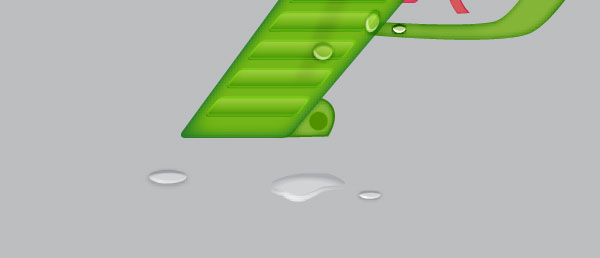
Step 37
Now, follow the sequence of images and repeat the same process as the previous steps to draw some water drops similar to the ones shown below.
Step 38
At this point your water gun should look like in the next image:
Step 39
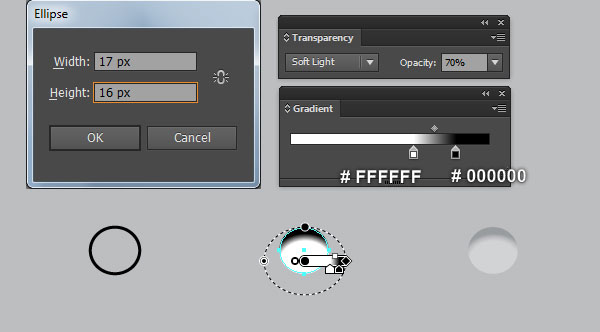
Pick the Ellipse Tool (L) and create a 17 by 16px ellipse, then fill it with the radial gradient you see in the image below.
Keep the newly created ellipse selected, change the Blending Mode to Soft Light and reduce the Opacity to 70%.
Now select the resulting ellipse and make a copy of it. Still having the copy selected, change the Blending Mode to Normal and change the Opacity to 100%.
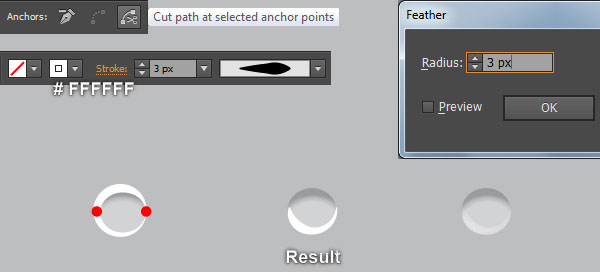
Keep the resulting ellipse selected, remove the fill color of it and add a 3px white stroke (# ffffff), then apply Width Profile 5 to the resulting object.
네 번째 이미지에 초점을두고 두 개의 앵커 포인트를 빨간색으로 강조 표시 하고 속성 막대 에서 " 선택한 앵커 포인트에서 패스 잘라 내기 "버튼을 클릭 합니다. 이렇게하면 흰색 타원이 두 경로가됩니다.
위쪽 경로를 선택하고 제거하십시오.
다음으로 나머지 경로를 다시 선택하고 3px 깃털 효과를 적용 합니다.
마지막 으로이 단계에서 생성 된 두 객체를 선택하고 그룹화 ( Ctrl + G ) 한 다음이 그룹을 마지막 이미지에 표시된 위치에 배치합니다.
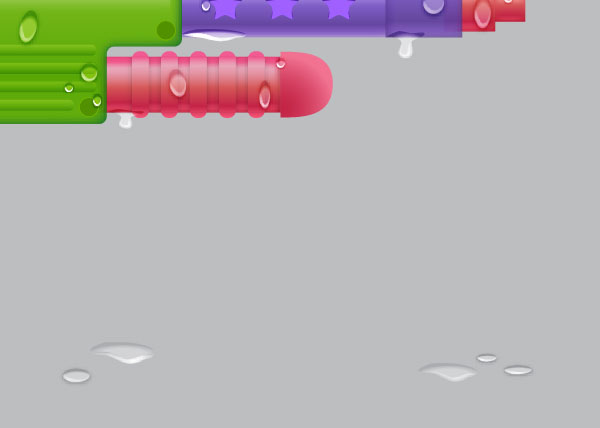
40 단계
마찬가지로 이전 단계와 동일한 과정을 반복하여 더 많은 물방울을 그립니다.
41 단계
이와 비슷한 것을 얻을 때까지 더 많은 물방울을 계속 그립니다. 또한 최종 이미지에서 모두 볼 수 있습니다.
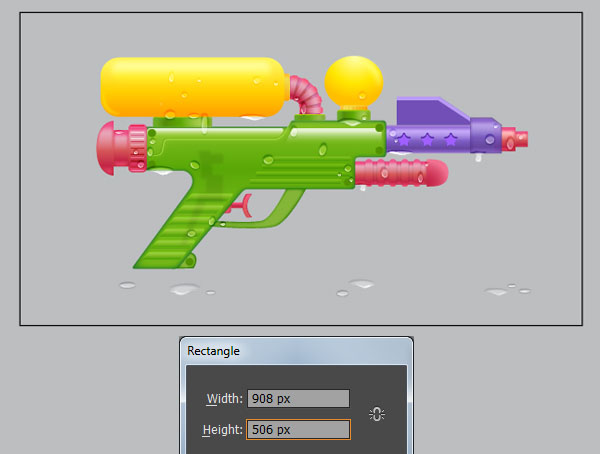
42 단계
우리는 물총으로 끝났어. 이제 배경 화면입니다.
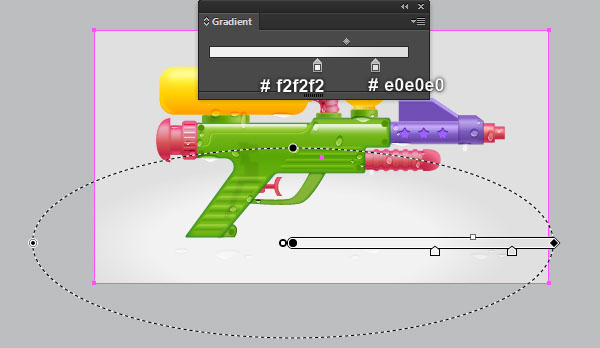
Pick the Rectangle Tool (M) and create a 908 by 506px rectangle, then place it in the position shown below.
Remove the stroke of the newly created rectangle and then fill it with the radial gradient you see in the second image.
Finally send the resulting rectangle to back (Ctrl +Shift +Left Square Bracket).
Step 43
To give a more realistic look I’m going to be adding some shadows in some key places.
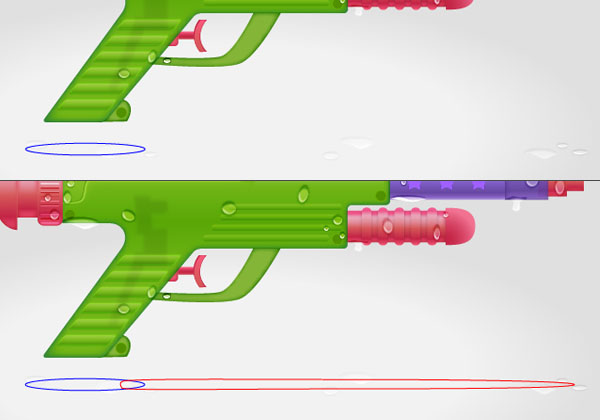
With the help of the Ellipse Tool (L) and the Pen Tool (P), create two objects as shown in the first and the second images.
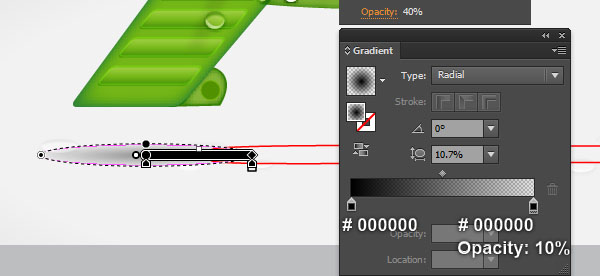
오브젝트가 그려지면 타원을 다시 선택하고 획을 제거하고 세 번째 이미지에서 볼 수있는 방사형 그래디언트로 채운 다음 결과 타원 의 불투명도 를 40 % 로 낮 춥니 다 .
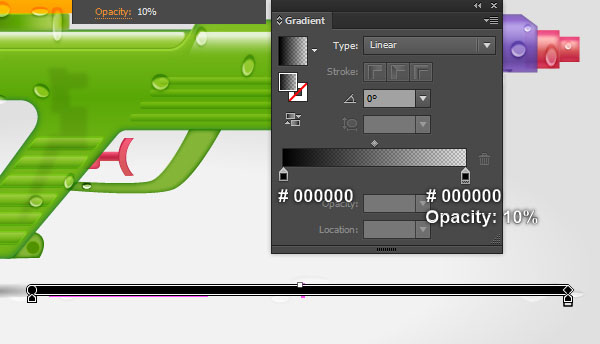
나머지 오브젝트를 선택하고 획을 제거한 다음 마지막 이미지 옆에 나타나는 선형 그래디언트로이 오브젝트를 채 웁니다.
마지막으로이 단계에서 만든 두 개체를 다시 선택하고 5px Gaussian Blur 효과를 적용한 다음 41 단계 에서 만든 물방울 뒤에 숨 깁니다 .
그리고 우리는 완료되었습니다!

'디자인 > 무료 디자인 자습서' 카테고리의 다른 글
| [일러스트] 아이스크림 콘 일러스트를 만드는 방법 (0) | 2018.06.05 |
|---|---|
| [일러스트] 사실적인 MacBook Pro 일러스트레이션 만들기 (0) | 2018.06.05 |
| [일러스트] 수채화 느낌 고양이 그리는 방법 (0) | 2018.06.04 |
| [일러스트] 푸드트럭 아이콘 그리는 방법 (0) | 2018.06.04 |
| [일러스트] 수채화 꽃 화환 만들기 (0) | 2018.06.03 |
| [일러스트] 립스틱 화장품 일러스트 그리는 방법 (1) | 2018.06.03 |
| [일러스트] 선풍기 그리는 방법 (0) | 2018.06.03 |
| [일러스트] 프라이팬 일러스트레이션을 그리는 방법 (0) | 2018.06.02 |


댓글