
다음 자습서에서는 Adobe Illustrator에서 반 사실적인 MacBook Pro 그림을 만드는 방법을 학습합니다.
이 자습서는 원래 2013 년 5 월 28 일에 게시되었습니다.
최종 이미지
언제나처럼, 이것이 우리가 만들게 될 최종 이미지입니다.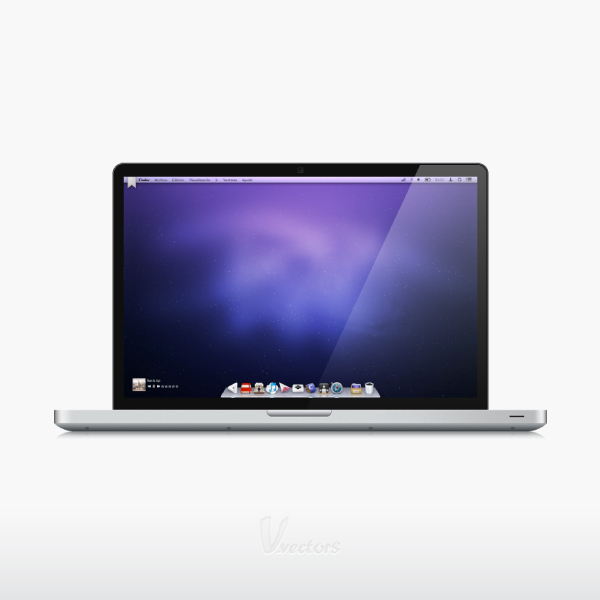
자습서 세부 정보
- 프로그램 : Adobe Illustrator CS5
- 예상 완료 시간 : 1 시간 30 분
- 난이도 : 중급 - 고급
자원
1 단계
Command + N을 눌러 새 문서를 만듭니다.
너비 상자에 1100을 입력하고 높이 상자에 720을 입력 한 다음 고급 버튼을 클릭하십시오.
RGB, Screen (72ppi)을 선택하고 확인을 클릭하기 전에 "픽셀 격자에 새 객체 정렬"상자가 선택 해제되어 있는지 확인하십시오.
그리드 (보기> 그리드 표시) 및 그리드에 스냅 (보기> 그리드에 맞추기)을 활성화하십시오. 2.5px마다 그리드가 필요합니다. 편집> 환경 설정> 안내선> 격자로 이동하고 Gridline every 상자에 2.5를 입력하고 Subdivisions 상자에 1을 입력하십시오.
또한 정보 패널 (윈도우> 정보)을 열어 모양의 크기와 위치가 포함 된 실시간 미리보기를 열어야합니다.
편집> 환경 설정> 단위> 일반에서 단위를 픽셀로 설정하는 것을 잊지 마십시오.
이 모든 옵션을 통해 작업 속도가 크게 향상됩니다.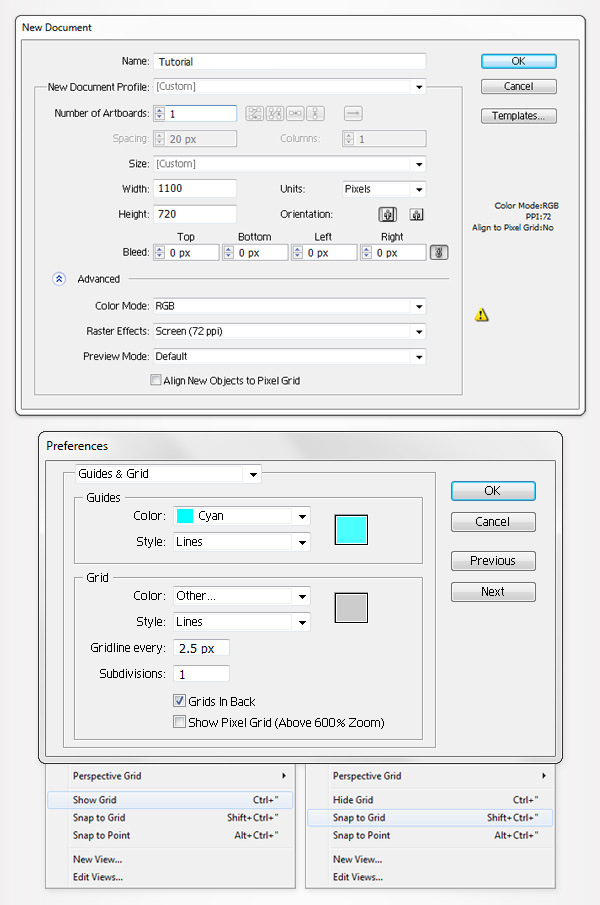
2 단계
Pick the Rectangle Tool(M), create a 920 by 15px shape and fill it with any color.
Switch to the Direct Selection Tool(A) and focus on the left side of this thin rectangle.
Select the bottom anchor point and drag it 40px to the right. The Snap to Grid will ease your work.
Move to the right side of this shape, select the bottom anchor point and drag it 40px to the left. In the end your shape should look like in the second image.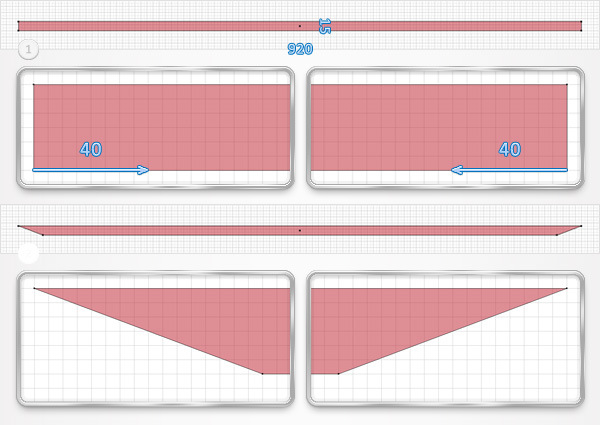
Step 3
Select the shape created in the previous step and go to Effect > Warp > Bulge. Enter the data shown below, click OK.
Go again to Effect > Warp > Arc Upper. Enter the properties shown below, click OK.
Go once again to Effect > Arc > Arc Lower. Enter the data shown below, click OK.
Go to Object > Expand Appearance. Fill the resulting shape with the linear gradient shown in the following image and focus on the Appearance panel (Window > Appearance).
Add a second fill for this shape using the Add New Fill button (pointed by the little, blue arrow). Select this new fill, set the color to black, lower its opacity to 2%, change the blending mode to Multiply.
Go to Effect > Artistic > Film Grain. Enter the data shown in the following image then click OK.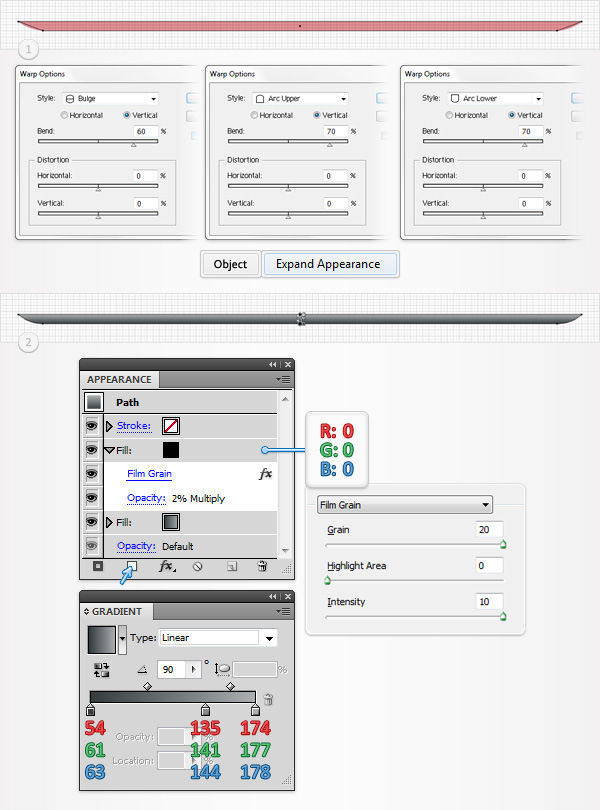
Step 4
Disable the Snap to Grid (View > Snap to Grid) then go to Edit > Preferences > General and make sure that the Keyboard Increment is set at 1px.
Select the shape edited in the previous step and make two copies in front (Control + C > Control + F > Control + F).
Select the top copy and move it 1px down using the down arrow from your keyboard.
Reselect both copies, open the Pathfinder panel (Window > Pathfinder) and click on the Minus Front button. Fill the resulting shape with R=147 G=149 B=152 and lower its opacity to 70%.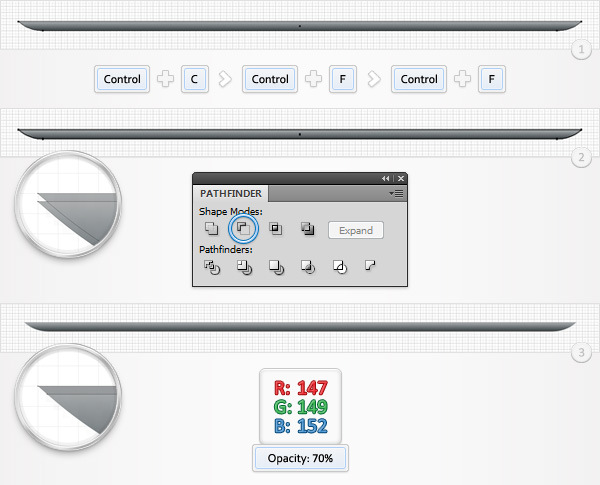
Step 5
Enable the Snap to Grid (View > Snap to Grid) and grab the Ellipse Tool(L). Create a 7.5 by 5px shape, fill it with R=72 G=74 B=79, lower its opacity to 70% and place it as shown in the first image.
Select this new shape and make two copies in front (Control + C > Control + F > Control + F).
Disable the Snap to Grid (View > Snap to Grid), select the top copy and move it 1px down using the down arrow from your keyboard.
Reselect both copies and click on the Minus Front button from the Pathfinder panel. Fill the resulting shape with R=65 G=65 B=66 and raise its opacity to 100%.
Select the two shapes created in this step and group them (Control + G).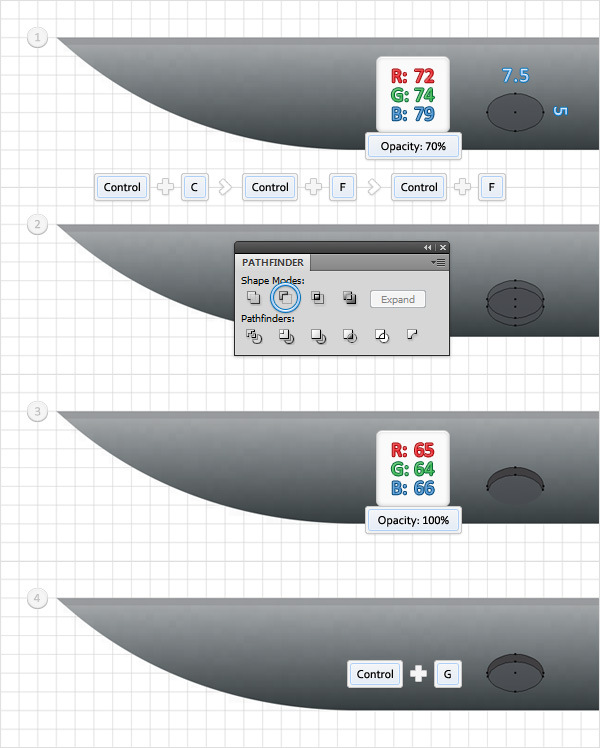
Step 6
Select the group created in the previous step and go to Effect > Distort&Transform > Transform. Enter the data shown below and click OK.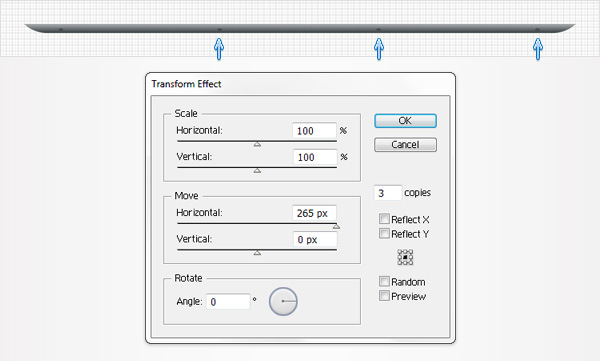
Step 7
Enable the Snap to Grid. Pick the Rectangle Tool(M), create a 920 by 25px shape, fill it with R=214 G=217 B=219 and place it as shown in the first image.
Make a copy of this shape (Control + C > Control + F), make it invisible and send it in the bottom of your Layers panel. You’ll need this copy later.
Now, focus on the visible shape. Pick the Mesh Tool(U) and add some mesh points as shown in the second image. Once again, the Snap to Grid will come in handy.
Pick the Direct Selection Tool(A), select the mesh points one by one and set the colors as shown in the following image.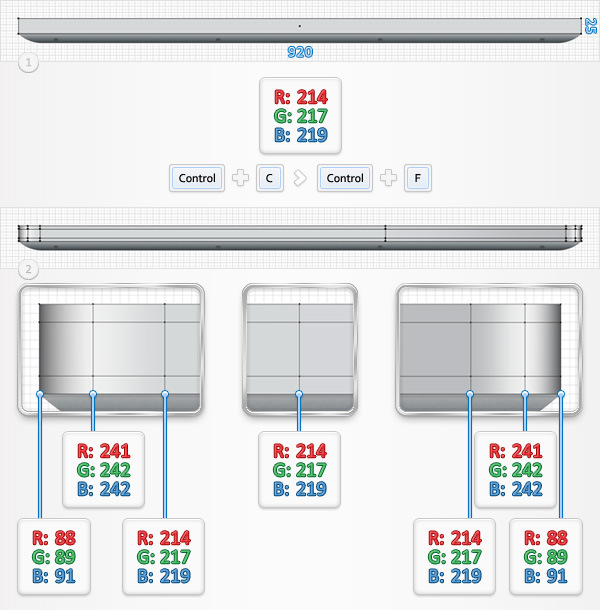
Step 8
레이어 패널에 초점을 맞춰 이전 단계에서 만든 보이지 않는 모양으로 돌아갑니다. 보이게하고 앞으로 가져옵니다 (Shift + Control +).
검정색으로 채우고 불투명도를 3 %로 낮추고 혼합 모드를 곱하기로 변경하십시오.
효과> 예술적 효과> 필름 그레인으로 이동하십시오. 아래 표시된 데이터를 입력하고 확인을 클릭하십시오.
9 단계
사각형 도구 (M)를 선택하고 120 x 40 픽셀 모양을 만들어 다음 그림과 같이 배치하십시오. 그것을 어떤 색깔이라도 채워라.
효과> 스타일> 둥근 모서리로 이동하십시오. 9px 반경을 입력하고 확인을 클릭하십시오.
오브젝트> 모양 확장으로 이동하십시오. 결과 모양을 두 번째 이미지에 표시된 선형 그래디언트로 채 웁니다.
[효과]> [스타일]> [그림자]로 이동합니다. 아래 표시된 데이터를 입력하고 확인을 클릭하십시오.
모양 패널에 초점을 맞 춥니 다. 단순히 0.75pt 스트로크를 추가하고 R = 88 G = 89 B = 91에 색상을 설정하십시오.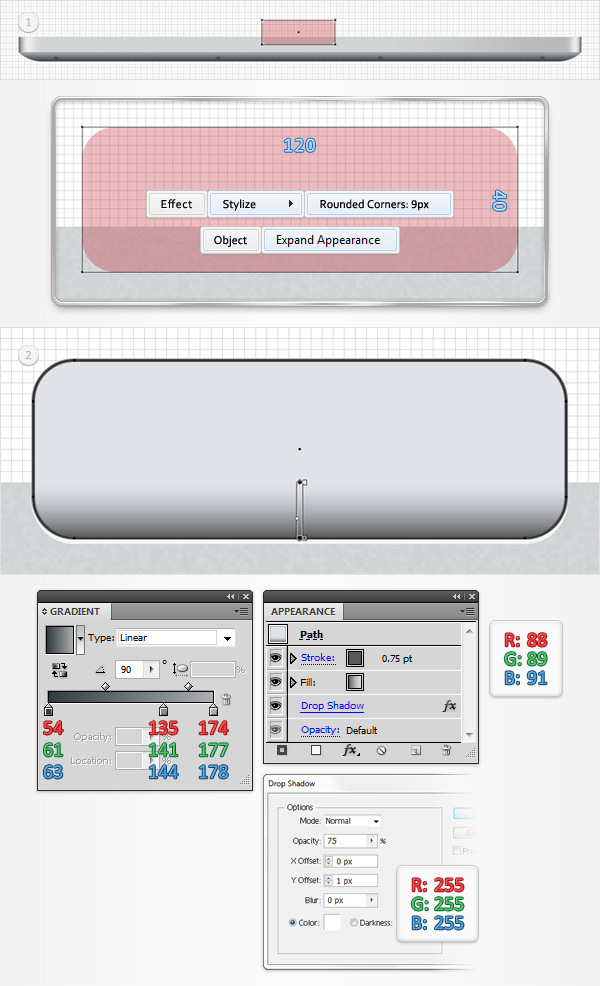
10 단계
Next, you need to mask the shape created in the previous step. Select the shape edited in the eighth step and make a copy in front (Control + C > Control + F).
Select this copy and go to the Appearance panel. Remove the Film Grain effect, raise the opacity to 100%, change the blending mode to Normal and set the fill color at white then bring it to front (Shift + Control + ] ).
Select this white shape along with the shape created in the previous step and go to the Transparency panel (Window > Transparency). Open the fly-out menu and simply click on Make Opacity Mask. In the end your masked shape should look like in the fourth image.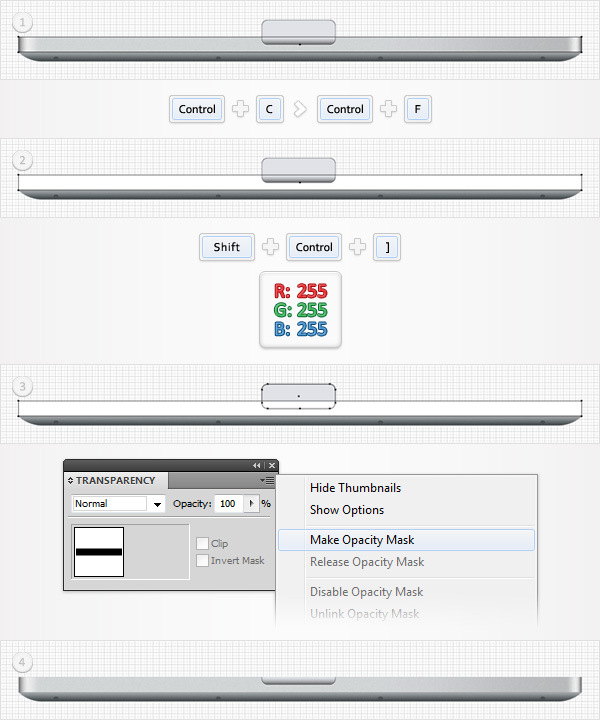
Step 11
Disable the Snap to Grid (View > Snap to Grid). Reselect the shape edited in the eighth step, make two copies in front (Control + C > Control + F > Control + F) and bring them to front (Shift + Control + ] ).
Select the top copy and move it 1px down.
Reselect both copies and click on the Minus Front button from the Pathfinder panel.
Select the resulting shape and go to the Appearance panel. First, remove the Film Grain effect and change the blending mode to Normal. Next, raise the opacity to 50% and set the fill color at white.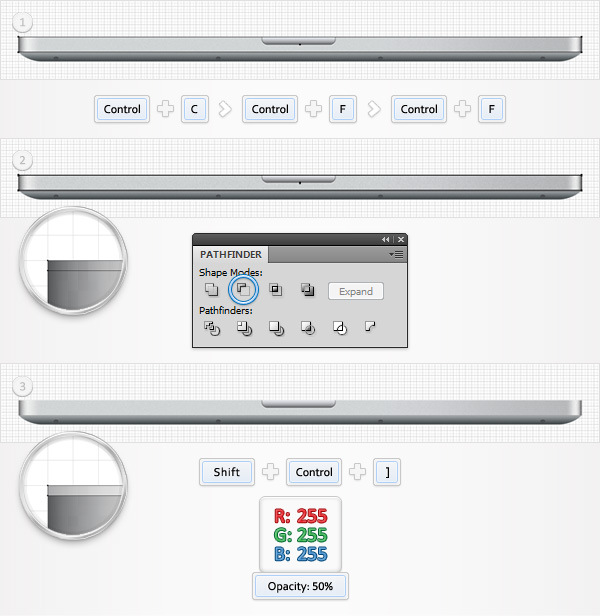
Step 12
Enable the Snap to Grid (View > Snap to Grid). Pick the Rectangle Tool(M), create a 27.5 by 2.5 px shape, fill it with R=35 G=31 B=32, place it as shown in the following image.
Go to Effect > Stylize > Rounded Corners. Enter a 1.5px radius, click OK.
[효과]> [스타일]> [그림자]로 이동합니다. 아래 표시된 데이터를 입력하고 확인을 클릭하십시오.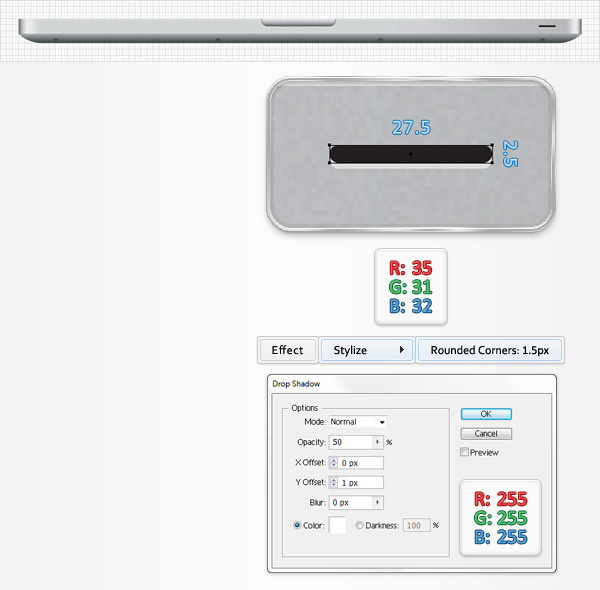
13 단계
사각형 도구 (M)를 선택하고 912.5 x 2.5px 모양을 만듭니다. R = 35 G = 31 B = 32로 채우고 다음 그림과 같이 배치하십시오.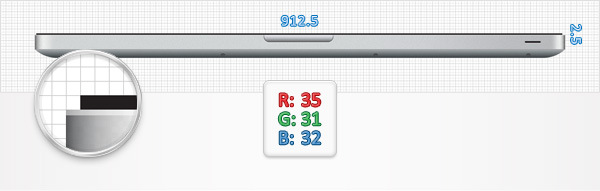
14 단계
직사각형 도구 (M)를 선택하고 920 x 5px 모양을 만들고 R = 214 G = 217 B = 219로 채우고 첫 번째 이미지와 같이 배치합니다. 이 도형을 복사하여 보이지 않게 만들고 레이어 패널의 하단에 보냅니다. 다시 말하지만, 나중에 보이지 않는 모양이 필요할 것입니다.
이제 보이는 모양에 집중하십시오. 메시 도구 (U)를 선택하고 두 번째 이미지에 표시된대로 메쉬 점을 추가합니다.
직접 선택 도구 (A)로 전환하고 메쉬 점을 하나씩 선택하고 아래 그림과 같이 색상을 설정합니다.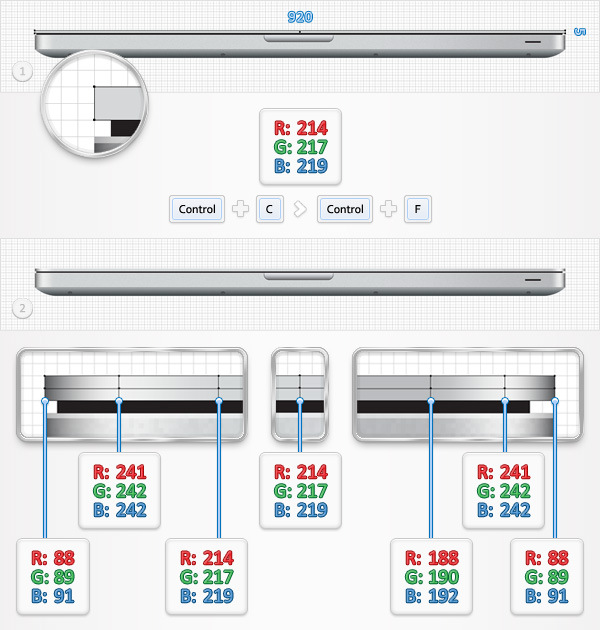
15 단계
[레이어] 패널에 초점을두고 이전 단계에서 만든 보이지 않는 모양으로 돌아갑니다. 보이게하고 앞으로 가져옵니다 (Shift + Control +).
검정색으로 채우고 불투명도를 3 %로 낮추고 혼합 모드를 곱하기로 변경하십시오.
효과> 예술적 효과> 필름 그레인으로 이동하십시오. 아래 표시된 데이터를 입력하고 확인을 클릭하십시오.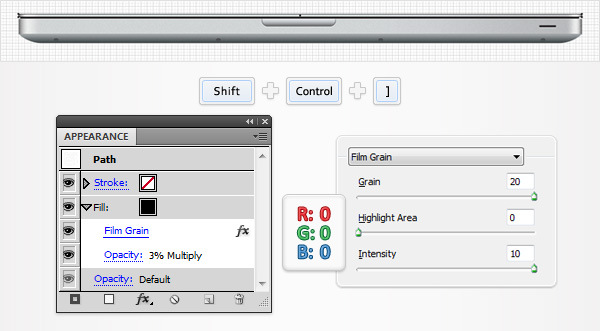
16 단계
눈금에 맞추기 (보기> 눈금에 맞추기)를 비활성화하십시오. 이전 단계에서 편집 한 모양을 다시 선택하고 앞에 두 개의 사본을 만듭니다 (Control + C> Control + F> Control + F).
상단 복사본을 선택하고 1px 아래로 이동하십시오.
두 사본을 다시 선택하고 패스 파인더 패널에서 마이너스 전면 버튼을 클릭하십시오. 결과 모양을 선택하고 모양 패널로 이동하십시오.
먼저 필름 그레인 효과를 제거하고 혼합 모드를 보통으로 변경합니다. 그런 다음 불투명도를 80 %로 높이고 채우기 색상을 흰색으로 설정합니다.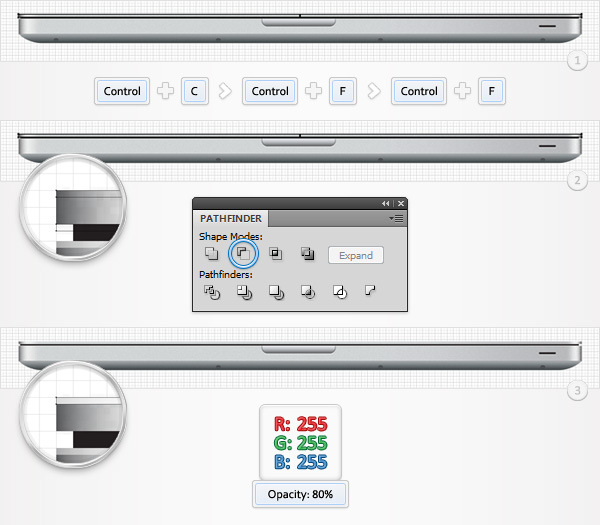
17 단계
Enable the Snap to Grid (View > Snap to Grid). Pick the Rectangle Tool(M), create a 920 by 12.5px shape, fill it with R=146 G=148 B=151 and place it as shown in the first image.
Switch to the Direct Selection Tool(A) and focus on the left side of this new shape.
Select the top anchor point and move it 35px to the right.
Focus on the right side of this grey shape, select the top anchor point and move it 35px to the left. In the end your shape should look like in the second image.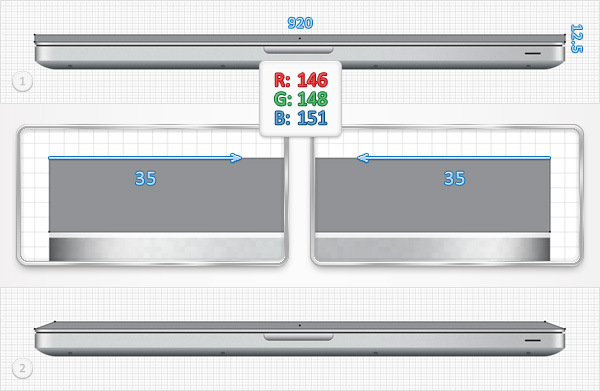
Step 18
Select the shape created in the previous step and go to Effect > Warp > Bulge. Enter the data shown below, click OK.
Go to Effect > Warp > Arc Upper. Again, enter the properties shown in the following image, click OK.
Go to Effect > Arc > Arc Lower. Once again, enter the data shown below, click OK .
Go to Object > Expand Appearance. Select the resulting shape, make a copy, make it invisible and send it in the bottom of your Layers panel. You’ll need it later.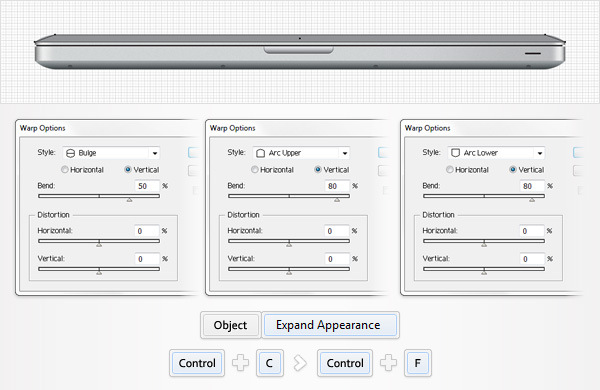
Step 19
Focus on the visible shape made in the previous step, pick the Mesh Tool(U) and add two mesh points (circled) as shown below.Once again, the Snap to Grid will ease your work.
Pick the Direct Selection Tool(A), select the four mesh points highlighted in the following image and set their color to R=235 G=235 B=237.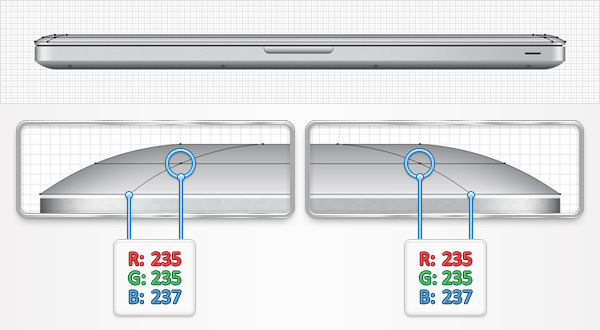
Step 20
Return to the Layers panel and get back to the invisible shape made in the eighteenth step. Make it visible and bring it to front (Shift + Control + ] ).
Fill it with black, lower its opacity to 3%, change the blending mode to Multiply.
Go to Effect > Artistic > Film Grain. Enter the data shown below and click OK.
레이어 패널에 계속 초점을 맞추고 마지막 7 단계에서 만든 다른 5 가지 모양과 함께이 모양을 선택한 다음 그룹화합니다 (Ctrl + G).
https://vectorcove.com/media/2016/133/macBook Pro 일러스트의 폐쇄 버전입니다.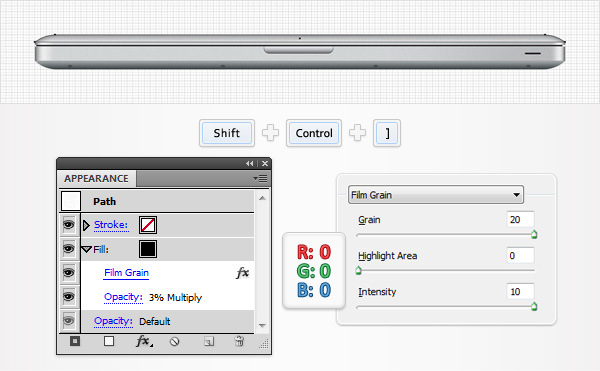
21 단계
이제 열린 버전을 만들어 봅시다. 먼저 [레이어] 패널에 초점을 맞추고 이전 단계의 피날레에서 만든 그룹의 가시성을 끕니다.
직사각형 도구 (M)를 선택하고 다음 그림과 같이 700 x 485px 모양을 만들고 배치하십시오. R = 15 G = 15 B = 15로 채우고 뒤쪽으로 보내십시오 (Shift + Control + [)).
효과> 스타일> 둥근 모서리로 이동하십시오. 반경 15pt를 입력하고 확인을 클릭하십시오.
오브젝트> 모양 확장으로 이동하십시오.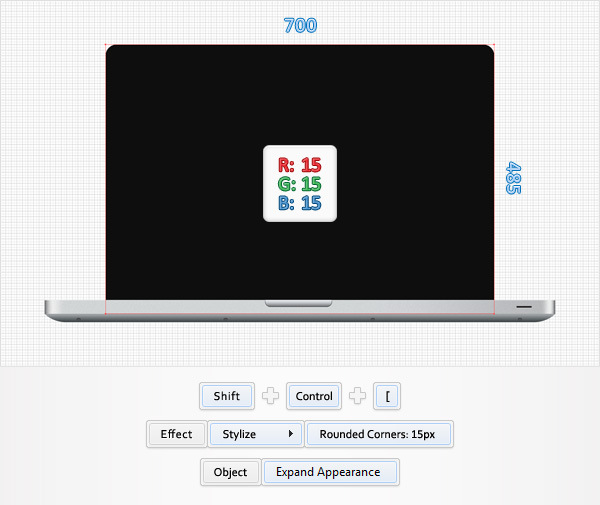
22 단계
이전 단계에서 작성한 모양을 다시 선택하고 모양 패널에 초점을 맞 춥니 다.
1pt 획을 추가하고 안쪽에 정렬하고 R = 109 G = 110 B = 113으로 설정합니다.
Apperance 패널에 계속 초점을 맞추고 Add New Stroke 버튼 (작은 파란색 화살표가 가리키는)을 사용하여이 모양에 대한 두 번째 획을 추가합니다.
이 새로운 선을 선택하고 폭을 1pt로 만들고 바깥쪽으로 정렬하고 R = 65 G = 65 B = 66으로 설정하십시오.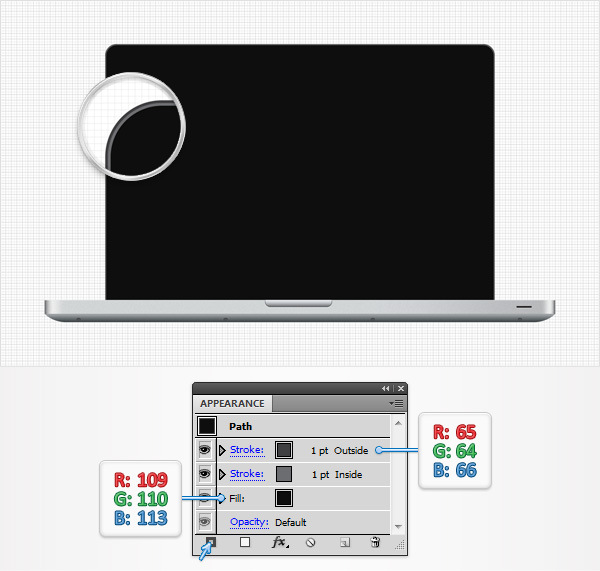
23 단계
사각형 도구 (M)를 선택하고 660 x 412.5 픽셀 모양을 만듭니다. R = 30 G = 30 B = 30으로 채우고 다음 그림과 같이 배치하십시오.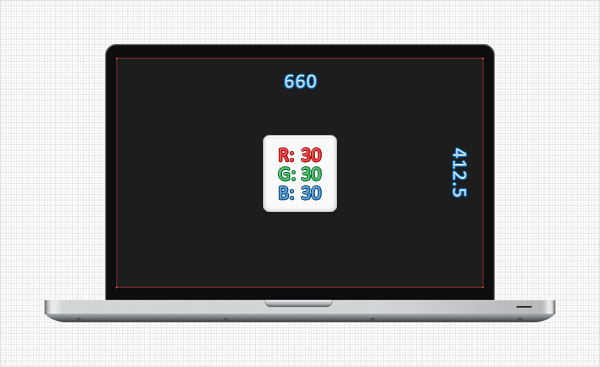
24 단계
직사각형 툴 (M)을 선택하고 10px 스퀘어를 만들고 아래 그림과 같이 배치합니다. 아래에 표시된 선형 그래디언트로 채 웁니다.
효과> 스타일> 둥근 모서리로 이동하십시오. 2x 반경을 입력하고 확인을 클릭하십시오.
모양 패널에 초점을 맞 춥니 다. 1pt 획을 추가하고, 선택하고, 색상을 흰색으로 설정하고, 내부에 정렬하고, 불투명도를 15 %로 낮 춥니 다.
Switch to the Ellipse Tool(L), create a 5px circle and place it as shown in the second image. Fill it with white and lower its opacity to 7%.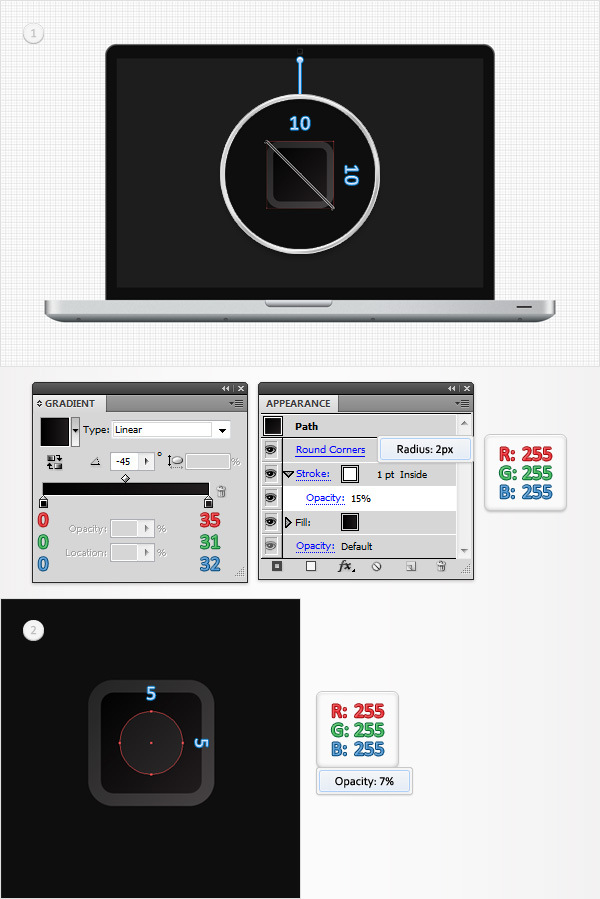
Step 25
Select the dark rectangle created in the twenty-first step and make a copy in front (Control + C > Control + F).
Pick the Rectangle Tool(M), create a 360 by 500px shape, fill it with a random color and place it as shown in the first image.
Switch to the Direct Selection Tool(A), focus on the top side of this new shape, select the left anchor point and move it 230px to the right. In the end your shape should look like in the second image.
Step 26
Select the two shapes created in the previous step and click on the Intersect button from the Pathfinder panel.
Select the resulting shape and go to Object > Path > Offset Path. Enter a -3px Offset and click OK.
원래 모양을 삭제 한 다음 결과 모양을 두 번째 이미지에 표시된 선형 그래디언트로 채 웁니다. 또한 불투명도를 30 %로 낮 춥니 다. 그라디언트 이미지의 노란색 0은 불투명도 백분율을 나타냅니다.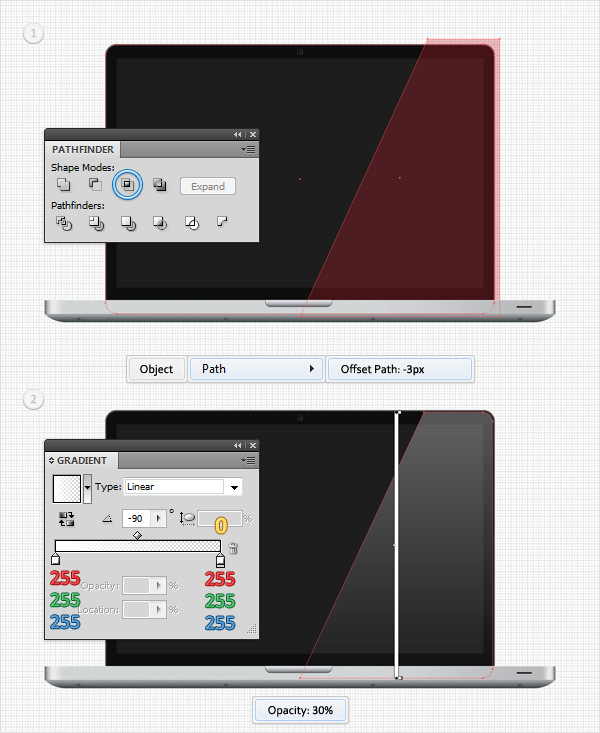
27 단계
어두운 화면을 간단한 화면 이미지로 쉽게 대체 할 수 있습니다.
Ai 파일 안의 데스크탑 스크린 샷을 드래그하여 선택하고 변형 패널 (윈도우> 변형)을 엽니 다. 너비 상자에 660을 입력하고 높이 상자에 412,5를 입력하십시오.
이제이 이미지를 23 번째 이미지에서 생성 된 사각형 위에 배치하십시오. 레이어 패널에 초점을 맞추고이 이미지를 이전 단계에서 만든 모양 아래로 드래그합니다.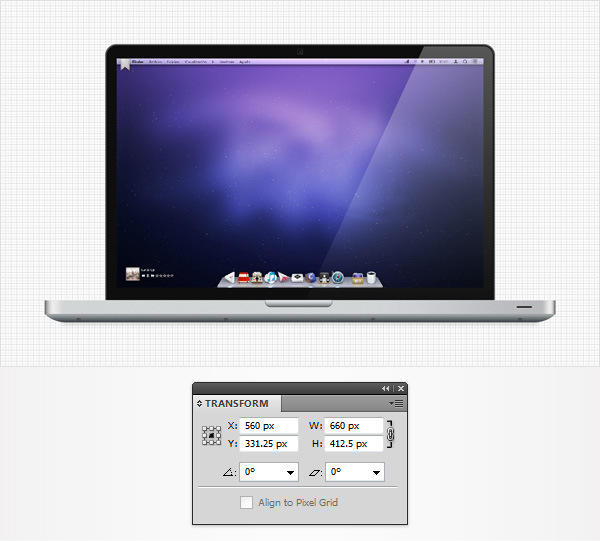
28 단계
사각형 도구 (M)를 선택하고 8x5x 모양을 만들어 검정색으로 채 웁니다. 다음 그림과 같이 배치하고 뒤쪽으로 보냅니다 (Shift + Control + [)).
Go to Effect > Stylize > Rounded Corners. Enter a 5px radius, click OK.
Go to Effect > Blur > Gaussian Blur. Enter a 4px radius, click OK.
Focus on the Layers panel and lock this blurred shape to make sure that you don’t accidentally select/move it.
Select the shapes highlighted in the second image (shapes created between step 2 to step 6) and group them (Control + G).
Select this new group and go to Object > Transform > Reflect. Check the Horizontal button and click on the Copy button. This will create a vertically flipped copy of your group. Select it and move it down as shown in the third image.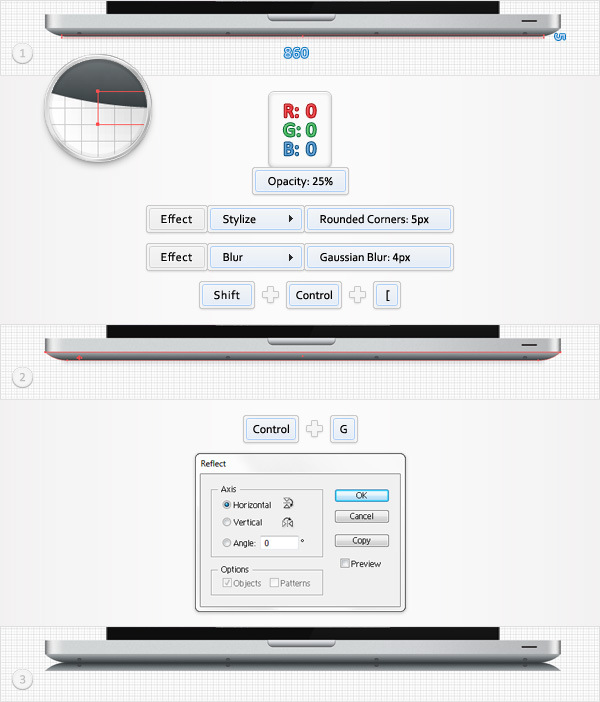
Step 29
Reselect the group created in the previous step and make a copy in front (Control + C > Control + F).
이 새 그룹을 선택하고 패스 파인더 패널에서 연합 버튼을 클릭하십시오. 결과 모양을 두 번째 이미지에 표시된 선형 그래디언트로 채 웁니다.
반전 된 그룹과 함께이 모양을 선택하고 투명도 패널로 이동하십시오. 플라이 아웃 메뉴를 열고 불투명 마스크 만들기를 클릭 한 다음 클립 상자의 선택을 취소하십시오.
마지막으로 마스크 된 그룹을 선택하고 불투명도를 50 %로 낮 춥니 다.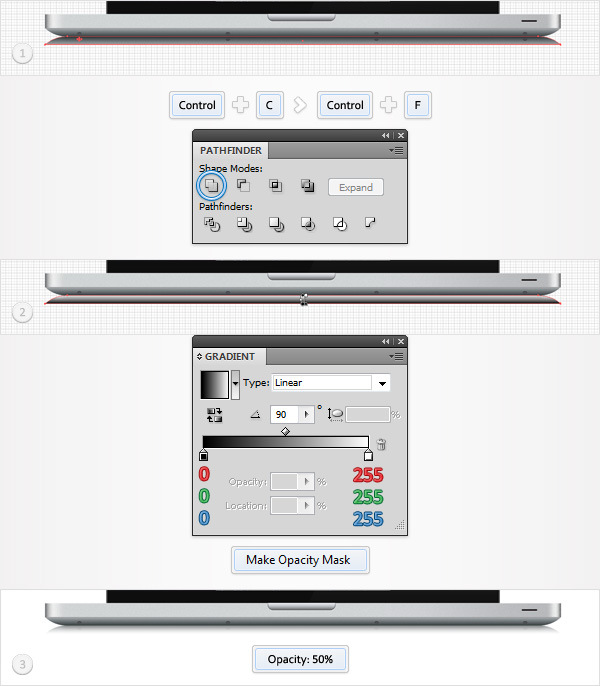
결론
최종 결과가 어떻게 표시되는지 알려드립니다.
'디자인 > 무료 디자인 자습서' 카테고리의 다른 글
| [일러스트] 맛있는 피자 일러스트 만드는 방법 (0) | 2018.06.06 |
|---|---|
| [일러스트] 칠판 메뉴판 그리기 (0) | 2018.06.06 |
| [일러스트] 귀여운 유니콘을 그리는 방법 (0) | 2018.06.05 |
| [일러스트] 아이스크림 콘 일러스트를 만드는 방법 (0) | 2018.06.05 |
| [일러스트] 수채화 느낌 고양이 그리는 방법 (0) | 2018.06.04 |
| [일러스트] 푸드트럭 아이콘 그리는 방법 (0) | 2018.06.04 |
| [일러스트] 물총 일러스트 그리는 방법 (0) | 2018.06.04 |
| [일러스트] 수채화 꽃 화환 만들기 (0) | 2018.06.03 |


댓글