
이 자습서를 따라 Adobe Illustrator에서 벡터 아이스크림 콘을 만드는 방법을 배웁니다.
우리는 콘과 와플 패턴의 모양으로 시작할 것이고, 그 후에 우리는 3 가지 맛의 아이스크림 레이어를 그릴 것입니다 : 초콜렛, 망고, 딸기들. 맛있겠 니? 의 시작하자!
최종 이미지
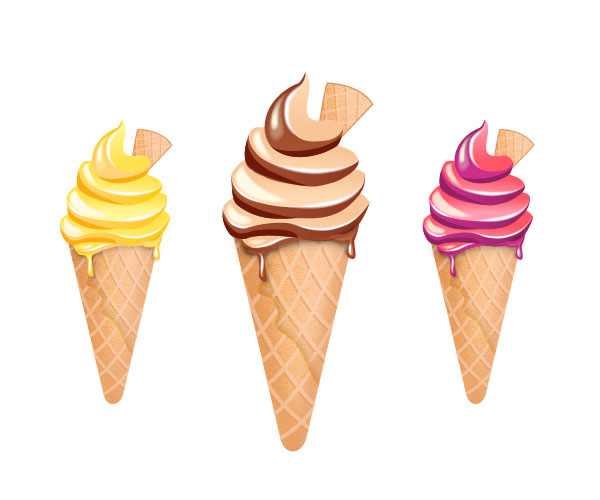
언제나처럼, 이것이 우리가 만들게 될 최종 이미지입니다.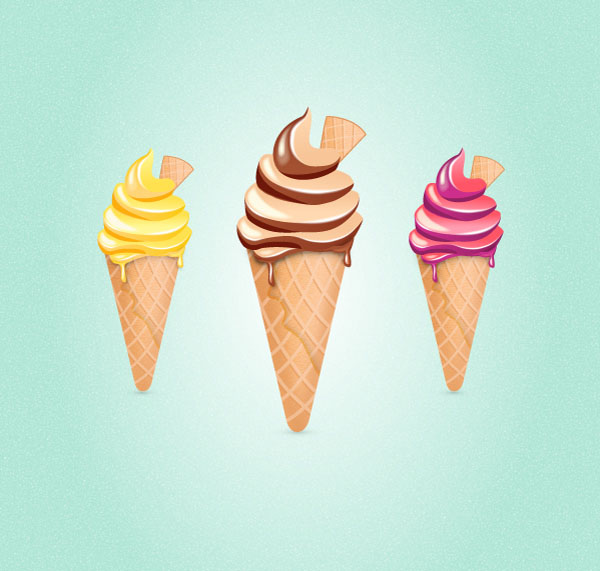
자습서 세부 정보
- 프로그램 : Adobe Illustrator CS5
- 예상 완료 시간 : 1 시간
- 난이도 : 초급 - 중급
1 단계
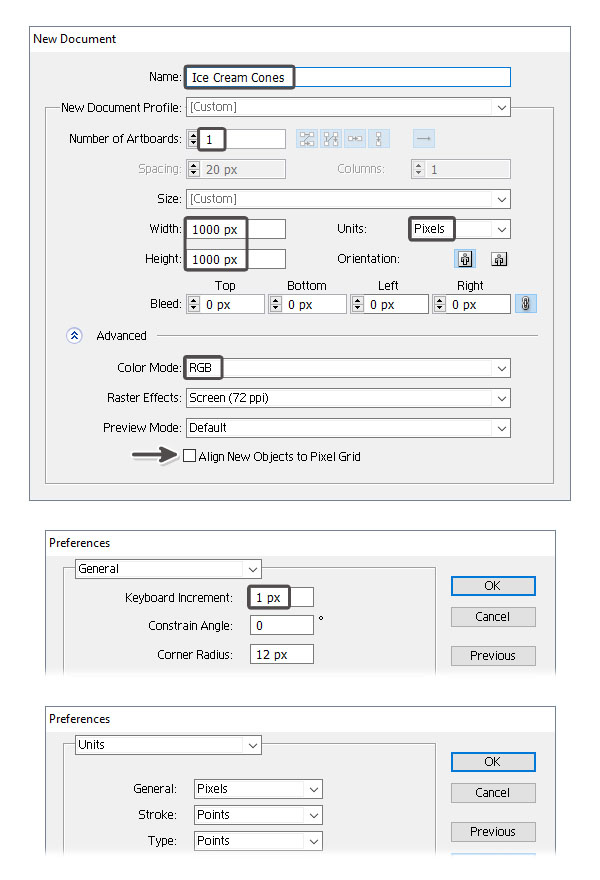
Illustrator를 실행 하고 파일> 새로 만들기 로 이동하여 빈 문서를 엽니 다. 파일의 이름을 입력하고 치수를 설정 한 다음 픽셀 을 단위 로 선택 하고 RGB 를 색상 모드 로 선택하십시오 . 또한 새 개체를 픽셀 격자에 정렬의 선택을 취소하십시오 . 다음으로 이동 > 환경 설정> 일반 편집 및 설정 키보드 증가를 에 1 개 픽셀거기있는 동안, 또한 이동 유닛 그들이 다음과 같은 이미지로 설정되어 있는지 확인합니다. 나는 보통 이러한 설정으로 작업하며 드로잉 프로세스 전반에 걸쳐 도움을 줄 것입니다.
2 단계
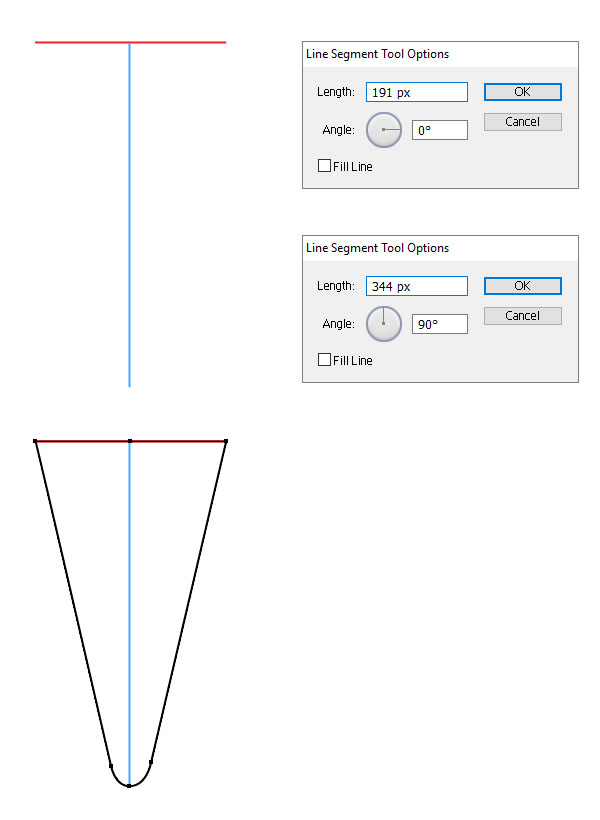
먼저 선분 도구 (\)를 잡으십시오 . 길이 가 191 픽셀 이고 가로 길이가 344 픽셀 인 세로선이있는 가로선을 그 립니다. 이 두 선을 안내선으로 사용하고 다음 그림과 같이 원뿔의 모양을 그립니다.
3 단계
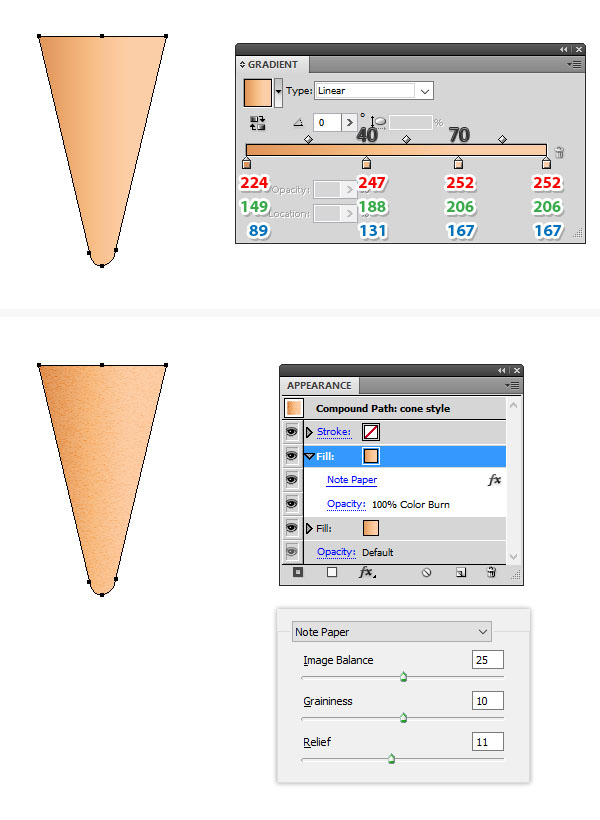
표시된 선형 그래디언트를 사용하여 원뿔 모양을 채 웁니다. 원 추가 선택된 상태에서 Appearance 패널 로 이동하여 Add New Fill 을 눌러 첫 번째 요소 위에 새 Fill 특성을 추가합니다. 기존 그래디언트를 유지 한 다음 효과> 스케치> 노트 용지 로 이동하여 표시된 설정을 적용하십시오. 이 채우기를 혼합 모드 컬러 번으로 설정하십시오 .
4 단계
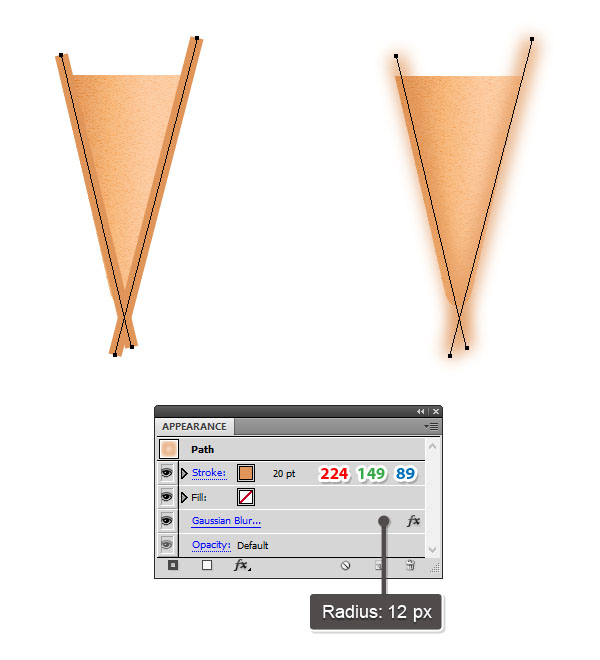
그런 다음 펜 도구 (P) 또는 선분 도구 (\) 를 사용하여 원뿔의 측면을 따라 두 개의 직선 경로를 그립니다. 그들에게 부여 태평양 표준시 02시 스트로크 밝은 갈색 색상을 사용합니다. 경로가 여전히 선택되어 있지만,로 이동 > 흐림 효과> 가우시안 블러 효과 와 적용 반경 의 12 픽셀을 모두.
5 단계
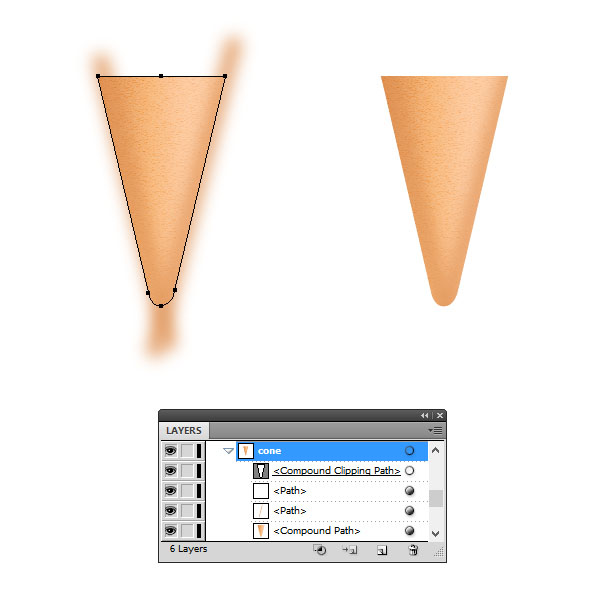
원뿔 모양을 선택한 다음 복사 하여 붙여 넣기 (Shift-Control-V) 를 클릭하여 사본을 가져옵니다. 기존의 모든 모양을 삭제하여이 사본을 획 - 없음 및 채우기 없음으로 설정하십시오. 이제 Artboard에서 모든 것을 선택하고 Object> Clipping Mask> Make (Control-7)로 이동하십시오 .
6 단계
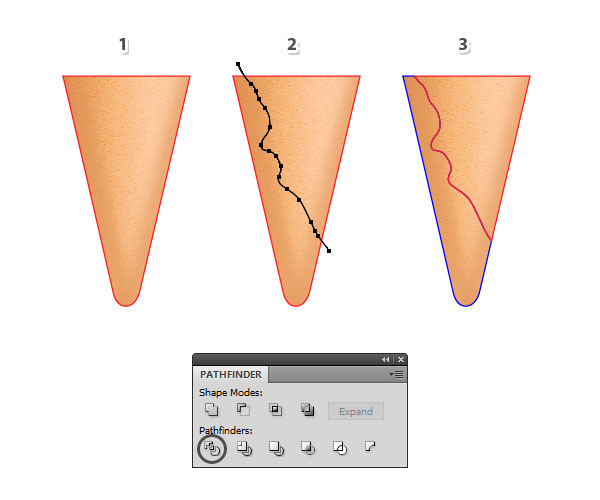
Select the cone shape and then Copy and Paste in Place (Shift-Control-V) again in order to get another copy of it (1). Next, take the Pencil Tool (N) and draw a random wavy path over the cone like in the image below (2). Select the copy of the cone along with the wavy path and press Divide in the Pathfinder panel. As a result you will get two separate shapes (3).
I will name the blue shape “cone-left” and the red shape “cone-right”. Keep handy a few copies of these shapes because you will need them throughout the tutorial.
Step 7
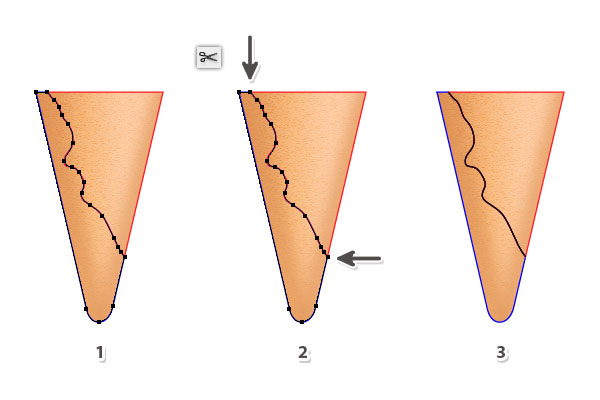
" cone-left "를 선택한 다음 Copy & Paste in Front (Control-F) 를 클릭하여 사본을 얻습니다 (1). 사본이 선택된 상태로 유지되는 동안 가위 도구 (C)를 잡고 표시된 두 개의 앵커 포인트를 클릭하여 모양을 자릅니다. 물결 모양 세그먼트 만 유지하고 필요하지 않으므로 다른 조각을 삭제하십시오 (3).
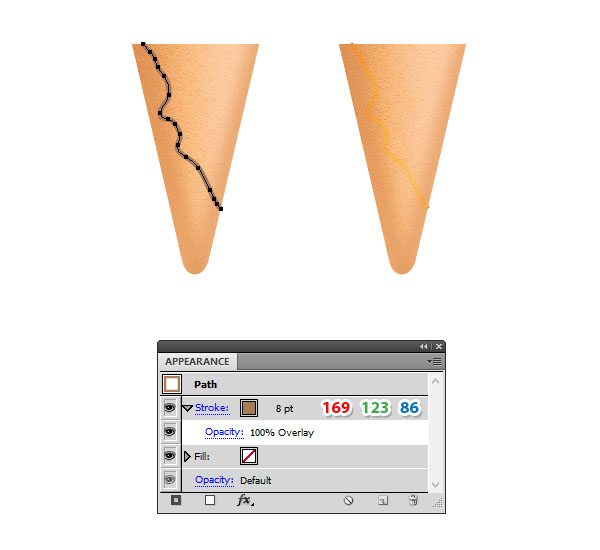
8 단계
이전 단계에서 얻은 경로를 선택하고 갈색을 사용하여 8pt 스트로크 를 지정합니다. 블렌딩 모드 를 오버레이로 설정하십시오 .
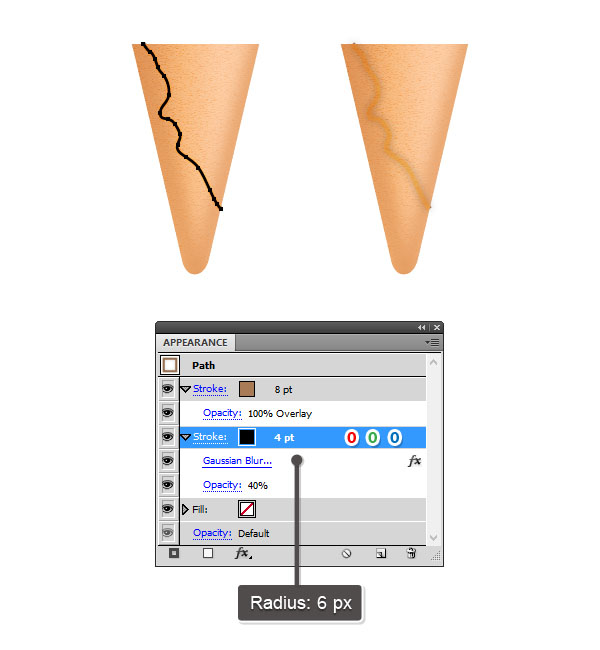
9 단계
물결 모양 경로가 선택된 상태에서 모양 패널 로 이동하여 새 획 추가를 누릅니다 . Weight 를 4pt로 설정하고 색상을 검정색으로 설정 한 다음이 Stroke 속성을 첫 번째 아래로 드래그합니다. 이동 > 흐림> 가우스 블러 효과 및 적용 반지름 의 6 PX를 ; 불투명도 를 40 %로 낮 춥니 다 .
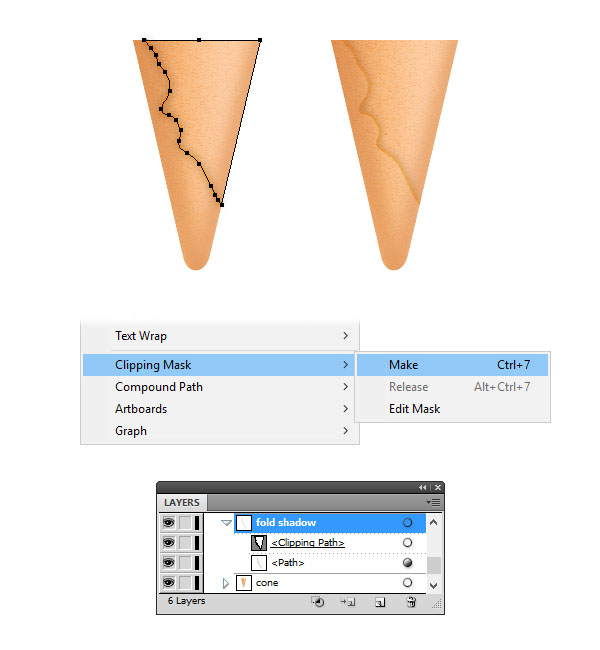
10 단계
가면을 만들어 봅시다. " 콘 오른쪽 "을 선택한 다음 복사 하여 붙여 넣기 (Shift-Control-V) 를 클릭하여 복사본을 가져옵니다. 이 복사본을 획 없음과 채움 없음으로 설정하십시오. 이제이 복사본과 함께 물결 모양의 경로를 선택하고 [ 개체]> [클리핑 마스크]> [만들기 (컨트롤 -7)]로 이동하십시오 . 결과 그룹의 이름을 " 접기 "로 지정할 수 있습니다 .
11 단계
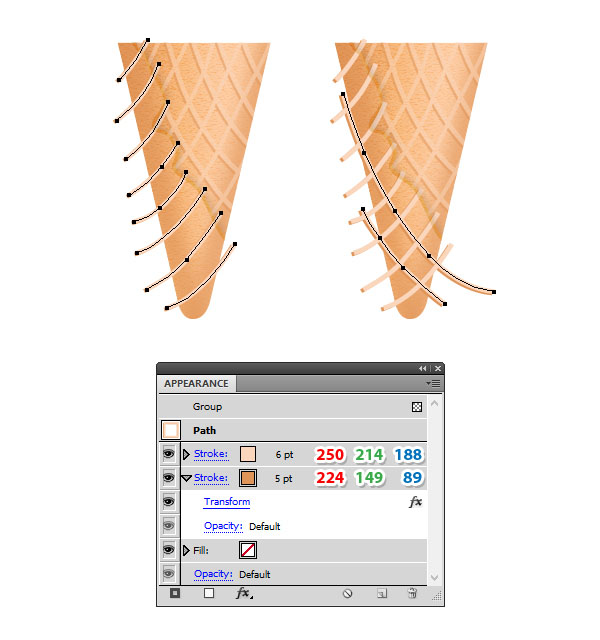
It’s time to create the pattern on the cone. Use the Pen Tool (P) or the Pencil Tool (N) and draw about five curved paths over the “cone-right”. Give them a 6 pt Stroke using the beige color indicated. Press Add New Stroke in the Appearance panel to add a new stroke below the first one. Select a 5 pt Strokeusing light brown; then go to Effect > Distort & Transform > Transform and apply the settings shown below. When you are done, Group (Control-G) these five paths.

Step 12
Next, draw other six curved paths over the “cone-right” but in the opposite direction. Give them a 5 pt Stoke using the beige color indicated. After that, Group (Control-G) these six paths.

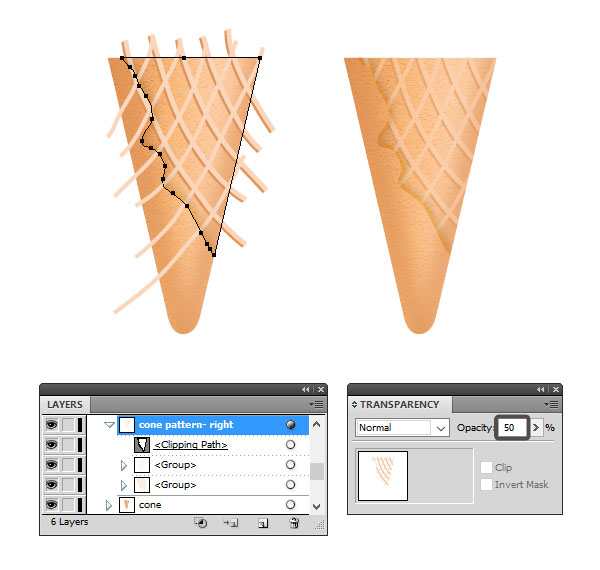
Step 13
At this step you’ll need a copy of the “cone-right”. Set the copy to stroke-none and fill-none and bring it in front of everything by going to Object > Arrange > Bring to Front (Shift-Control-]). Now, select this copy along with the two groups of curved paths and go to Object > Clipping Mask > Make (Control-7). Reduce the Opacity for the resulting group to 50%.
Step 14
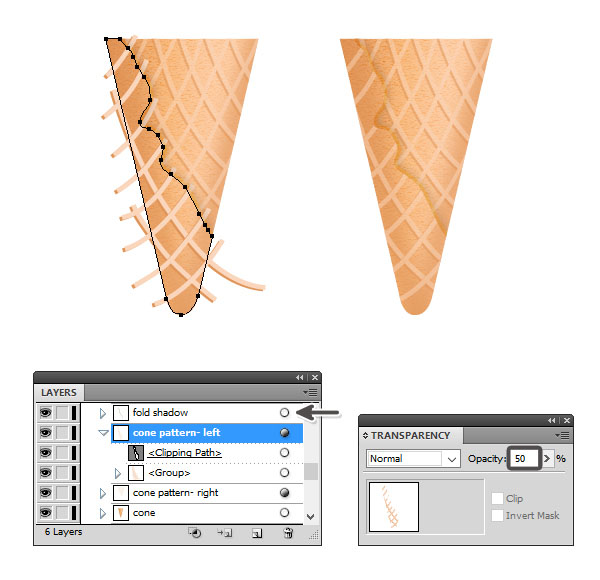
Following the technique explained above, you can now create the pattern on the left side of the cone. Draw the curved paths over the “cone-left” as shown below and use the same settings from earlier. After you are done, Group (Control-G) all these paths.
Step 15
To create the mask, you’ll need a copy of the “cone-left”. Set the copy to stroke-none and fill-none and bring it in front of everything by going to Object > Arrange > Bring to Front (Shift-Control-]). Now, select this copy along with the group of curved paths and go to Object > Clipping Mask > Make (Control-7). Reduce the Opacity for the resulting group to 50%.
이 시점에서 접힌 그림자가 길을 잃어 버렸고 볼 수 없다면 레이어 패널 에서 그룹을 찾은 다음 원뿔 패턴 위로 드래그합니다.
16 단계
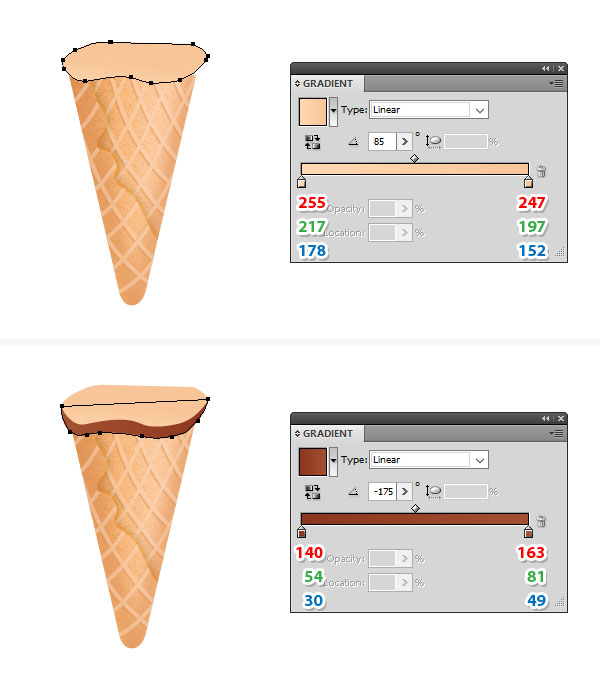
콘이 준비되었습니다. 그래서 초콜릿 아이스크림을 계속합시다. 펜 도구 (P)를 가져 와서 원뿔 위에 아래와 같은 모양을 그립니다. 표시된 선형 그래디언트로 채 웁니다.
다음 모양을 그리고 초콜릿 그라디언트로 채우고 첫 번째 모양 뒤에 보냅니다.
17 단계
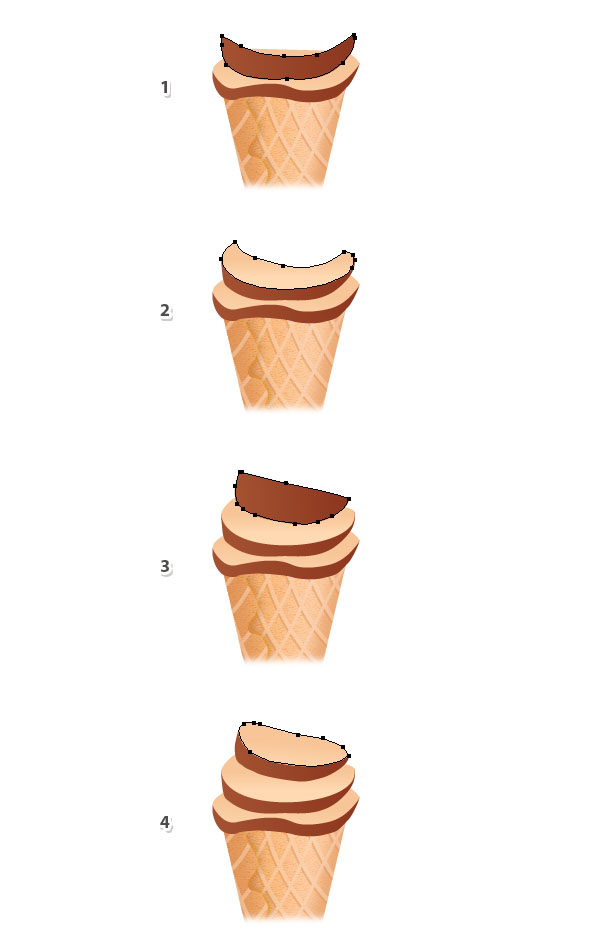
일련의 이미지를 따라 다음 단계의 아이스크림을 그립니다. 시간을 가지십시오.하지만 아이스크림이라는 것을 잊지 마십시오. 너무 정확하지 않아도됩니다.
18 단계
이제 아이스크림 (1-2)의 윗부분을 그리고 그 뒤쪽의 두 가지 모양을 아이스크림이 녹을 바닥에 그립니다 (3-4).
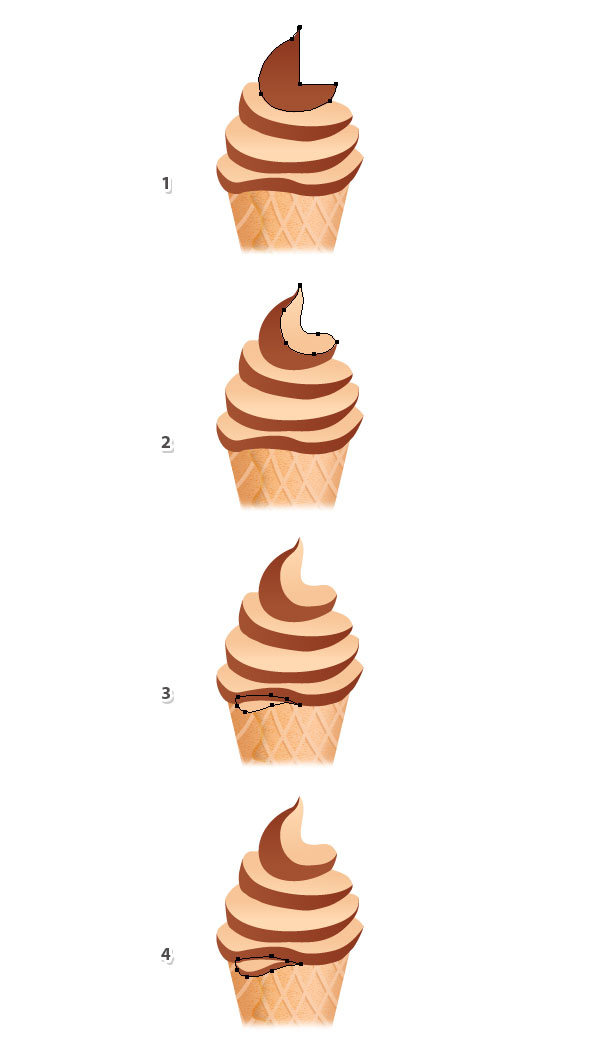
19 단계
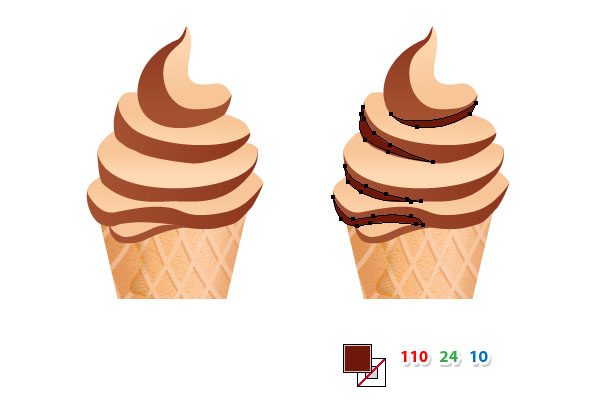
To add some dimension, draw a thinner shape on each layer and use a darker shade of brown to fill the shapes.
Step 20
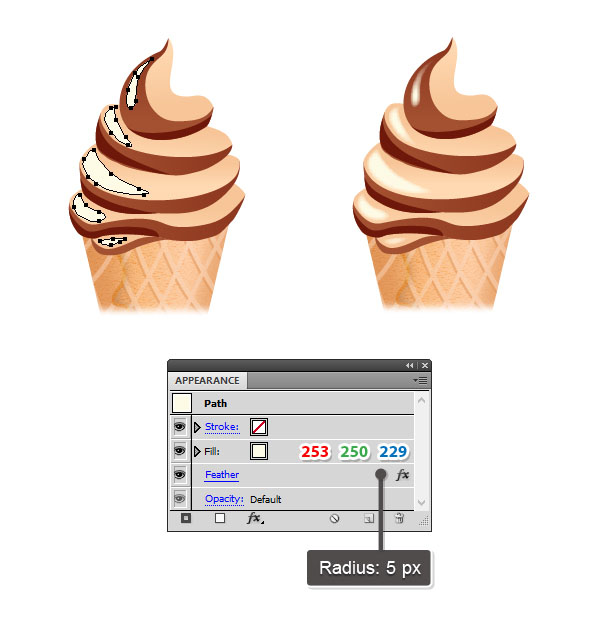
Let’s add some shine. Grab the Pen Tool (P) and draw a moon-like shape on each layer in the left side. Fill these shapes with the color indicated and then go to Effect > Stylize > Feather. Apply a Radius of 5 px for the bigger shapes and 4 px for the smaller shapes.
Step 21
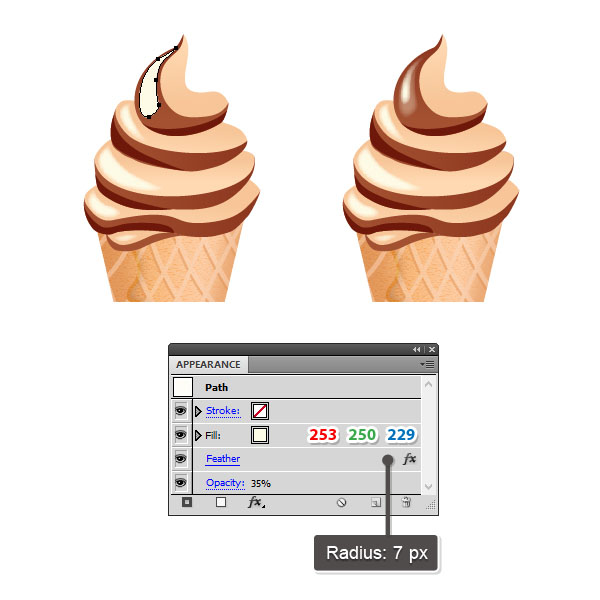
왼쪽에있는 아이스크림 위에 더 큰 모양을 그립니다. 같은 색으로 채 웁니다. 다음으로 이동 효과> 스타일 화> 깃털 과 적용 반경 의 7 픽셀 . 줄이기 불투명도 를 35 % 와 작은 한 뒤에이 모양을 보낼 수 있습니다.
22 단계
사용 펜 도구 (P)를 다음 그림과 같이 오른쪽에 녹는 아이스크림의 모양, 왼쪽에 하나 하나를 그립니다 (1). 상단에 두 개의 유사하지만 약간 작은 모양을 계속 사용하고 채우기 위해 밝은 그라디언트를 사용하십시오 (2). 아래 이미지 (3)에서 최종 결과를 볼 수 있습니다.
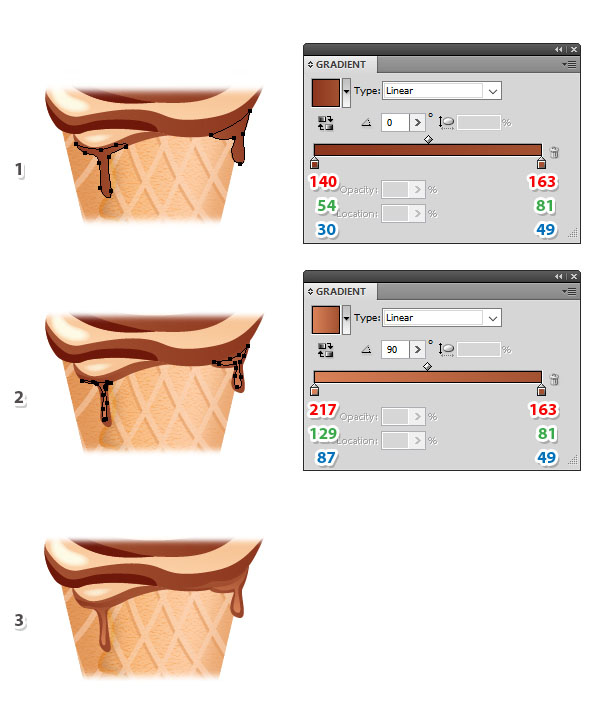
23 단계
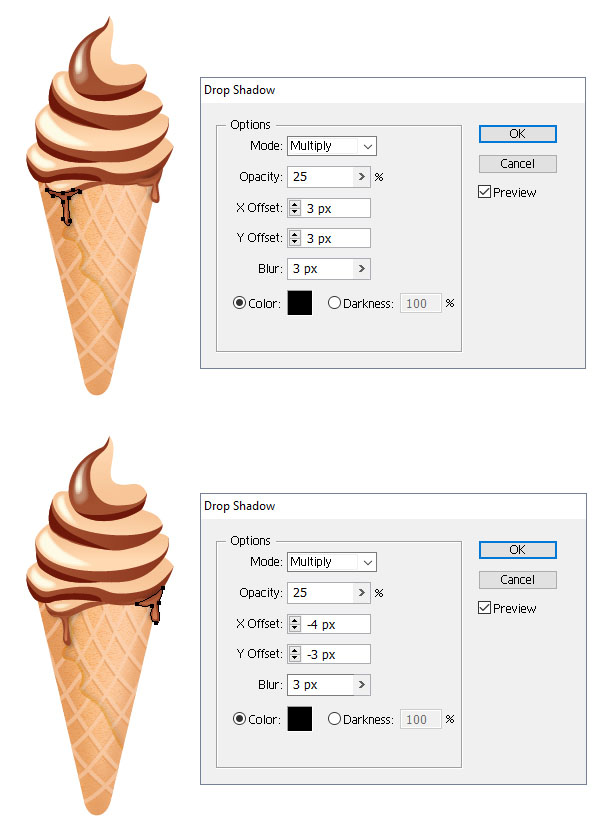
왼쪽의 용융 물방울에 초점을 맞추고 더 큰 모양 만 선택하십시오. 효과> 스타일> 그림자 놓기로 이동하고 표시된 설정을 적용하십시오.
다음으로 오른쪽의 녹는 물방울에 초점을 맞추고 더 큰 모양을 선택하고 표시된 그림자 설정을 사용하여 그림자 효과를 다시 적용하십시오.
24 단계
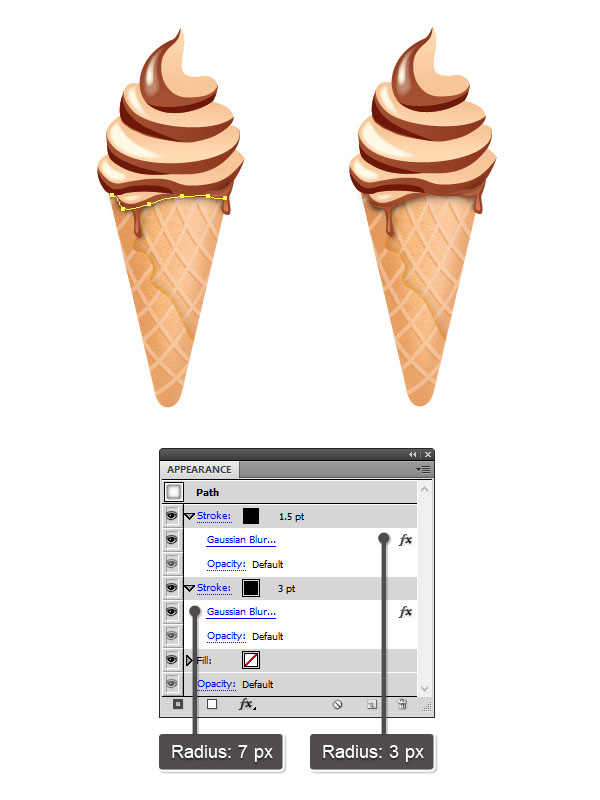
Grab the Pen Tool (P) or the Pencil Tool (N) and draw a path following the bottom edge of the ice cream. Select a 1.5 pt black Stroke and then go to Effect > Blur > Gaussian Blur and apply a Radius of 3 px. Add a New Stroke below the first, select a 3 pt black Stroke and then apply a 7 px Gaussian Blur. Move this path behind the ice cream layers but in front of the cone and you’ll get the shadow underneath.
Step 25
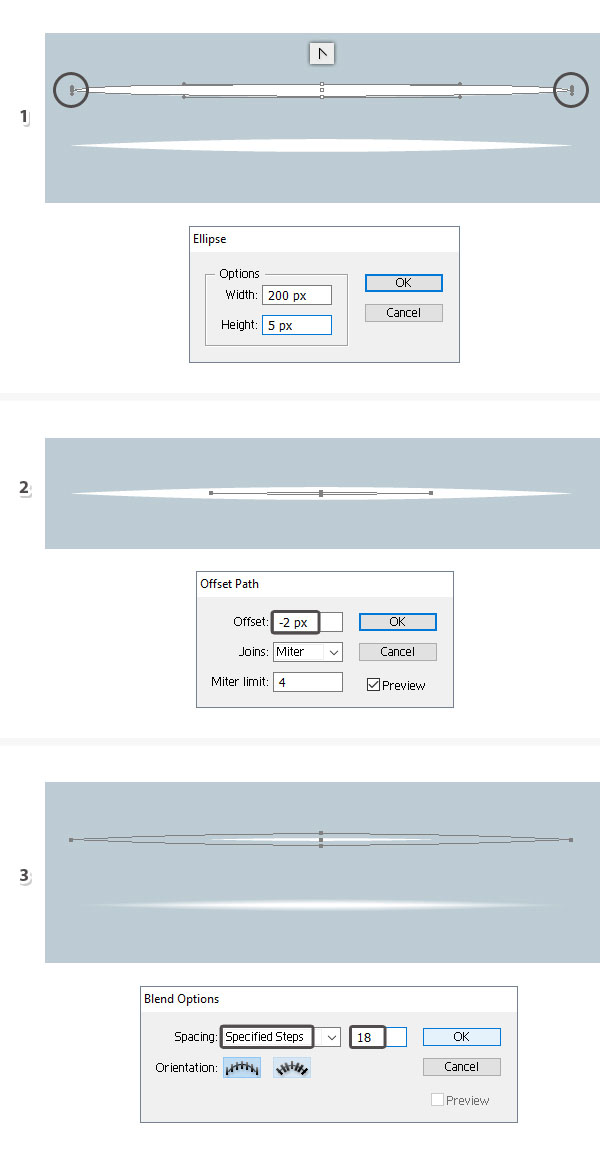
Let’s create a custom Highlight Art Brush. First, take the Ellipse Tool (L) and draw a 200 x 5 px ellipse filled with white. Switch to the Convert Anchor Point Tool (Shift-C) and click once on the two end points in order to remove the handles and to obtain the pointed ends (1).
With the ellipse still selected, go to Object > Path > Offset Path and apply an Offset of -2 px. As a result, you will get a smaller ellipse in the center (2).
Set the Opacity of the bigger ellipse to 0% but keep the Opacity of the smaller ellipse to 100%. Select both shapes, go to Object > Blend > Blend Options and choose 18 Specified Steps. Hit OK and then go back to Object > Blend > Make (Alt-Control-B) (3).
Drag the resulting blend group into the Brushes panel and choose New Art Brush. Type “Highlight Art Brush” as the name, leave the rest of the settings as they are and just hit OK.
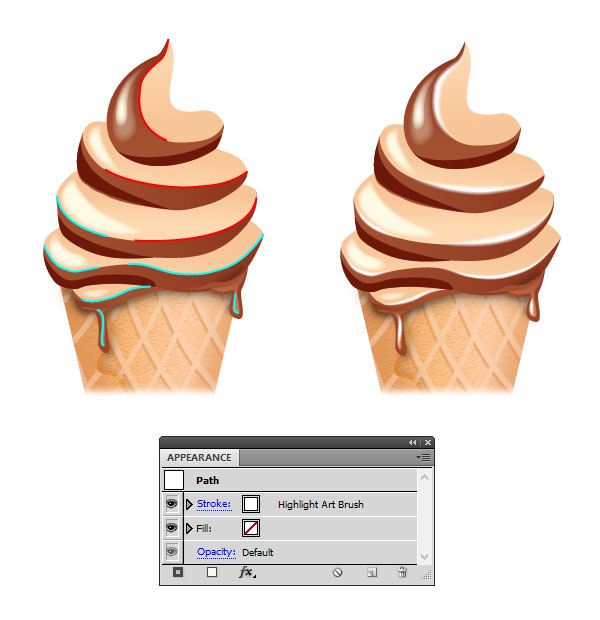
Step 26
Use the Pen Tool (P) or the Paintbrush Tool (B) to draw a few paths following the edge between the ice cream layers and also a path on each melting drop. Stroke these paths with the Highlight Art Brush. Set the Weight to 2 pt for the red paths and to 1 pt for the blue paths. This will add smoothness and extra shine to the chocolate ice cream.
Step 27
At this point the chocolate ice cream cone is ready. You can easily create other delicious ice cream flavors by making a few changes.
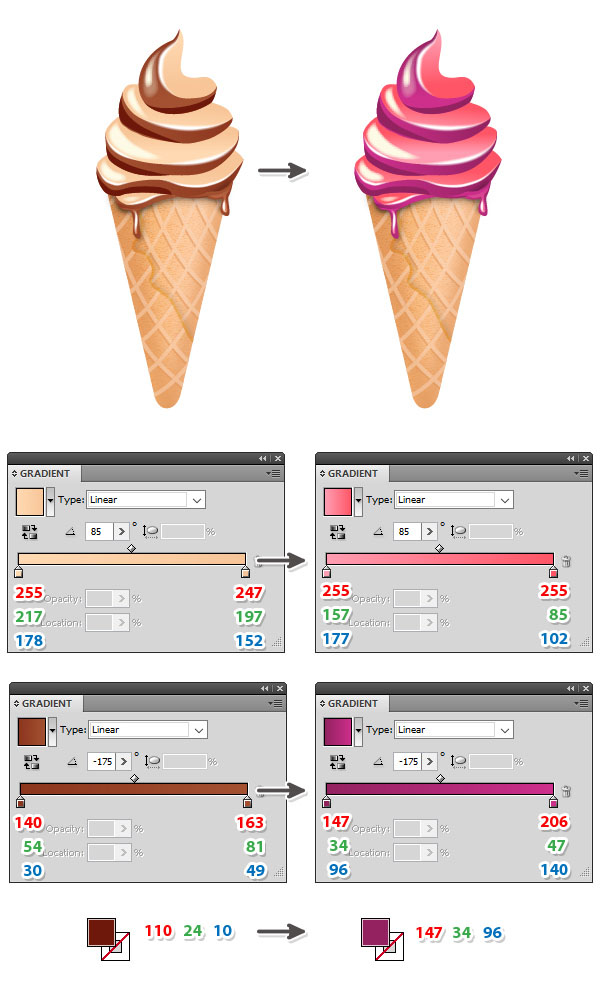
첫째로, 초콜렛 아이스크림 콘의 사본을 만드십시오. 초콜릿 레이어에 사용 된 두 개의 그라디언트를 아래와 같이 분홍색 및 자주색 그라데이션으로 바꿉니다. 완료되면 어두운 갈색으로 채워진 4 개의 얇은 도형을 선택하고 자주색으로 변경하십시오. 방금 딸기 아이스크림 콘을 얻었습니다.
28 단계
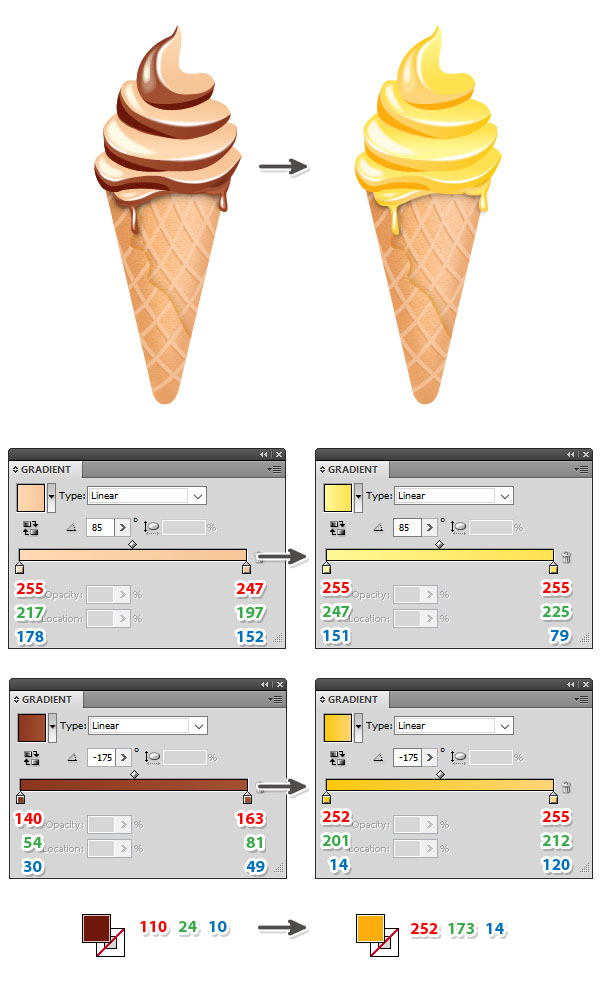
망고 아이스크림 콘을 만들려면 먼저 초콜릿 아이스크림을 하나 더 만듭니다. 두 개의 초콜릿 그라디언트를 새로운 그라데이션으로 바꾸고 짙은 갈색으로 채워진 더 얇은 셰이프는 채우기 색으로 노란색의 어두운 음영을 선택하십시오.
29 단계
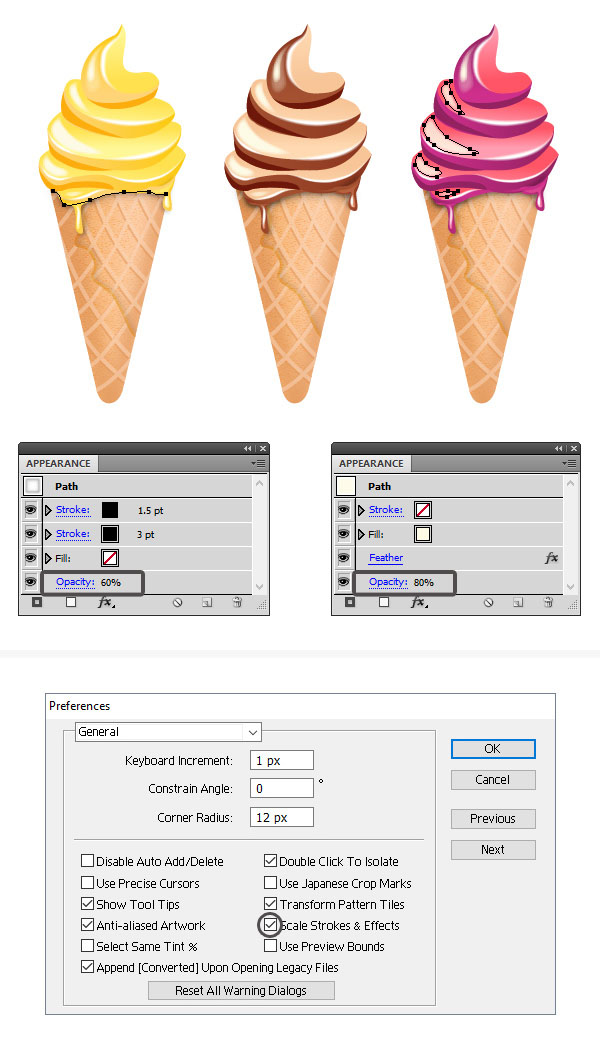
Here are the three ice cream cones. Because the mango ice cream is lighter in color, you can select the shadow-path below the ice cream layers and reduce the Opacity to 60% to make it more discreet. Because the berries ice cream is darker in color, you can select the four shine-shapes and reduce the Opacity to 80% to make them less strong.
If you want to scale the ice cream cones, go to Edit > Preferences > General and make sure that Scale Strokes & Effects is checked before you do so.
Step 30
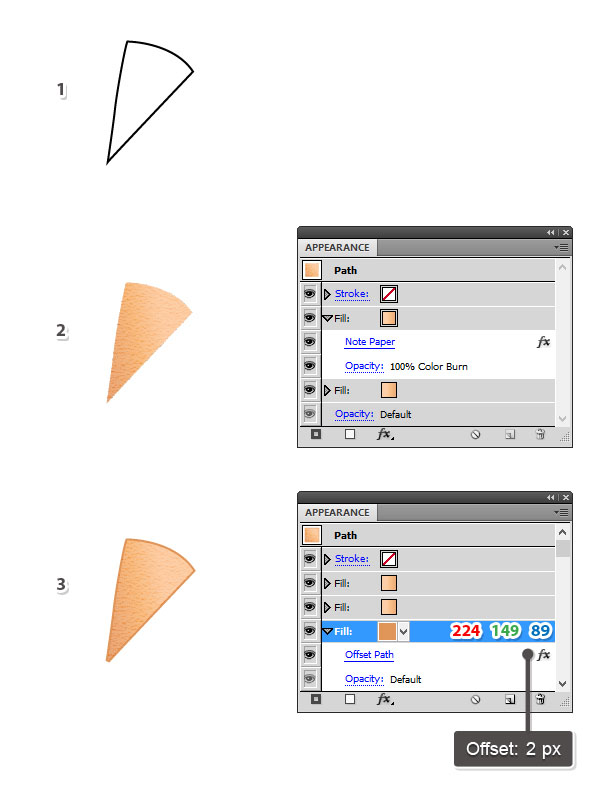
아이스크림 콘을위한 장식으로 와플 조각을 만들 수 있습니다. 먼저 펜 도구 (P) (1) 로 삼각형 모양을 그립니다 . 동일한 그래디언트를 사용하고 원뿔 (2)과 동일한 설정을 적용하십시오. [ 모양] 패널 의 아래쪽에 [ 새 채우기] 를 추가하고 밝은 갈색을 색상으로 사용합니다. [ 효과]> [패스]> [패스 오프셋]으로 이동하여 (2)에서 테두리를 만들려면 [ 2 픽셀 오프셋] 을 적용합니다 .
31 단계
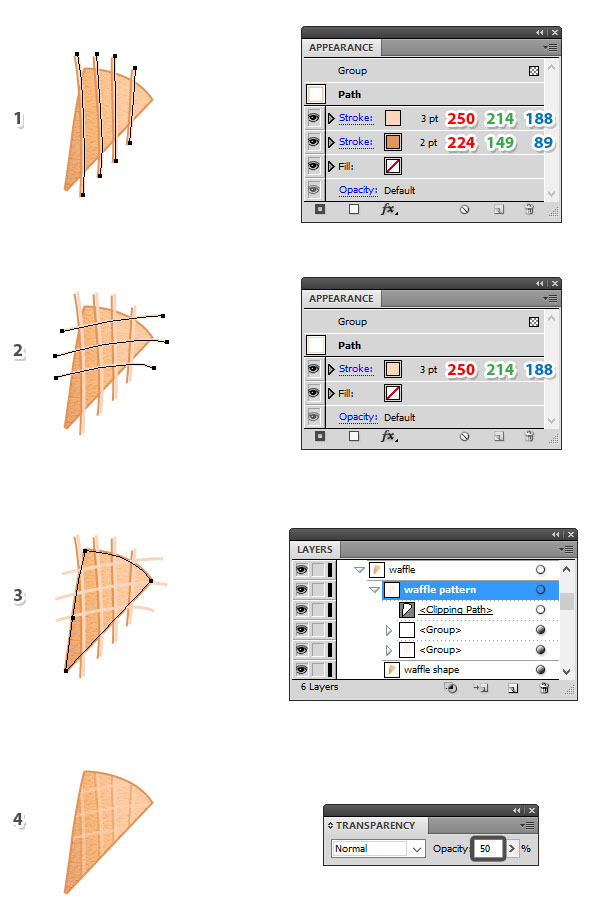
와플에 패턴을 생성하려면 원뿔에 대해 설명한 것과 동일한 기술을 사용하십시오. 와플 위에 선을 그리고 그림 (1-2)의 설정을 사용하십시오. 그런 다음 와플 모양을 선택한 다음 복사 하여 붙여 넣기 (Shift-Control-V) 를 클릭하여 복사본을 가져옵니다. 이 복사본을 획 없음과 채움 없음으로 설정하십시오. 이 복사본을 선 그룹과 함께 선택하고 개체> 클리핑 마스크> 만들기 (컨트롤 -7) (3)로 이동하십시오. 선 그룹의 불투명도 를 50 %로 줄이고 완료되었습니다 (4).
32 단계
아이스크림 옆에있는 와플 조각을 옮기고 뒤에서 보내십시오. 다른 아이스크림 콘에 대해 두 장의 복사본을 만들고 문제없이 크기를 조정할 수 있습니다.
멋진 일!
초콜렛, 망고, 딸기 아이스크림 콘이있는 최종 이미지입니다. 이 튜토리얼을 즐겁게 사용하고 오늘 새로운 것을 배웠 으면합니다. 창의력을 발휘하고 다른 맛있는 향을 만들어보세요. 가능성은 무한합니다.
'디자인 > 무료 디자인 자습서' 카테고리의 다른 글
| [일러스트] 컴퓨터 마우스를 그리는 방법 (0) | 2018.06.06 |
|---|---|
| [일러스트] 맛있는 피자 일러스트 만드는 방법 (0) | 2018.06.06 |
| [일러스트] 칠판 메뉴판 그리기 (0) | 2018.06.06 |
| [일러스트] 귀여운 유니콘을 그리는 방법 (0) | 2018.06.05 |
| [일러스트] 사실적인 MacBook Pro 일러스트레이션 만들기 (0) | 2018.06.05 |
| [일러스트] 수채화 느낌 고양이 그리는 방법 (0) | 2018.06.04 |
| [일러스트] 푸드트럭 아이콘 그리는 방법 (0) | 2018.06.04 |
| [일러스트] 물총 일러스트 그리는 방법 (0) | 2018.06.04 |


댓글