
다음 단계에서는 Adobe Illustrator에서 간단한 스톱워치 그림을 만드는 방법을 배웁니다. 처음에는 문서 준비 방법과 간단한 그리드 설정 방법을 배우게됩니다. 다음으로 기본 도구와 효과를 사용하여 모양 패널과 패스 파인더 패널을 사용하여 스톱워치의 기본 모양을 만드는 방법을 배웁니다. 모양 패널을 최대한 활용하고 여러 변형 및 변형 효과를 사용하여 작은 스톱워치 구성 요소를 만드는 방법과 미묘한 음영 및 강조를 추가하는 방법을 배웁니다. 마지막으로, 스톱워치를 쉽게 색칠하는 방법을 배우게됩니다.
자습서 세부 정보
- 프로그램 : Adobe Illustrator CS5 - CC
- 난이도 : 초급 - 중급
- 다루는 주제 : 기본 도구 및 효과, 변형 기법 및 모양 패널, 기본 혼합 및 벡터 모양 작성 기법
- 예상 완료 시간 : 45 분
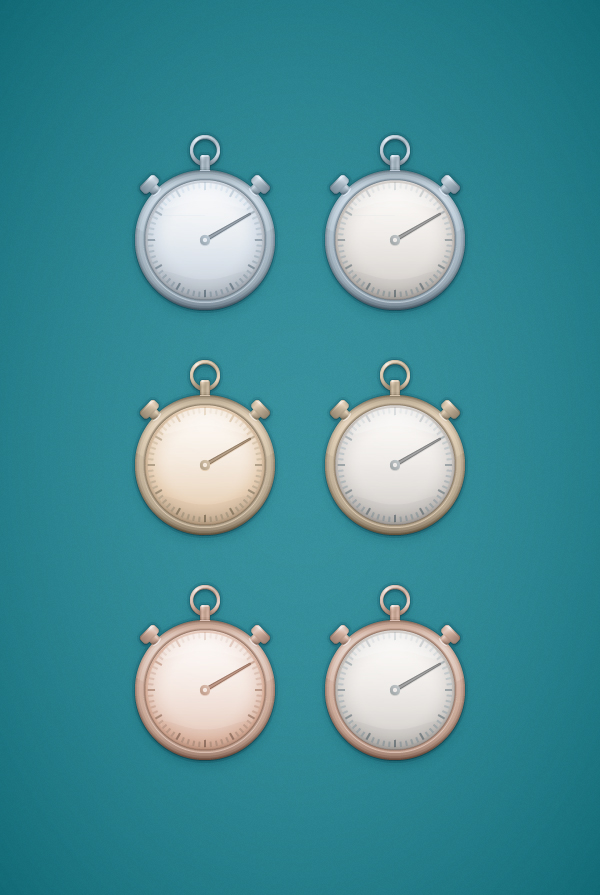
최종 이미지
언제나처럼, 이것이 우리가 만들게 될 최종 이미지입니다.
1 단계
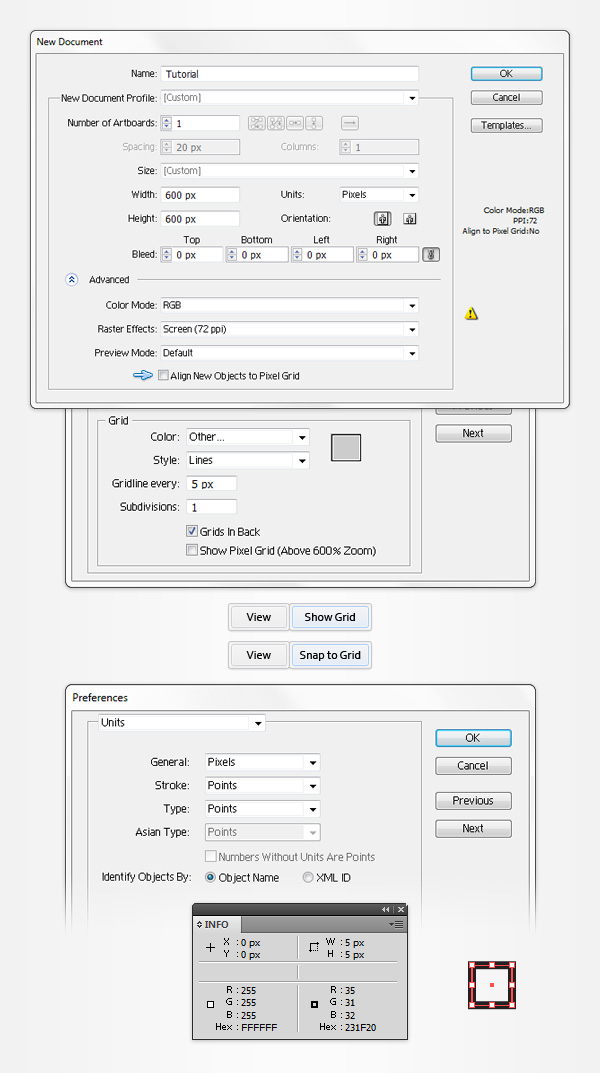
히트 명령 + N을 새 문서를 만들 수 있습니다. 너비와 높이 상자에 600을 입력하고 고급 버튼 을 클릭하십시오 . RGB , Screen (72ppi)을 선택 하고 [ OK]를 클릭하기 전에 [ 픽셀 격자에 새 객체 정렬] 상자가 선택 해제되어 있는지 확인하십시오. 그리드 ( 보기> 그리드 표시 ) 및 그리드 에 스냅 ( 보기> 그리드에 맞추기)을 활성화하십시오 . 5px마다 그리드가 필요하므로 Edit> Preferences> Guides 로 가서 Gridline every 상자에 5를 입력 하고 Subdivisions 상자에 1을 입력하십시오 . [ 정보] 패널 ([ 창]> [정보])를 사용하여 모양의 크기와 위치를 실시간 미리보기 할 수 있습니다. 편집> 환경 설정> 단위> 일반에서 단위 를 픽셀로 설정하는 것을 잊지 마십시오 . 이 모든 옵션을 통해 작업 속도가 크게 향상됩니다.
2 단계
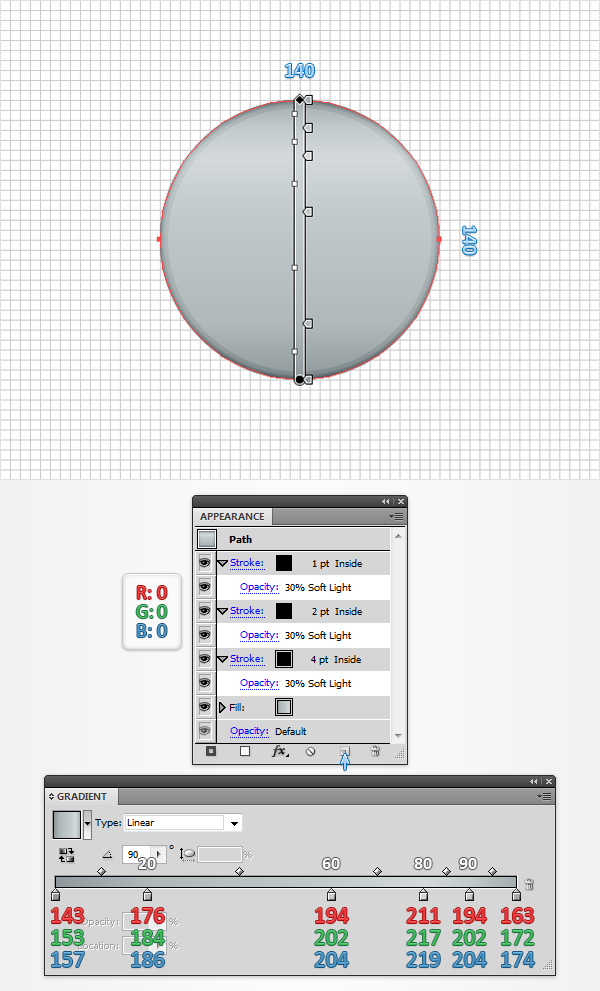
Using the Ellipse Tool (L), create a 140px circle and fill it with the linear gradient shown in the following image. Make sure that this new shape stays selected and focus on the Appearancepanel (Window > Appearance). Add a 4pt stroke and select it. Set the color at black, align it to inside, lower its Opacity to 30% and change the Blending Mode to Soft Light. Keep focusing on the Appearance panel, make sure that the stroke is still selected and simply click the Duplicate Selected Item button (pointed by the little, blue arrow in the following image). This should add a copy of the selected stroke. Select this new stroke, and simply decrease the weight from 4pt to 2pt. Select this 2pt stroke, and duplicate it using that same Duplicate Selected Item button. Select this third stroke, and simply set the weight at 1pt. The white numbers from the Gradientimage stand for Location percentage.
Step 3
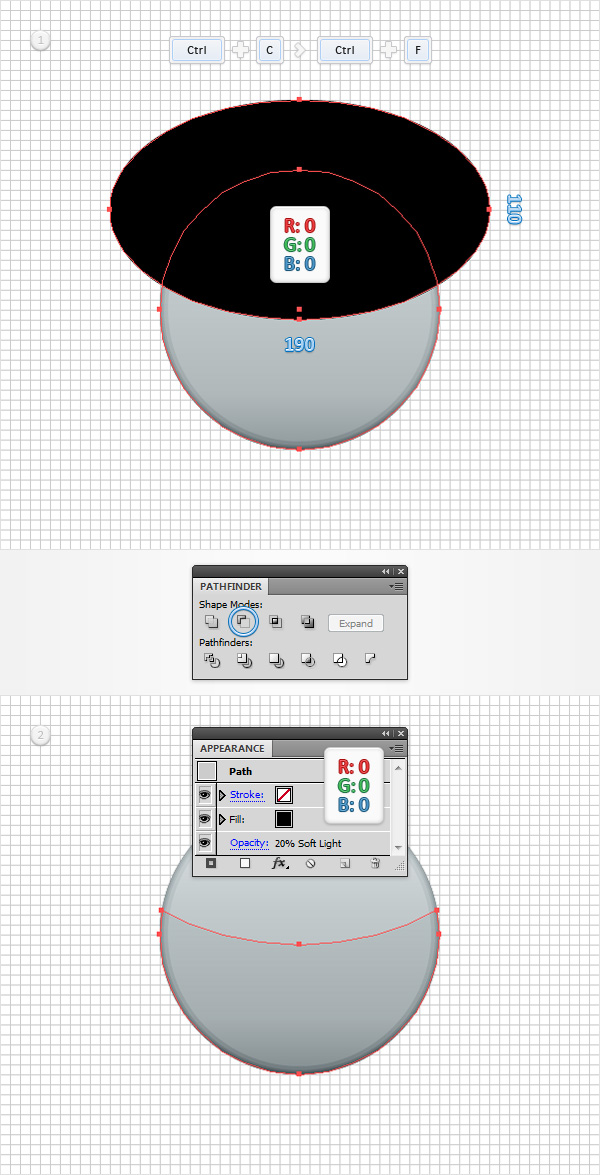
Make sure that your 140px circle is still selected and make a copy in front (CTRL + C > CTRL + F). Using the Ellipse Tool (L), create a 190 x 110px shape, fill it with black and place it as shown in the first image. Select this new shape along with the copy made in the beginning of the step, open the Pathfinder panel (Window > Pathfinder) and click the Minus Front button. Select the resulting shape, and focus on the Appearance panel. First, select the three stroke and simply remove them. Next, select the fill. Replace the existing linear gradient with a simple black, lower its Opacity to 20%혼합 모드 를 부드러운 빛으로 변경하십시오 .
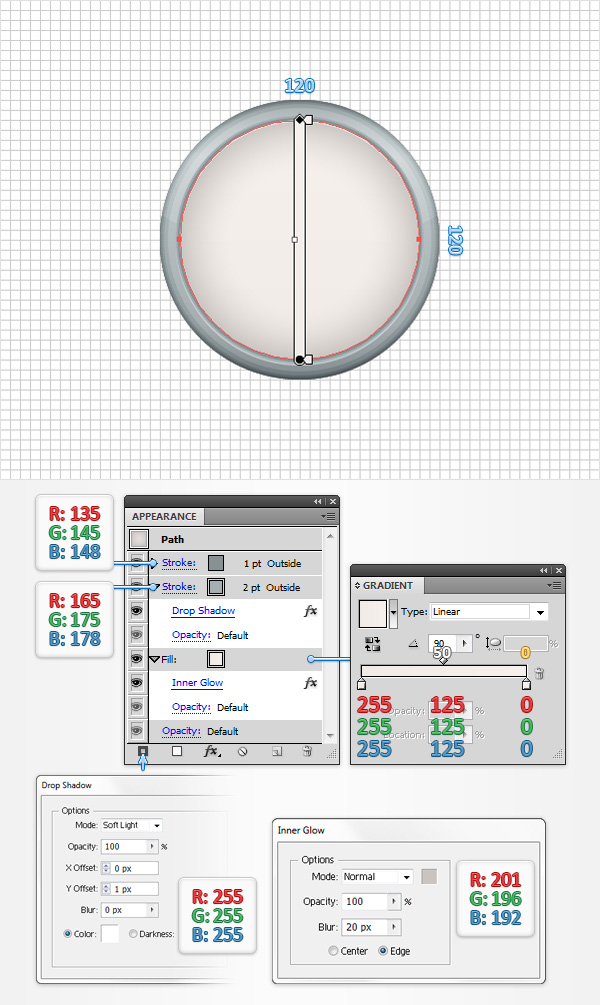
4 단계
은 Using 타원 도구 (L) , 크리에이트 120 픽셀 , 원을 아래와 같이 선형 그라데이션을 채우고 다음 이미지와 같이 배치. 이 새 모양을 선택한 상태로 유지하고 모양 패널 에 초점을 맞 춥니 다 . 먼저 채우기를 선택하고 [ 효과]> [스타일]> [내부 광선]으로 이동합니다 . 다음 그림에 표시된 등록 정보를 입력하고 확인을 클릭하십시오. [ 모양] 패널로 돌아와 2pt 획을 추가합니다. 그것을 선택하고 R = 165 G = 175 B = 178 에서 색상을 설정하고 바깥쪽으로 정렬하고 효과> 스타일> 그림자 제거로 이동하십시오 . 다음 그림에 표시된 등록 정보를 입력하고 확인을 클릭하십시오. 외모로 돌아 가라.새로운 스트로크 추가 단추 (다음 그림의 작은 파란색 화살표가 가리키고 있음)를 사용하여 두 번째 획을 추가하십시오 . 이 새로운 획을 선택하고 폭을 1pt로 만들고 R = 135 G = 145 B = 148에 색상을 설정하고 바깥쪽으로 정렬되었는지 확인하십시오.
5 단계
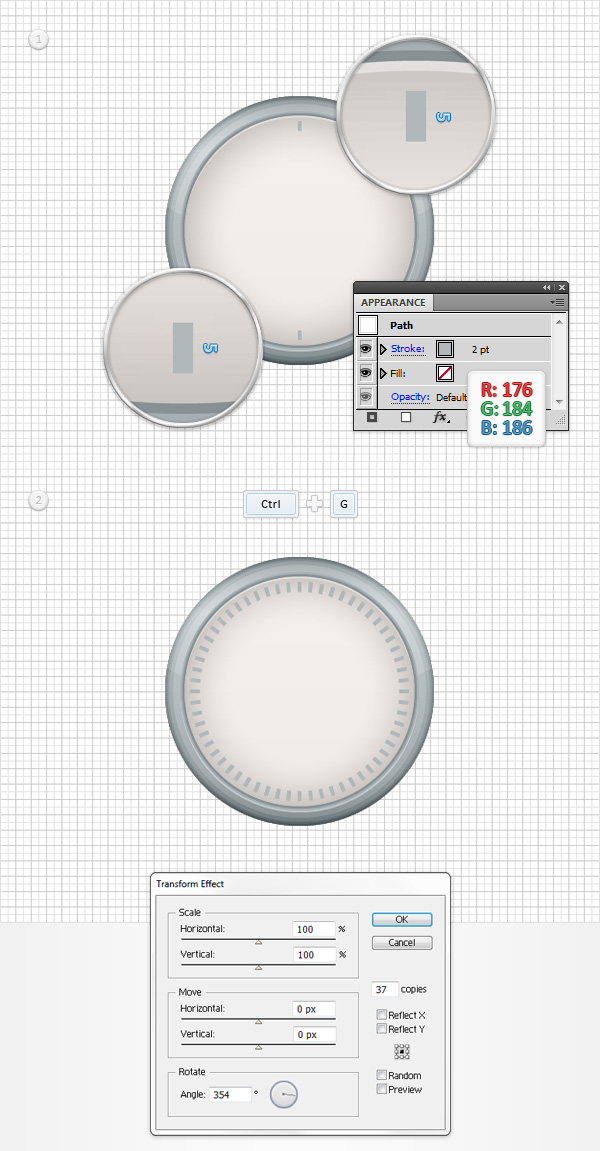
For this step you will need a grid every 1px, so go to Edit > Preferences > Guides & Grid and enter 1 in the Gridline every box. Using the Pen Tool (P), create a 5px, vertical path, add a 2pt stroke and set its color at R=176 G=184 B=186. Duplicate this new shape (CTRL + C > CTRL + F). Place these tiny, new paths as shown in the first image then Group them (CTRL + G). Make sure that this new group is selected and go to Effect > Distort & Transform > Transform. Enter the properties shown in the following image and click OK.
Step 6
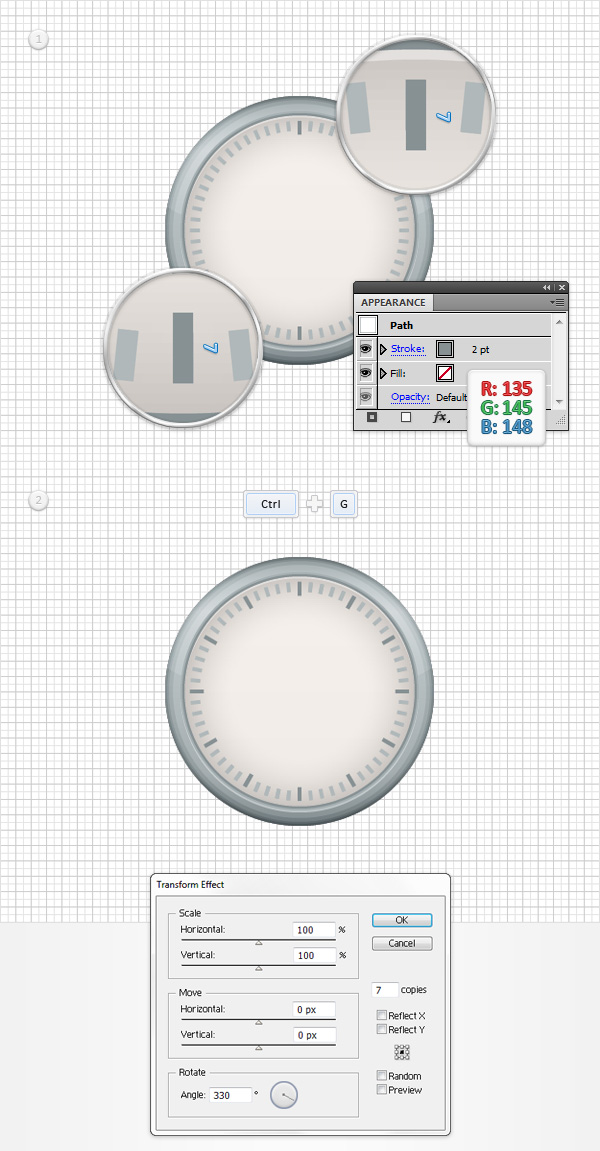
Using the Pen Tool (P), create a 7px, vertical path, add a 2pt stroke and set its color at R=135 G=145 B=148. Duplicate this new shape (CTRL + C > CTRL + F). Place these tiny, new paths as shown in the first image then Group them (CTRL + G). Make sure that this new group is selected and go to Effect > Distort & Transform > Transform. Enter the properties shown in the following image and click OK.
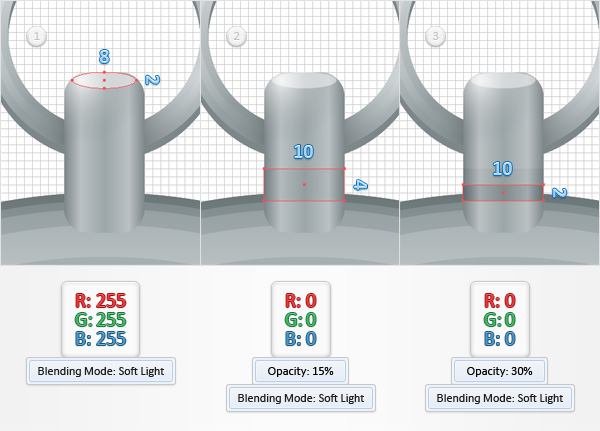
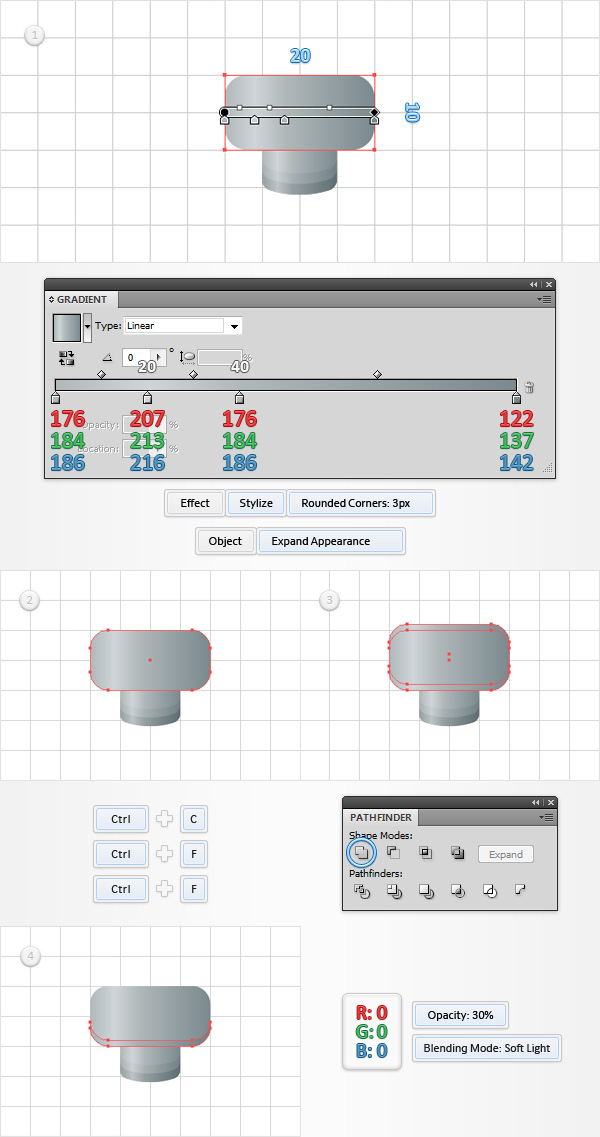
Step 7
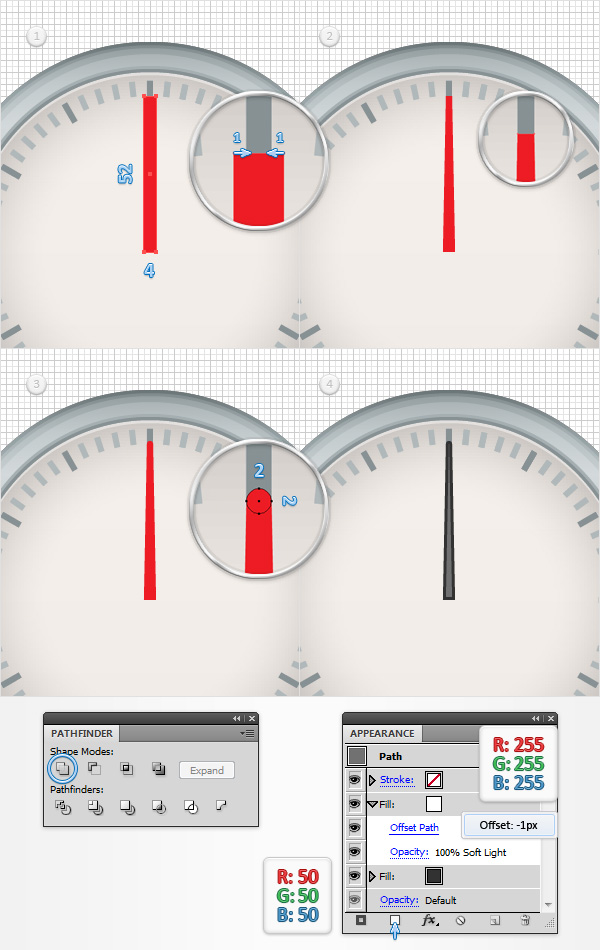
Using the Rectangle Tool (M), create a 4 x 52px shape, fill it with red and place it as shown in the first image. Focus on the top side of this new rectangle and pick the Direct Selection Tool (A). Select the left anchor point and drag it 1px to the right then select the right anchor point and drag it 1px to the left. Switch to the Ellipse Tool (L), create a 2px circle, fill it with the same red and place it as shown in the third image. Select both shapes made in this step and click the Unite button from the Pathfinder panel. Select the resulting shape and replace the red with R=50 G=50 B=50. 이 어두운 모양이 선택되어 있는지 확인하고 모양 패널을 강조 표시 한 다음 새 채우기 추가 단추 (다음 이미지의 작은 파란색 화살표가 가리키고 있음)를 사용하여 두 번째 채우기를 추가하십시오 . 이 새로운 채우기를 선택 흰색의 색상을 설정, 변경 블렌딩 모드 에 부드러운 빛을 및 이동 효과> 경로> 오프셋 경로 . -1px 간격 띄우기를 입력하고 확인을 클릭하십시오.
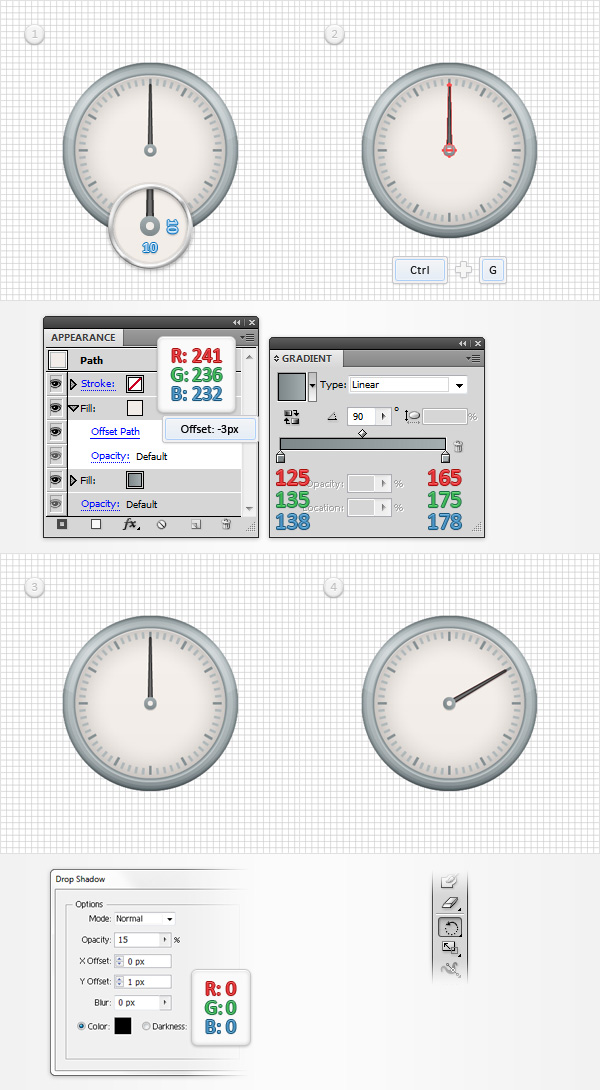
8 단계
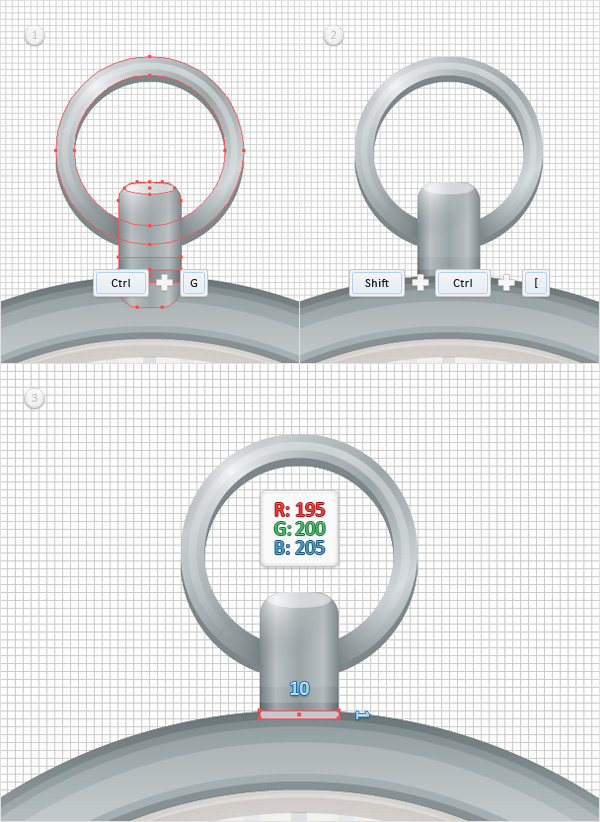
" gridline every 5px "( 으)로 돌아 가기 때문에 편집> 환경 설정> 안내선 및 격자 로 이동하여 모든 격자 선에 5를 입력하십시오. 은 Using 타원 도구 (L) , 크리에이트 10px를 , 원 화상의 다음에 나타낸 선형 그라데이션을 채우고 초점 외관 패널. 이를 선택, 새로운 형상에 대한 제 충전 추가의 색상을 설정할 수 = 241 (236) G = B = R (232) 및 이동 효과> 패스> 오프셋 경로 . -3px 간격 띄우기를 입력하고 확인을 클릭하십시오. 손 모양과 함께이 작은 원을 선택하고 그룹화하십시오 ( CTRL + G ). 이 새 그룹이 선택되어 있는지 확인하고 [ 효과]> [스타일]> [그림자]로 이동하십시오.. 다음 그림에 표시된 등록 정보를 입력하고 확인을 클릭하십시오. 마지막으로 Rotate Tool (R)을 사용하여이 그룹을 쉽게 회전 할 수 있습니다 . 이 도구를 잡고 시계 손 그룹을 선택하고 그 작은 원의 중간에 참조 점을 놓은 다음 시계 버튼을 클릭하여 드래그하면 시계 바늘이 회전합니다.
9 단계
Using the Ellipse Tool (L), create a new 120px circle, fill it wtih the linear gradient shown below and place it as shown in the following image. The yellow zero from the Gradient image stands for Opacity percentage. Make sure that this new shape stays selected and focus on the Appearance panel. First, select the fill, lower its Opacity to 65% and go to Effect > Path > Offset Path. Enter a -3px Offset and click OK. Keep focusing on the Appearance panel and add a 1pt, black stroke. Align it to inside, change the Blending Mode to Soft Light and lower its Opacity to 30%. Add a second stroke for this shape, make it 3px wide, align it to inside, make sure that the color is set at black then lower its Opacity to 20% and change the Blending Mode to Soft Light.
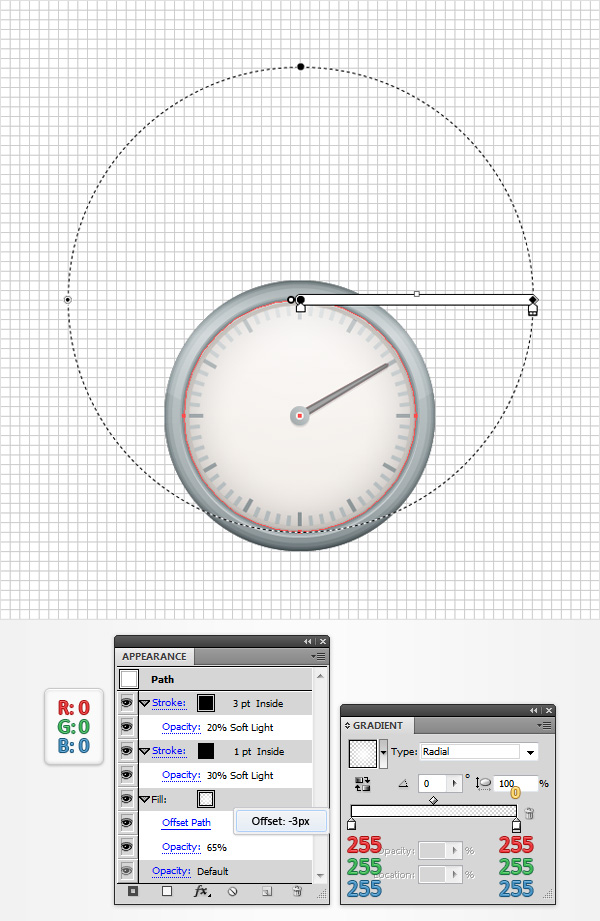
Step 10
Make sure that the shape made in the previous step is still selected and focus on the Appearancepanel. Add a new fill, drag it in the top of the Appearance panel, lower its Opacity to 15% and use the linear gradient shown in the following image. Remember that the yellow zero from the Gradient image stands for Opacity percentage.
Step 11
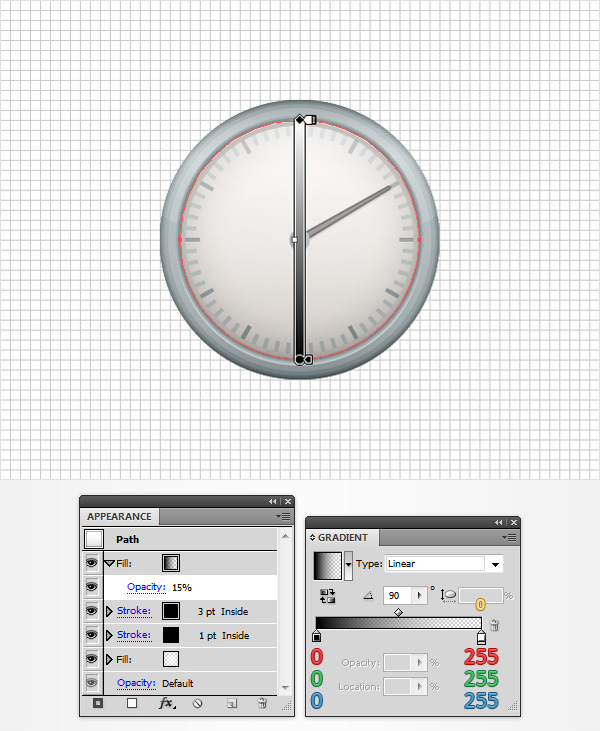
Using the Ellipse Tool (L), create a 70 x 20px shape, fill it with black, place it as shown in the first image, lower its Opacity to 3% and go to Effect > Warp > Arc. Enter the properties shown in the first image and click OK. Make sure that the Ellipse Tool (L) is still active and create a new 70 x 20px shape. Fill it with white, place it as shown in the second image, lower its Opacity to 20% and go again to Effect > Warp > Arc. Enter the properties shown in the second image and click OK.
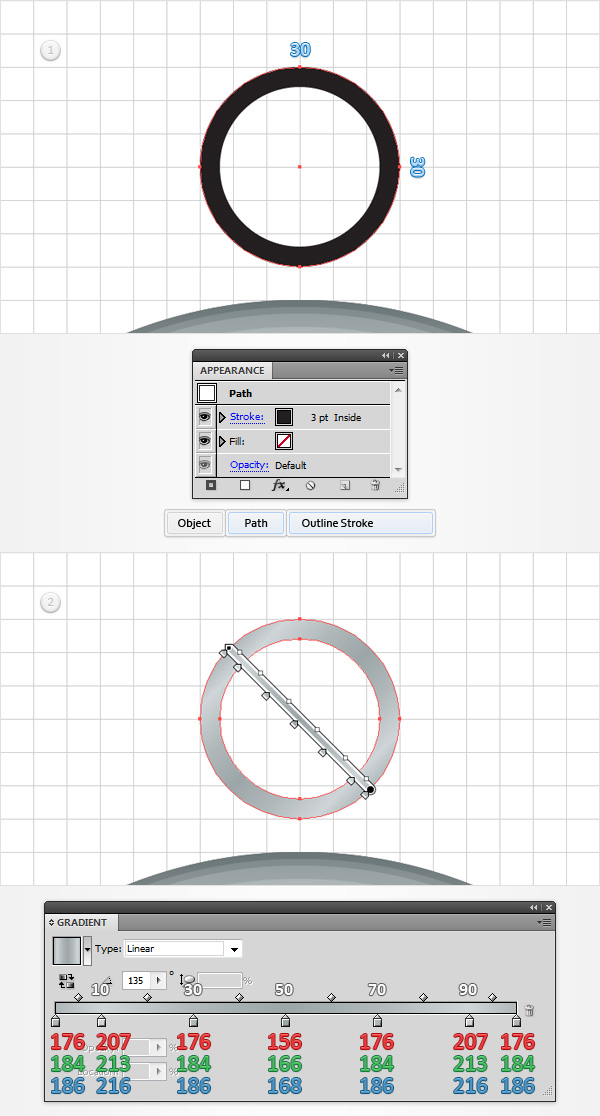
Step 12
Using the Ellipse Tool (L), create a 30px circle and place it as shown in the following image. Make sure that this new shape has no color set for the fill, add a 3pt, black stroke, align it to inside and go to Object > Path > Outline Stroke. Select the resulting shape, focus on the Appearance panel and replace the existing fill color with the linear gradient shown in the following image.
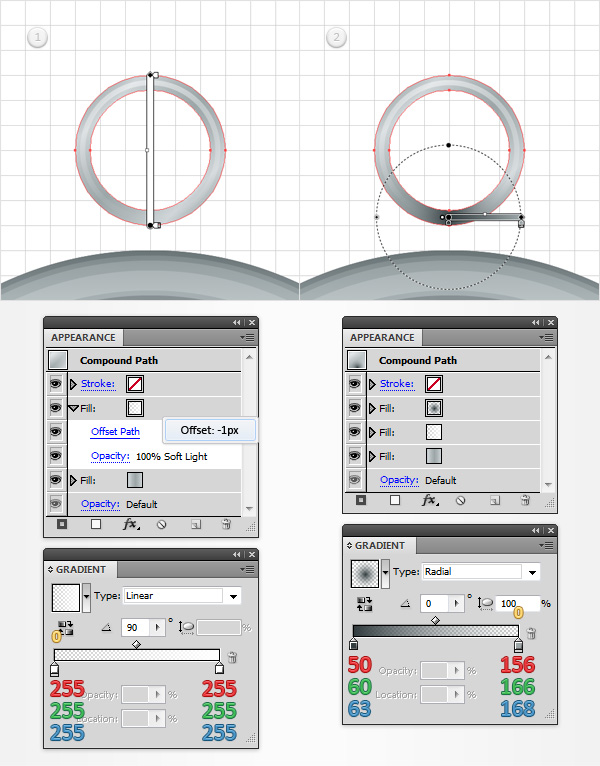
Step 13
이전 단계에서 만든 모양이 선택되어 있는지 확인하고 모양 패널 에 초점을 맞 춥니 다 . 이 경로에 대해 두 번째 채우기를 추가하고 선택합니다. 첫번째 이미지에 도시 된 선형 구배를 사용하여 변경 혼합 모드 에 부드러운 빛을 그리고 이동 효과> 패스> 오프셋 경로 . -1px 간격 띄우기를 입력하고 확인을 클릭하십시오. 로 돌아 모양 패널과이 경로에 대한 세 번째 채우기를 추가합니다. 그것을 선택하고 두 번째 이미지에 표시된 방사형 그래디언트를 추가하기 만하면됩니다.
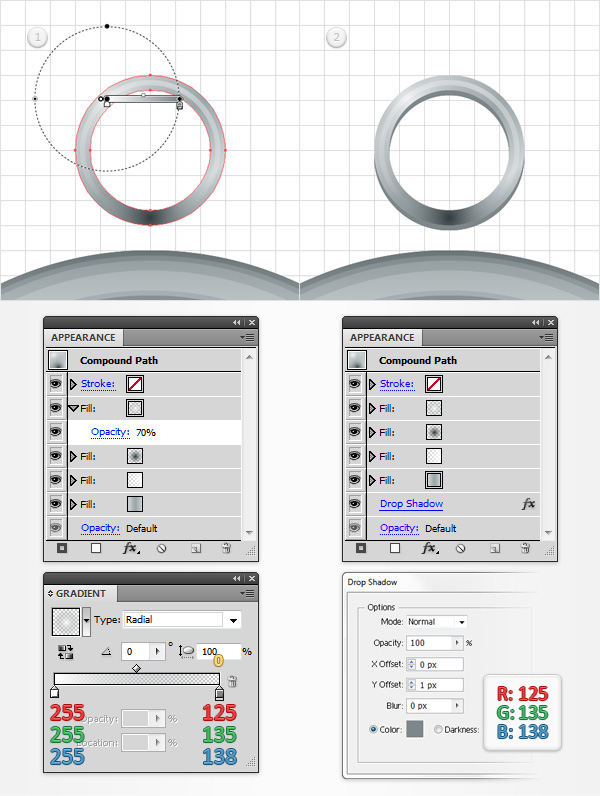
14 단계
30px 컴파운드 경로가 선택되어 있는지 확인하고 모양 패널 에 초점을 맞 춥니 다 . 이 경로에 대해 네 번째 채우기를 추가하고 선택하고 첫 번째 이미지에 표시된 방사형 그래디언트를 사용하여 불투명도 를 70 %로 낮 춥니 다 . 로 돌아 모양의 전체 경로를 선택, 패널 (단순히 상단에서 텍스트의 "복합 경로"부분을 클릭 모양 패널)와로 이동합니다 > 스타일 화> 그림자에 영향을 . 다음 그림에 표시된 등록 정보를 입력하고 확인을 클릭하십시오.
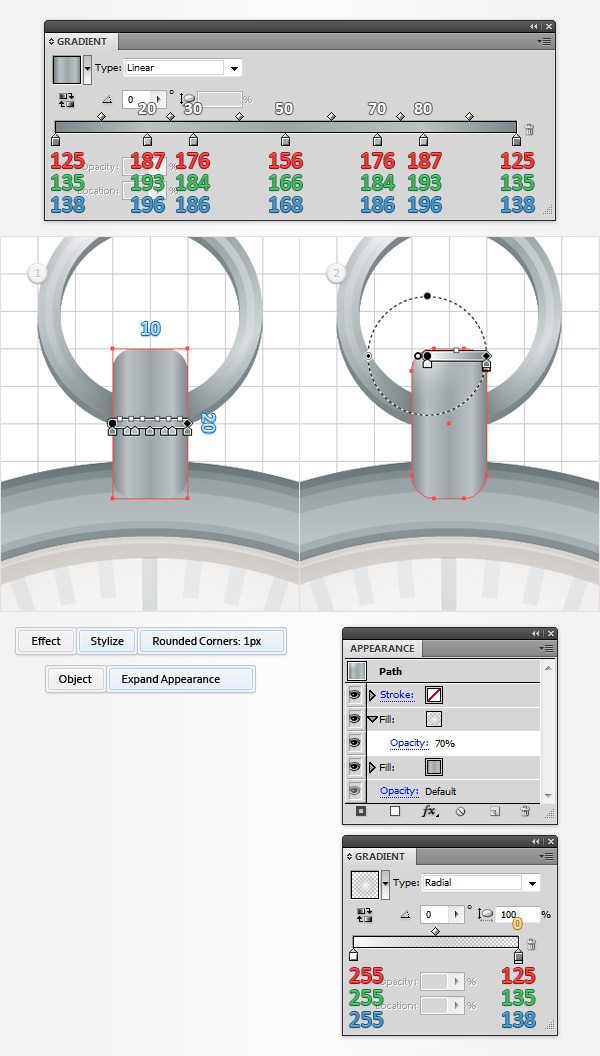
15 단계
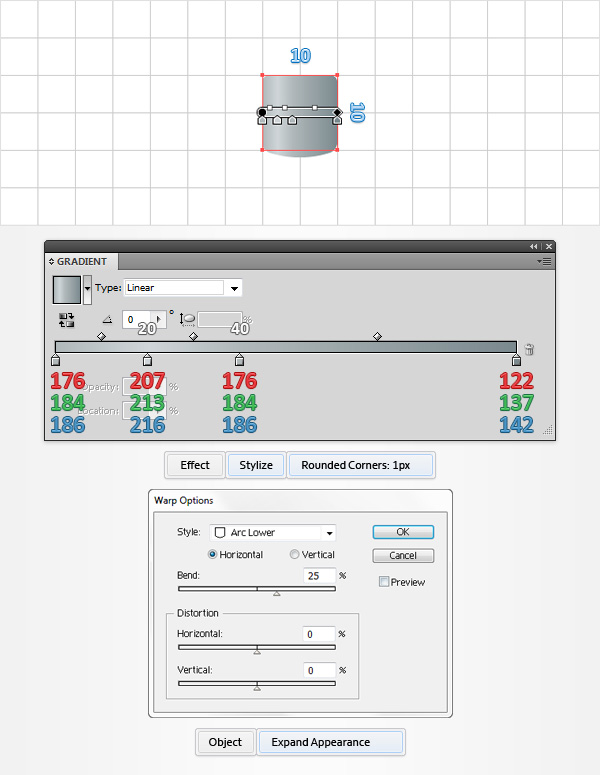
Using the Rectangle Tool (M), create a 10 x 20px shape, fill it with the linear gradient show below, place it as shown in the first image and go to Effect > Stylize > Rounded Corners. Enter a 1px radius, click OK and go to Object > Expand Appearance. Make sure that this new shape stays selected, focus on the Appearance panel and add a second fill. Select it, use the radial gradient shown in the following image and lower its Opacity to 70%.
Step 16
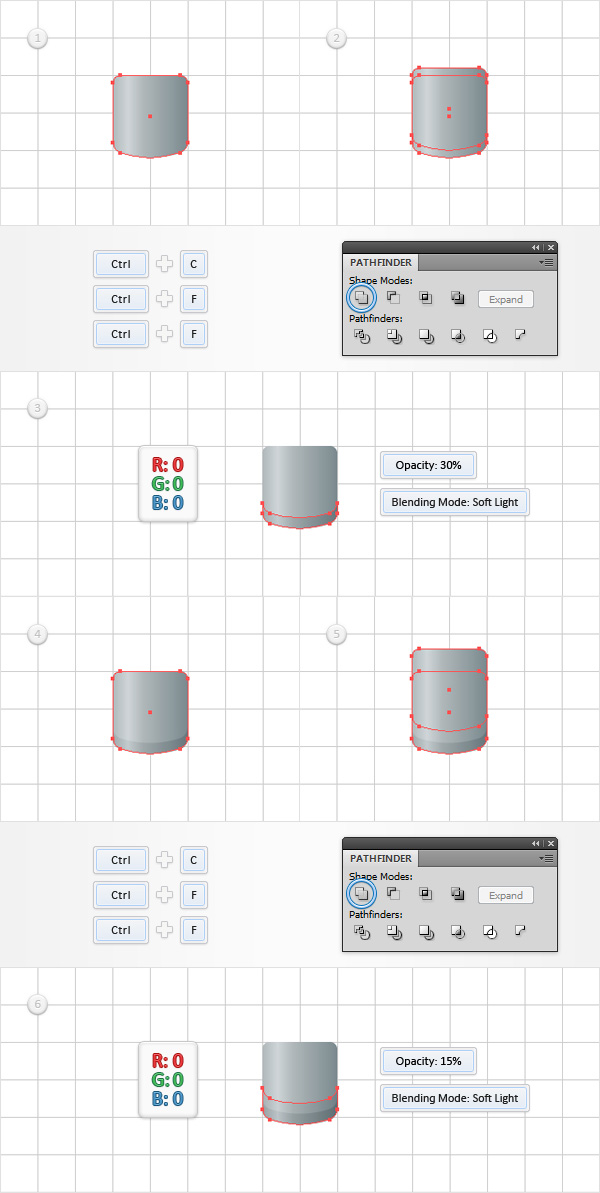
Switch to “gridline every 1px“, so go to Edit > Preferences > Guides & Grid and enter 1 in the Gridline every box. Using the Ellipse Tool (L), create an 8 x 2px shape, fill it with white and change the Blending Mode to Soft Light. Pick the Rectangle Tool (M), create a 10 x 4px shape, fill it with black, place it as shown in the second image, lower its Opacity to 15% and change the Blending Mode to Soft Light. Continue with the Rectangle Tool (M), create a 10 x 2px shape, fill it with black, place it as shown in the third image, lower its Opacity to 30% and change the Blending Mode to Soft Light.
Step 17
Select all the shapes made in the last five steps and Group them (CTRL + G). Select this new group and send it to back (Shift + CTRL + [ ). Using the Rectangle Tool (M), create a 10 x 1pxshape, fill it with R=195 G=200 B=205 and place it as shown in the third image.
Step 18
Return to “gridline every 5px“, so simply go to Edit > Preferences > Guides & Grid and enter 5 in the Gridline every box. Using the Rectangle Tool (M), create a 10px square, fill it with the linear gradient shown below and go to Effect > Stylize > Rounded Corners. Enter a 1px radius, click OK and go to Effect > Warp > Arc Lower. Enter the properties shown in the following image, click OK and go to Object > Expand Appearance.
Step 19
Disable the Snap to Grid (View > Snap to Grid) then go to Edit > Preferences > General and make sure that the Keyboard Increment is set at 1px. Select the shape made in the previous step and make two copies in front (CTRL + C > CTRL + F > CTRL + F). Select the top copy and move it 1px up using the up arrow from your keyboard. Reselect both copies and click the Minus Front button from the Pathfinder panel. Fill the resulting shape with black, lower its Opacity to 30% and change the Blending Mode to Soft Light. Reselect the shape made in the previous step and make another two copies in front (CTRL + C> CTRL + F> CTRL + F ). 상단 복사본을 선택하고 키보드의 위쪽 화살표를 사용하여 3px 위로 이동하십시오. 두 사본을 다시 선택 하고 패스 파인더 패널 에서 마이너스 전면 버튼을 클릭하십시오 . 결과 모양을 검정색으로 채우고 불투명도 를 15 %로 낮추고 혼합 모드 를 부드러운 빛으로 변경하십시오 .
20 단계
눈금에 맞추기 ( 보기> 눈금에 맞추기)를 활성화하십시오 . 은 Using 직사각형 도구 (M) , 크리에이트 20 × 10px , 형상을 아래와 같이 선형 그라데이션을 작성하여 아래 그림에 도시 된 바와 같이 배치하고 이동 > 스타일 화> 모서리를 둥글게 효과 . 3px 반지름을 입력하고 확인을 클릭 한 다음 오브젝트> 모양 확장으로 이동 하십시오 . 눈금에 맞추기 ( 보기> 눈금에 맞추기)를 비활성화 한 다음 결과 모양을 선택하고 앞에 두 개의 사본을 만듭니다 ( CTRL + C> CTRL + F> CTRL + F). 상단 복사본을 선택하고 1px 위로 이동하십시오. 두 사본을 다시 선택 하고 패스 파인더 패널 에서 마이너스 전면 버튼을 클릭하십시오 . 결과 모양을 검정색으로 채우고불투명도 상위 30 %와는 변경 블렌딩 모드 에 부드러운 빛을 .
21 단계
Reselect the rounded rectangle made in the previous step and go to Object > Path > Offset Path. Enter a -1px Offset and click OK. Select the resulting shape and make a copy in front (CTRL + C > CTRL + F). Select this copy and move it 1px down. Reselect both copies and click the Minus Frontbutton from the Pathfinder panel. Fill the resulting shape with the linear gradient shown below and change its Blending Mode to Soft Light. Reselect the rounded rectangle made in the previous step and make two copies in front (CTRL + C > CTRL + F > CTRL + F). Select the top copy and move it 1px down using the down arrow from your keyboard. Reselect both copies and click the Minus Front button from the Pathfinder panel. Fill the resulting shape with black, lower its Opacity to 30% and change the Blending Mode to Soft Light.
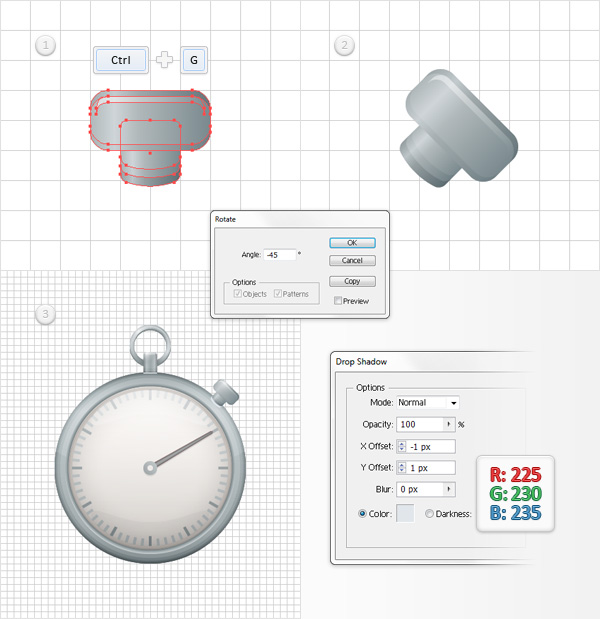
Step 22
Enable the Snap to Grid (View > Snap to Grid). Reselect all the shapes made in the last four steps and Group them (CTRL +G). Select this new group and go to Object > Transform > Rotate. Enter a -45 degrees angle and click the OK button. Select this rotated group and place it as shown in the third image. Focus on the Layers panel (Window > Layers), open this fresh group, select the bottom shape and go to Effect > Stylize > Drop Shadow. Enter the properties shown in the following image and click OK. In the end things, should look like in the third image.
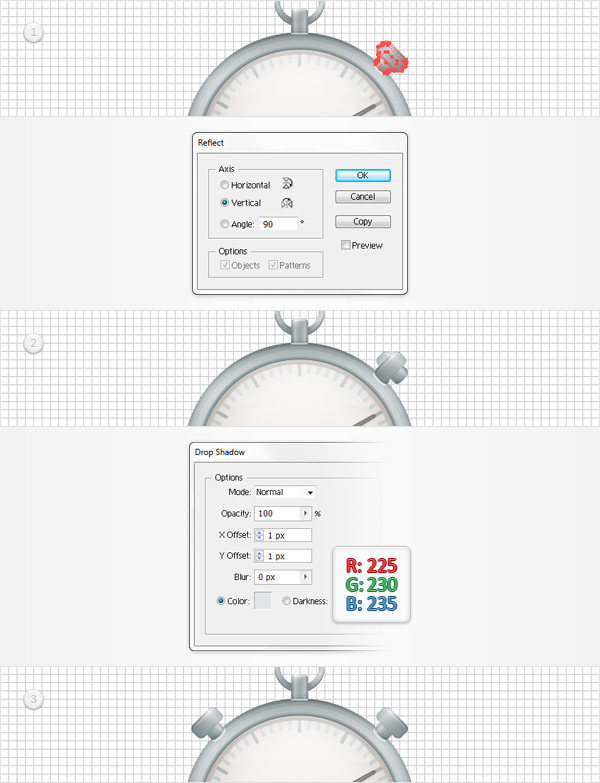
Step 23
Make sure that your button group is still selected and go to Object > Transform > Reflect. Check the Vertical box and click the Copy button. This will create a horizontally, flipped group copy. Focus on the Layers panel, open this new group, select the bottom shape and move to the Appearance panel. Open the existing Drop Shadow effect and edit it as shown in the following image. Select this entire new group, drag it to the left and place it as shown in the third image.
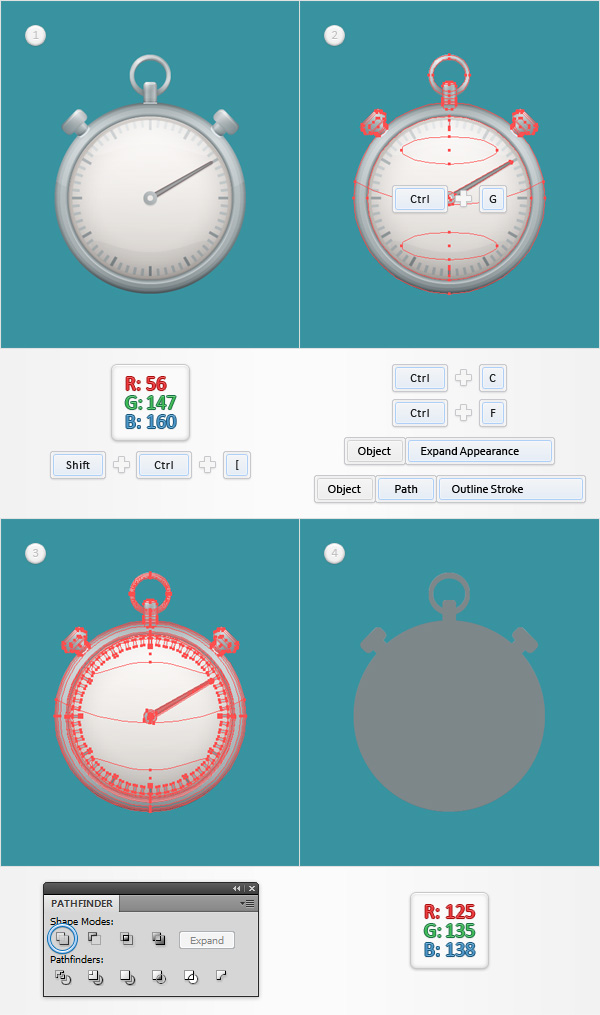
Step 24
Using the Rectangle Tool (M), create a shape of your Artboard, fill it with R=56 G=147 B=160and send it to back (Shift + CTRL + [ ). Move to the Layers panel and lock this rectangle to make sure that you won’t accidentally select/move it. Select all the shapes that make up your stopwatch and Group them (CTRL + G). Select this new group and make a copy in front (CTRL + C > CTRL + F). Select this group copy, go to Object > Expand Appearance and Object > Path > Outline Stroke then click the Unite button from the Pathfinder panel. Fill the resulting shape with R = 125G = 135B = 138 . 레이어 패널로 이동 하고이 새 도형을 두 번 클릭하고 간단하게 " 다시 칠하기 " 라고 이름을 지정합니다 .
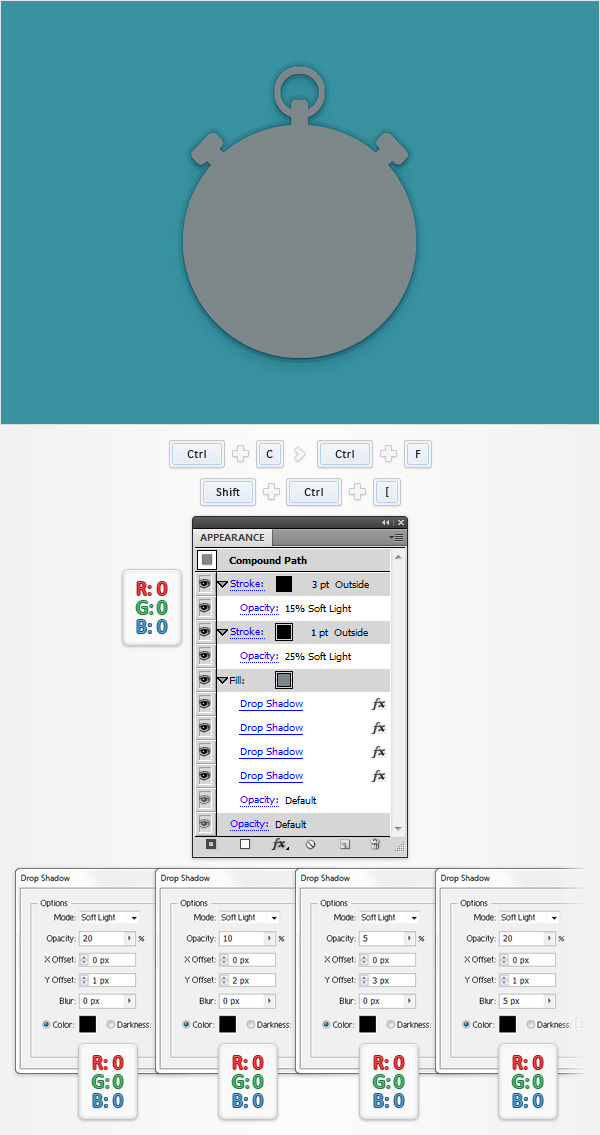
25 단계
" 다시 칠하기 "모양을 선택 하고 앞에 복사 ( Ctrl + C> Ctrl + F ) 한 다음 뒤로 ( Shift + CTRL + [ )로 보내십시오 . 에 초점 레이어 이 사본에 패널을 더블 클릭하고 "이름을 바꿉니다 그림자 ". " 그림자 "모양이 선택된 상태로 유지되고 모양 패널 에 초점을 맞추 었는지 확인하십시오 . 1pt, 검은 색 선을 추가하고 바깥쪽으로 정렬하고 혼합 모드 를 부드러운 빛으로 변경 하고 불투명도 를 25 %로 낮 춥니 다 . 이 도형에 두 번째 획을 추가하고 폭을 3pt로 설정하고 검정색으로 설정 한 다음 바깥쪽으로 정렬하고 혼합 모드 를Soft Light를 선택 하고 불투명도 를 15 %로 낮 춥니 다 . [ 모양] 패널 에 계속 집중 하고 기존 채우기를 선택 하고 다음 그림에 표시된 네 가지 [ 그림자 효과]를 추가합니다 (왼쪽부터 시작).
26 단계
Now, here’s a simple blending technique that you can use to easily recolor the stopwatch. Select your “recolor” shape, replace the existing fill color with R=148 G=163 B=187, lower its Opacity to 40% and (most importantly) change the Blending Mode to Color. Here’s what you have to do if you don’t want to recolor the stopwatch screen. Using the Ellipse Tool (L), create a 120px circle, fill it with a random color and place it as shown in the second image. Select this new circle along with the “recolor” shape and click the Minus Front button from the Pathfinder패널. 레이어패널로 이동 하여 결과 모양을 두 번 클릭하고 이름을 " recolorFrame "으로 지정합니다. 결국 네 번째 이미지에서와 같이 보일 것입니다.

27 단계
마지막으로 여기에 스톱워치를 다시 칠하는 데 사용할 수있는 두 가지 색상이 있습니다. 다른 색상이나 그라디언트를 사용해보십시오.

그리고 우리는 완료되었습니다!
이 튜토리얼을 마음껏 즐기시고 앞으로의 프로젝트에서 이러한 기술을 적용 해 주시길 바랍니다.
'디자인 > 무료 디자인 자습서' 카테고리의 다른 글
| [일러스트] 벡터 질감 텍스처를 만드는 방법 (2) | 2018.06.11 |
|---|---|
| [일러스트] 강아지 동물 일러스트로 그리는 방법 (0) | 2018.06.11 |
| [일러스트] 동물 소를 그리는 방법 (2) | 2018.06.11 |
| [일러스트] 작은시티 도시 일러스트 그리는 방법 (0) | 2018.06.10 |
| [일러스트] 도넛 형 글꼴 스타일을 만드는 방법 (0) | 2018.06.10 |
| [일러스트] 벡터 햄버거 만드는 방법 (0) | 2018.06.09 |
| [일러스트] 달 이모티콘 아이콘을 만드는 방법 (0) | 2018.06.09 |
| [일러스트] 초콜렛 묻힌 딸기 벡터 그리는 방법 (0) | 2018.06.09 |


댓글