
다음 자습서에서는 Adobe Illustrator에서 간단한 악마 뿔 장난감 일러스트레이션을 만드는 방법을 배웁니다.
첫 번째 단계에서는 기본 블렌딩, 마스킹 및 벡터 모양 구축 기술과 간단한 혼합 및 라이브 코너 기능을 사용하여 간단한 그리드를 설정하는 방법과 두 개의 뿔을 만드는 방법을 배우게됩니다. 다음으로, [모양] 패널을 최대한 활용하는 방법과 파선을 쉽게 만드는 방법을 배우게됩니다. 마지막으로 [모양] 패널, 두 개의 선형 그래디언트 및 일부 기본 효과를 사용하여 미묘한 그림자를 추가하는 방법을 학습합니다.
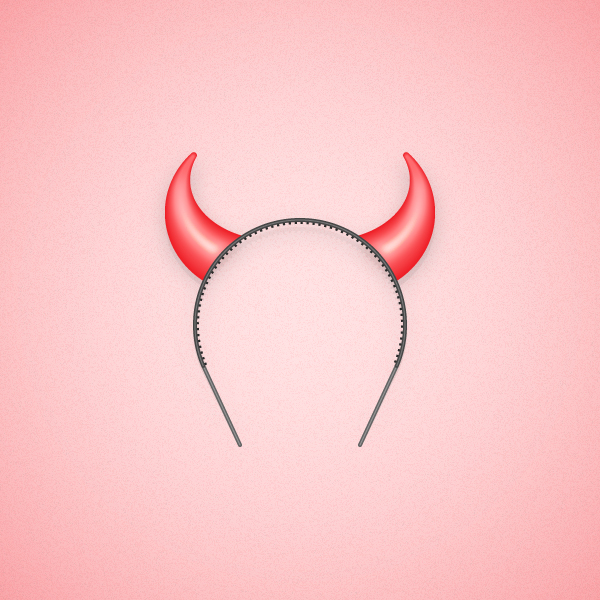
최종 이미지
언제나처럼, 이것이 우리가 만들게 될 최종 이미지입니다.
자습서 세부 정보
- 프로그램 : Adobe Illustrator CC
- 예상 완료 시간 : 45 분
- 난이도 : 초급 - 중급
1 단계
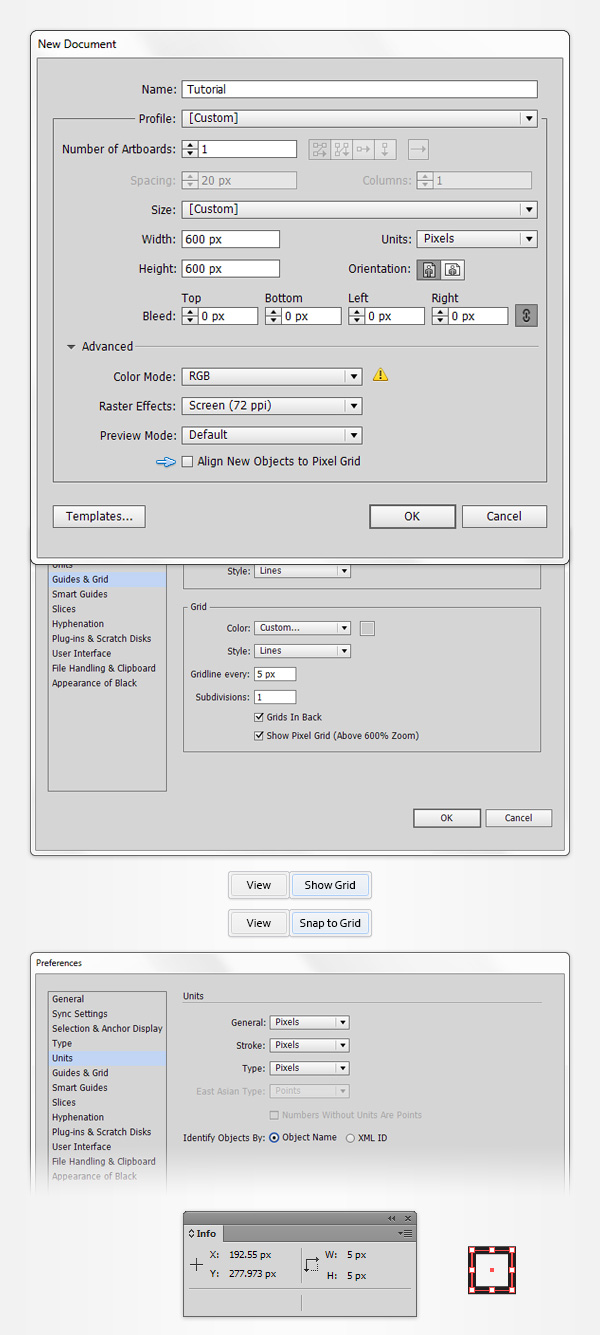
Hit Control + N to create a new document. Select Pixels from the Units drop-down menu, enter 600 in the width and height boxes then click on the Advanced button. Select RGB, Screen (72ppi) and make sure that the Align New Objects to Pixel Grid box is unchecked before you click OK.
Enable the Grid (View > Show Grid) and the Snap to Grid (View > Snap to Grid). You will need a grid every 5px, so simply go to Edit > Preferences > Guides > Grid, enter 5 in the Gridline every box and 1in the Subdivisions box. Try not to get discouraged by all that grid, it will ease your work and keep in mind that you can easily enable or disable it using the Control + ‘ keyboard shortcut.
또한 정보 패널 ( 윈도우> 정보 )을 열어 모양의 크기와 위치가 포함 된 실시간 미리보기를 열어야합니다 . 편집> 환경 설정> 단위> 일반에서 단위 를 픽셀로 설정하는 것을 잊지 마십시오 . 이 모든 옵션을 통해 작업 속도가 크게 향상됩니다.
2 단계
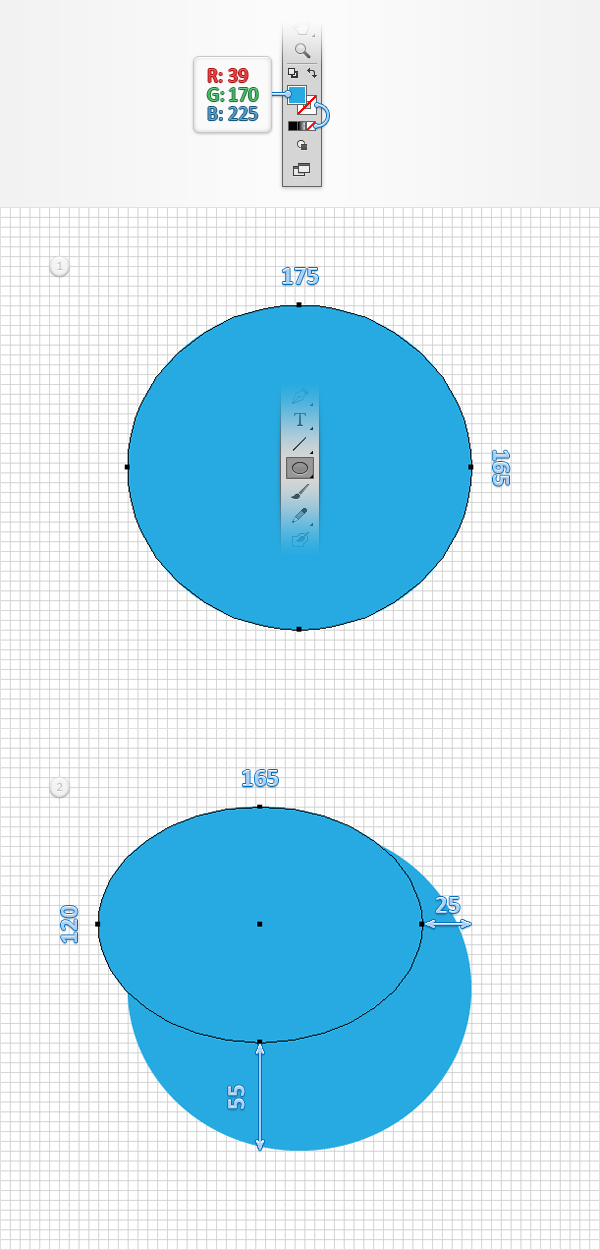
타원형 도구 (L)를 선택하고 툴바에 초점을 맞 춥니 다. 스트로크에서 색상을 제거한 다음 칠을 선택하고 색상을 R = 39 G = 170 B = 225로 설정 합니다. 대지로 이동하여 175 x 165 픽셀의 직사각형을 만들고 그리드 및 Snap to Grid 기능을 사용하면 작업을 쉽게 수행 할 수 있습니다.
동일한 도구를 사용하여 165 x 120 픽셀 모양을 만들어 두 번째 이미지에 표시된 것과 똑같이 배치하십시오. 다시 한번 그리드와 Snap to Grid 기능이 유용 할 것입니다.
3 단계
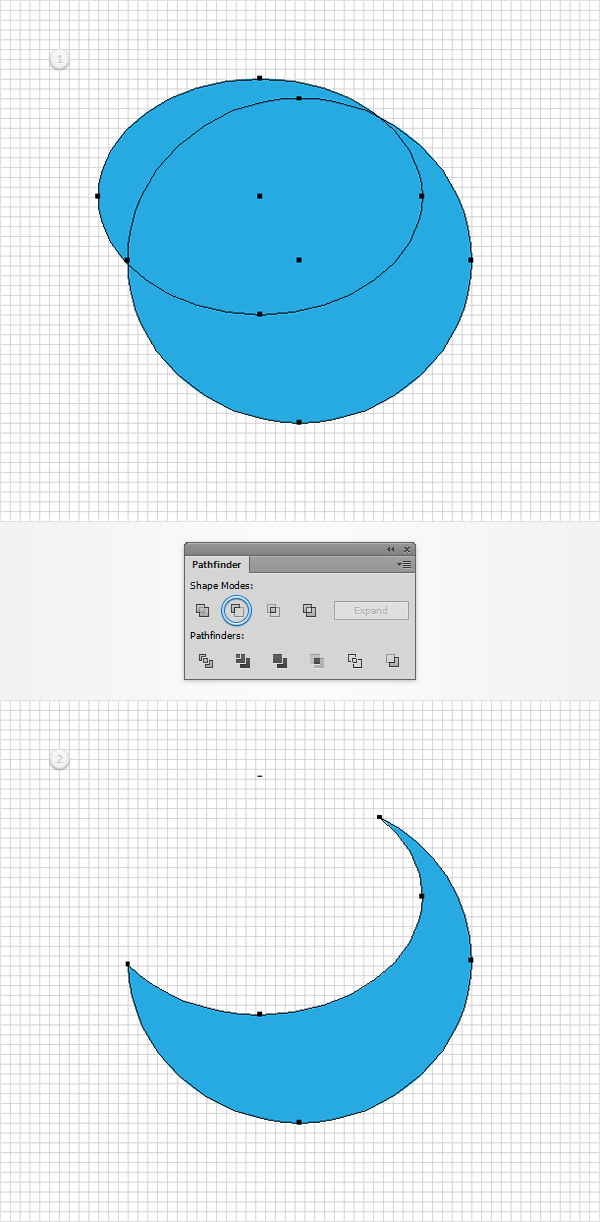
선택 도구 (V)를 사용하여 지금까지 만들어진 두 도형을 모두 선택하고 패스 파인더 패널 ( 윈도우> 패스 파인더 )을 연 다음 마이너스 프론트 버튼을 클릭 합니다.
4 단계
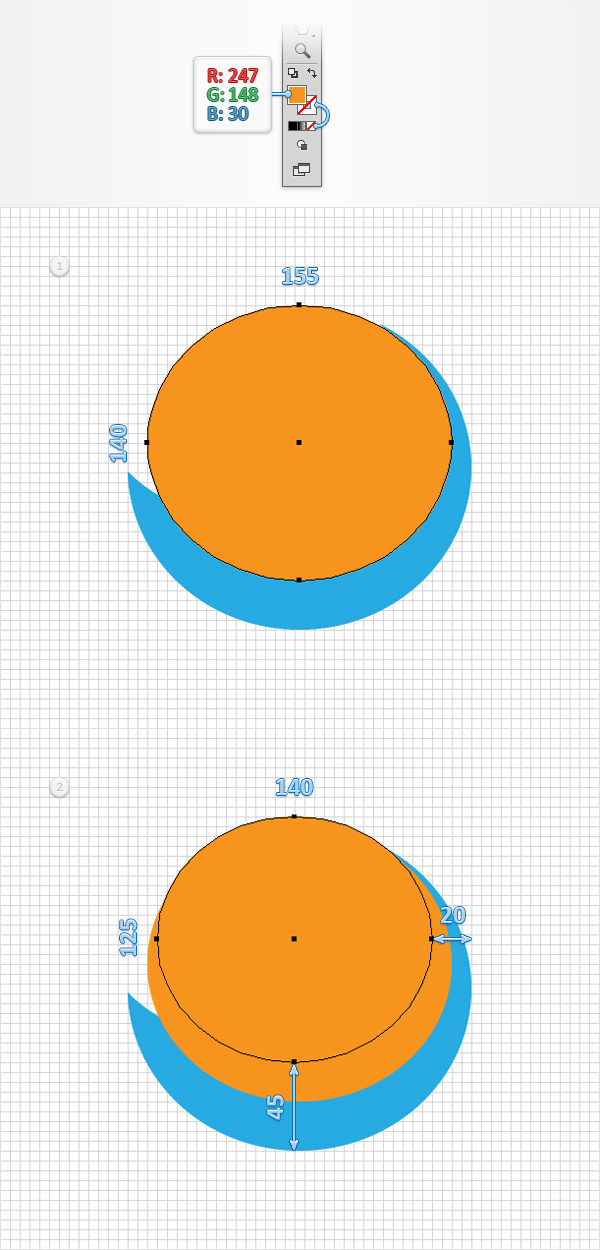
툴바에 초점을두고 기존 채우기 색상을 R = 247 G = 148 B = 30으로 바꿉니다 . 그랩 타원 도구 (L)은 , 크리에이트 155 X 140px 형상과 제 이미지와 같이 정확하게 배치.
Using the same tool, create a 140 x 125px shape and place it exactly as shown in the second image.
Step 5
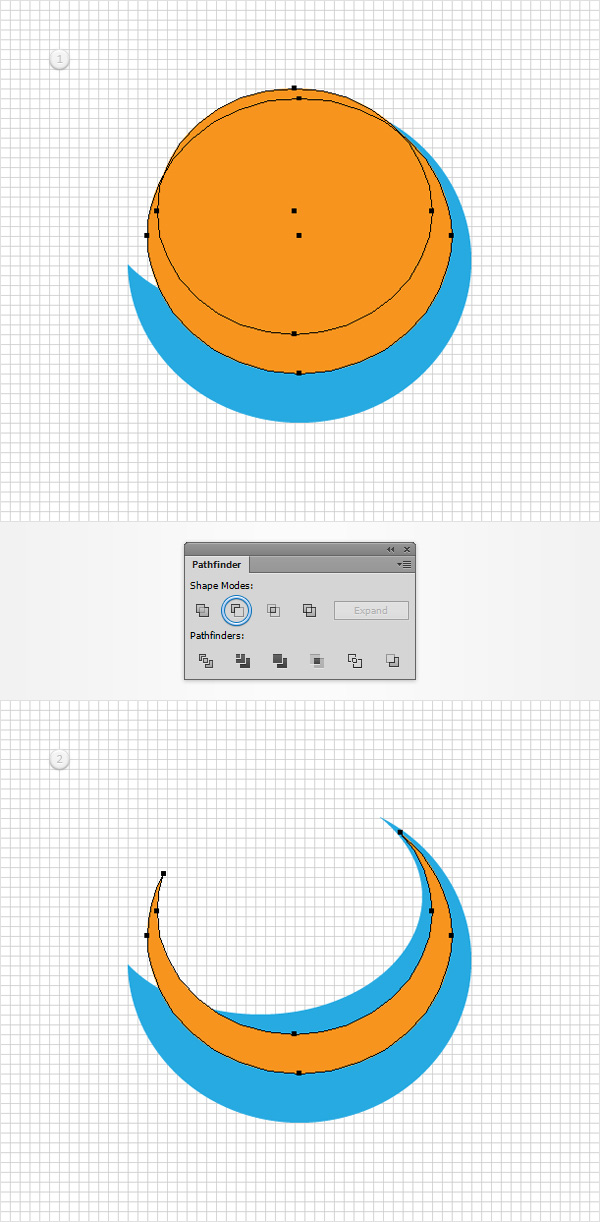
Grab the Selection Tool (V), select both orange shapes made so far and click the Minus Front button from the Pathfinder panel.
Step 6
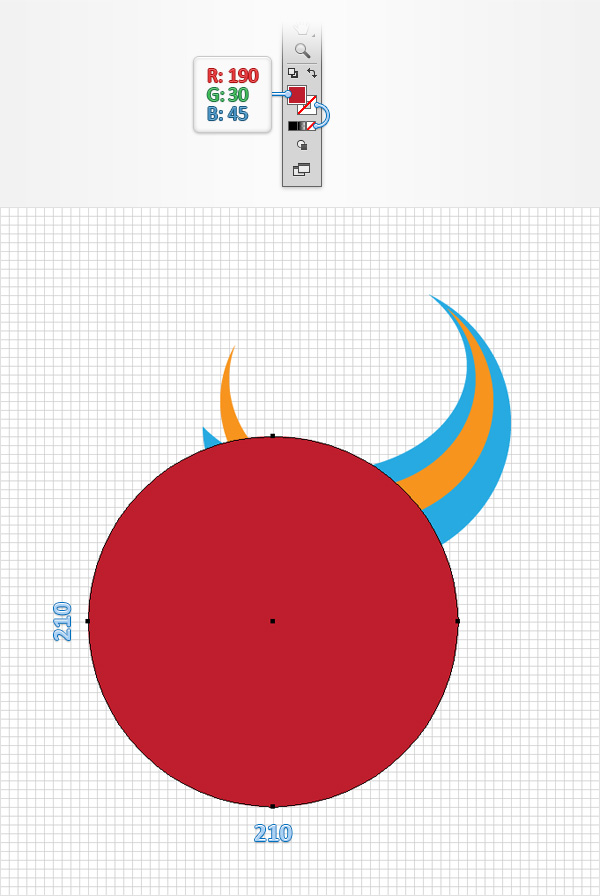
Get back to your Toolbar and replace the existing fill color with R=190 G=30 B=45. Using the Ellipse Tool (L), create a 210px circle and place it exactly as shown in the following image.
Step 7
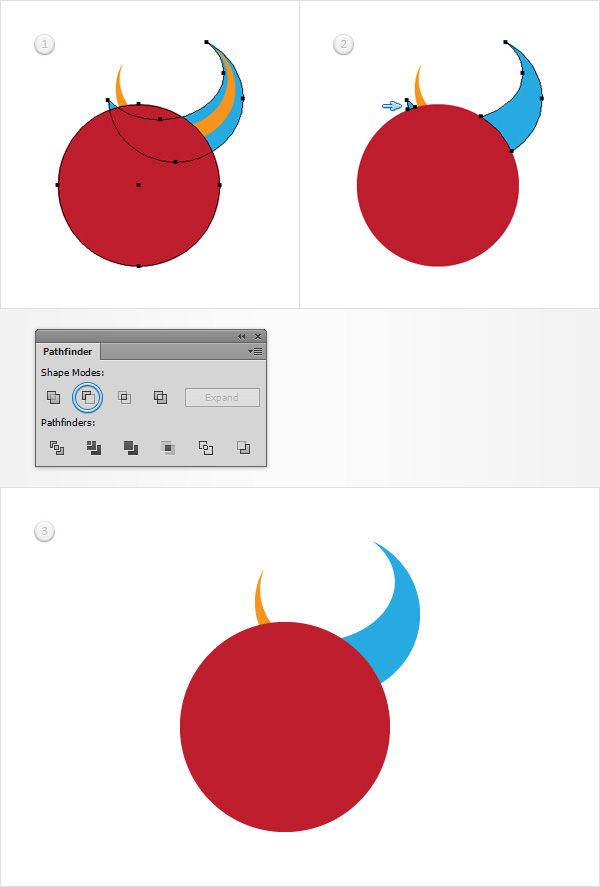
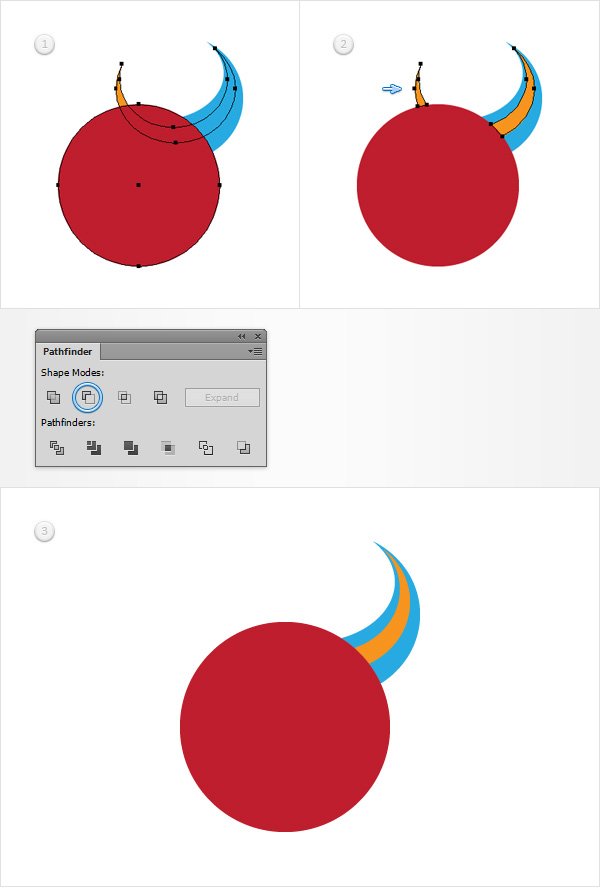
Make sure that your red circle is still selected and make two copies in front (Control + C > Control + F > Control + F). Select one of these copies along with the blue shape and click the Minus Front button from the Pathfinder panel.
Make sure that the resulting group of shapes is selected and simply hit Shift + Control + G to Ungroupthem.
Keep focusing on your blue shapes, select the smaller one and hit the Delete button from your keyboard to get rid of it. In the end things should look like in the third image.
Step 8
Select one of your red circles along with the orange shape and click the Minus Front button from the Pathfinder panel.
Ungroup (Shift + Control + G) the resulting group then select the smaller, orange shape and remove it. In the end things should look like in the third image.
Step 9
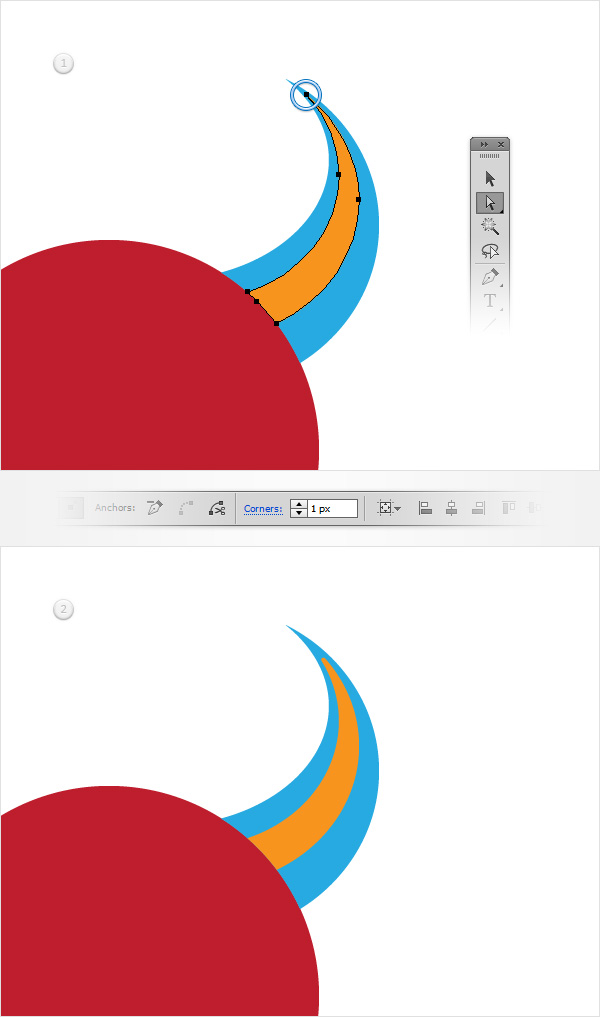
Focus on your orange shape and grab the Direct Selection Tool (A). Select the top anchor point, focus on the top bar and enter 1px in that Corners box.
This feature is only available for CC users. The best solution to replace this effect would be the Round Any Corner script that can found in this article: 20 Free and Useful Adobe Illustrator Scripts. Save it to your hard drive, return to Illustrator and make the Direct Selection Tool (A) active. Select that top anchor point and go to File > Scripts > Other Script. Open the Round Any Corner Script, enter a 20px radius and click OK. The end result might look a bit different, but it’s really not that noticeable. Feel free to try a different value for the radius. Keep in mind that in some cases you will have to increase/decrease the value mentioned in that Corners box.
Step 10
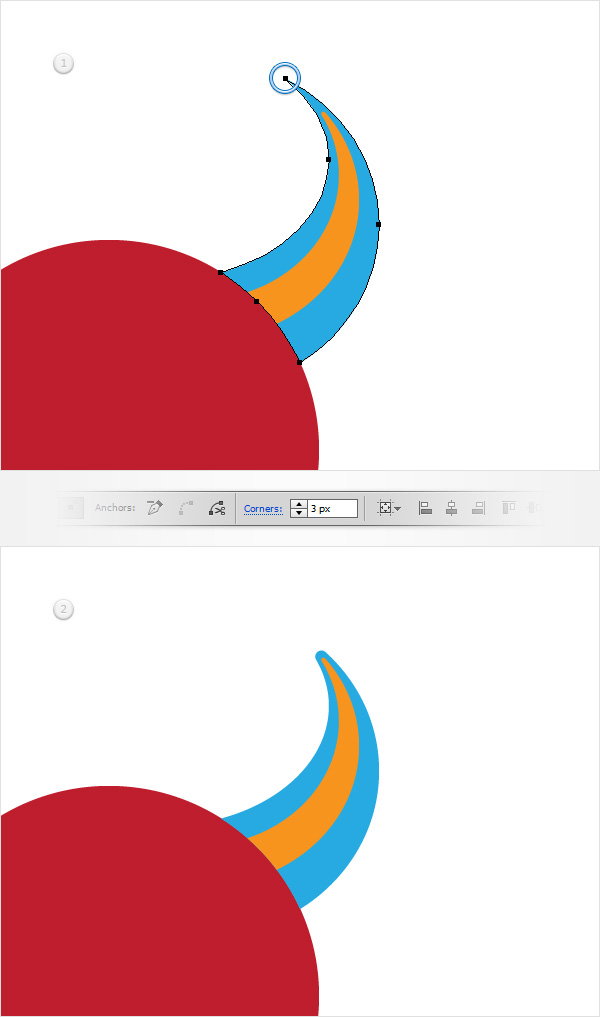
Focus on your blue shape and make sure that the Direct Selection Tool (A) is still active. Select the top anchor point, focus on the top bar and this time enter 3px in that Corners box.
Step 11
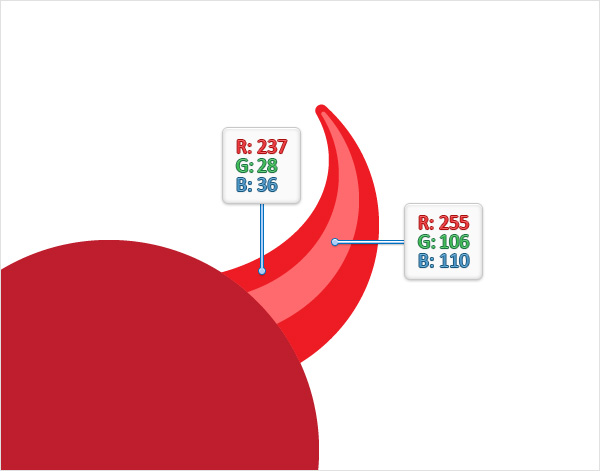
Reselect your blue shape and replace the existing fill color with R=237 G=28 B=36 then select the orange shape and replace the existing fill color with R=255 G=106 B=110.
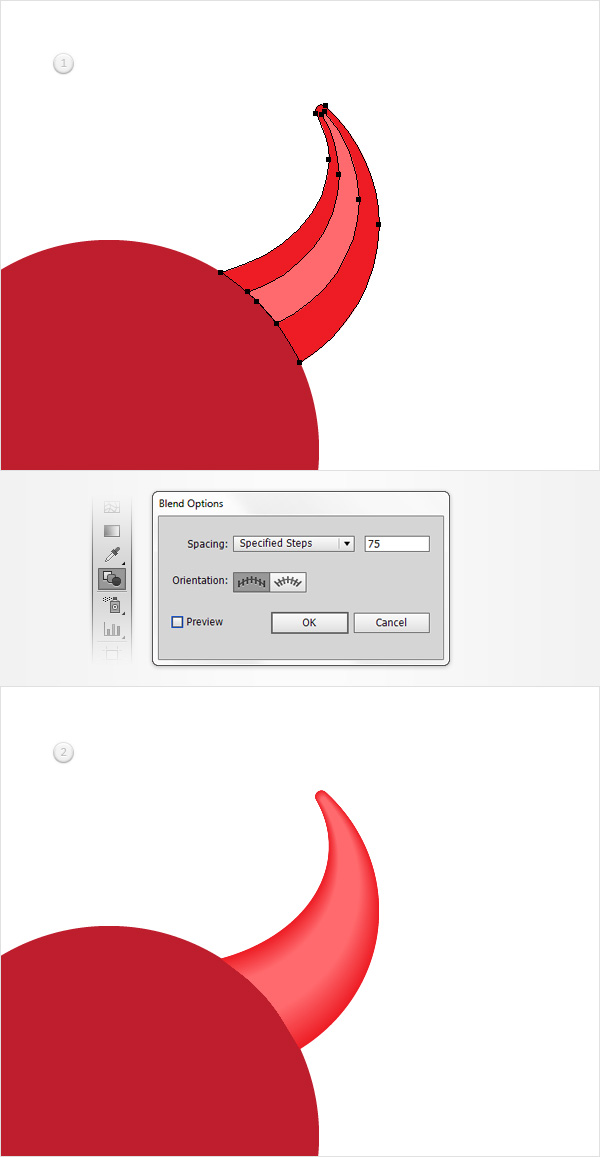
Step 12
Focus on your Toolbar and double click on the Blend Tool to open the Blend Options window. Select Specified Steps from the Spacing drop-down menu and enter 75 in that white box.
Reselect the two red shapes that make up the horn and hit Alt-Control-B to create a new blend. In the end things should look like in the second image.
Step 13
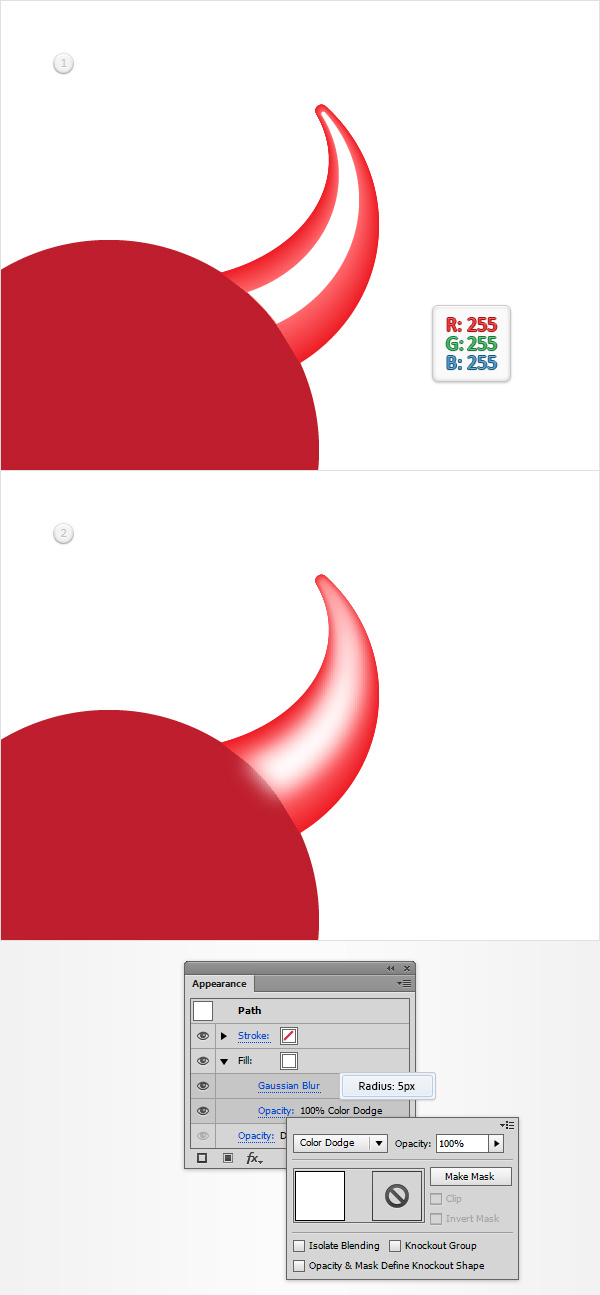
Move to the Layers panel and open the existing layer. Focus on the blend, open it and duplicate the top shape (Control + C > Control + F).
Select this copy, drag it outside the blend (in the top of the Layers panel) and replace the existing fill color with a simple white (R=255 G=255 B=255).
Make sure that this white shape stays selected and focus on the Appearance panel (Window > Appearance). First, click on that "Opacity" piece of text that stands for the existing fill to open the Transparency fly-out panel. Change the Blending Mode to Color Dodge then go to Effect > Blur > Gaussian Blur. Enter a 5px Radius and click OK.
Step 14
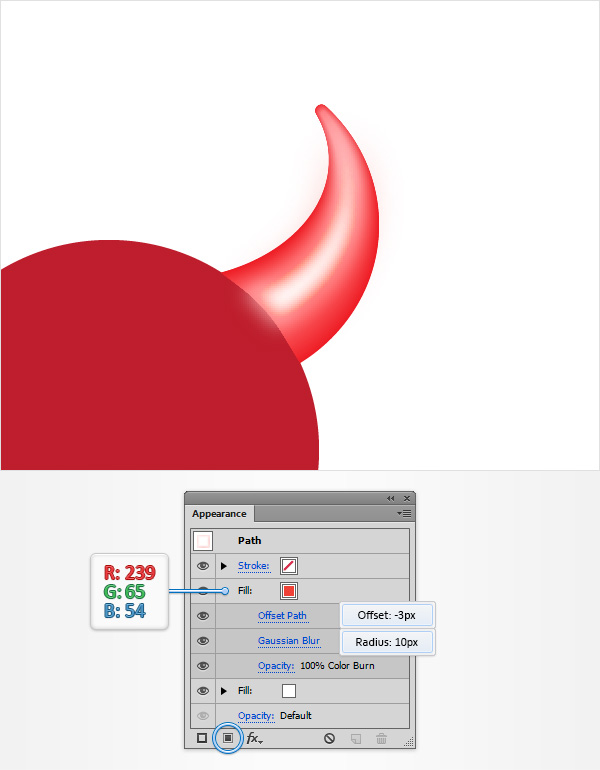
Make sure that your white shape stays selected, focus on the Appearance panel and add a second fill using the Add New Fill button. Select this new fill, set the color to R=239 G=65 B=54, change its Blending Mode to Color Burn
Go to Effect > Path > Offset Path. Enter a -3px Offset, click OK and go to Effect > Blur > Gaussian Blur. Enter a 10px Radius and click OK.
Step 15
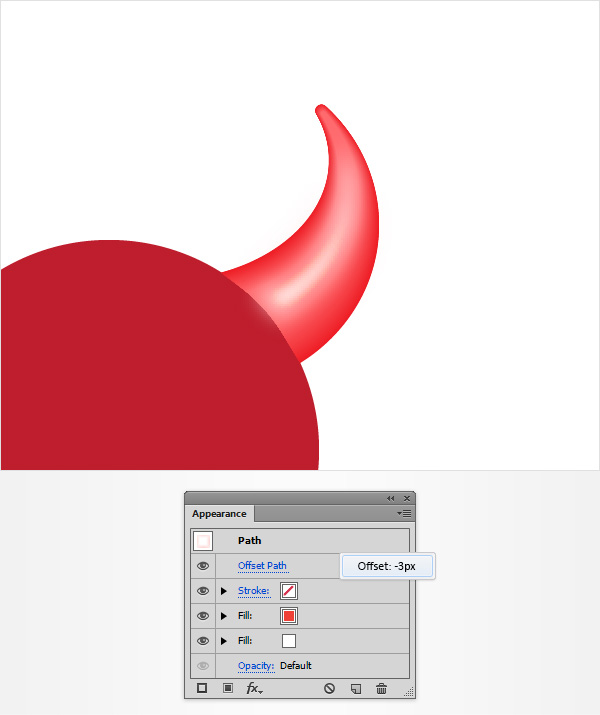
흰색 모양을 다시 선택하고 모양 패널을 강조 표시 한 다음 전체 패스가 선택되었는지 확인한 다음 ( 모양패널 상단의 " 패스 "텍스트를 클릭 ) 효과> 패스> 패스 오프셋으로 이동합니다 . -3px 간격 띄우기를 입력하고 확인을 클릭하십시오 .
16 단계
혼과 호른을 구성하는 다른 모양을 다시 선택하고 Ctrl + G 를 눌러 그룹화하십시오 .
[ 레이어] 패널로 이동 하고이 새 그룹을 열고 블렌드에 중점을두고 맨 아래 모양을 복제합니다. 이 사본을 선택하고 레이어 패널 의 맨 위로 드래그 하고 기존 채우기 색상을 간단한 흰색으로 바꿉니다.
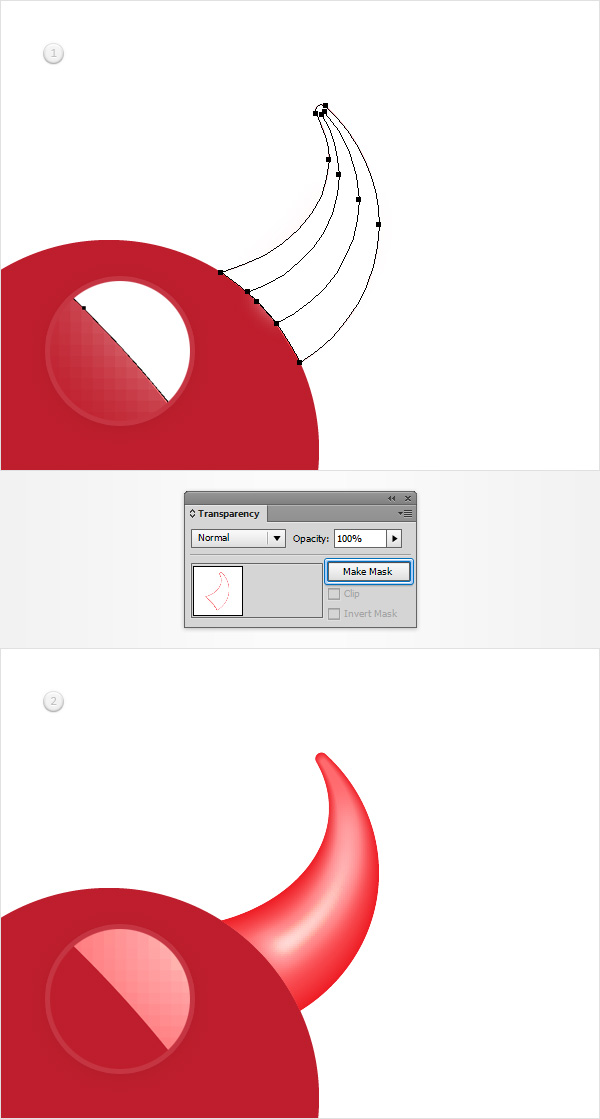
이제 그룹과 함께이 흰색 모양을 선택하고 투명도 패널 ( 윈도우> 투명도 )을 연 다음 마스크 만들기 버튼을 클릭 합니다. Illustrator CC 사용자가 아닌 경우 [ 투명도] 패널 의 플라이 아웃 메뉴를 열고 [ 불투명 마스크 만들기] 명령을 클릭해야합니다 .
레이어 패널로 돌아가 마스크 된 그룹의 이름을 두 번 클릭하고 이름을 " 호른 (Horn) "으로 변경합니다 .
17 단계
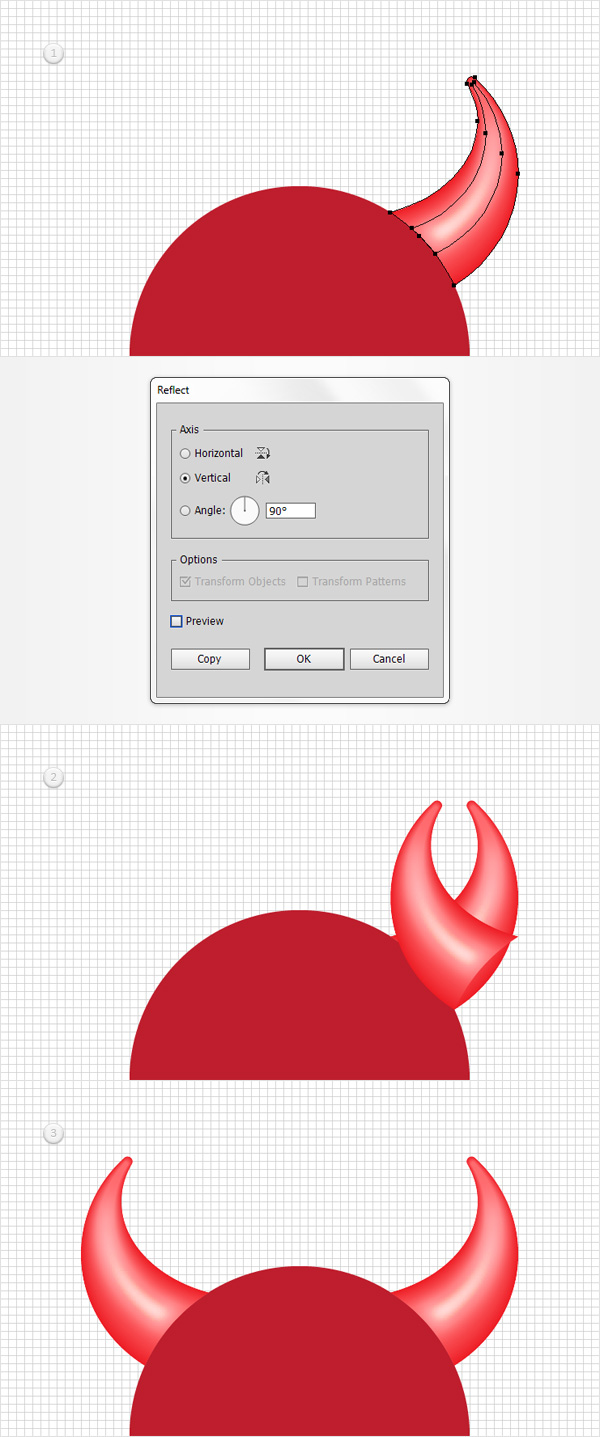
" Horn "그룹이 선택되어 있는지 확인하고 Object> Trasnform> Reflect로 이동하십시오 . 체크 수직 한 후 클릭 상자를 복사 버튼을 누릅니다.
Select the newly made group, hold the Shift button from your keyboard and drag it to the left as shown in the third image.
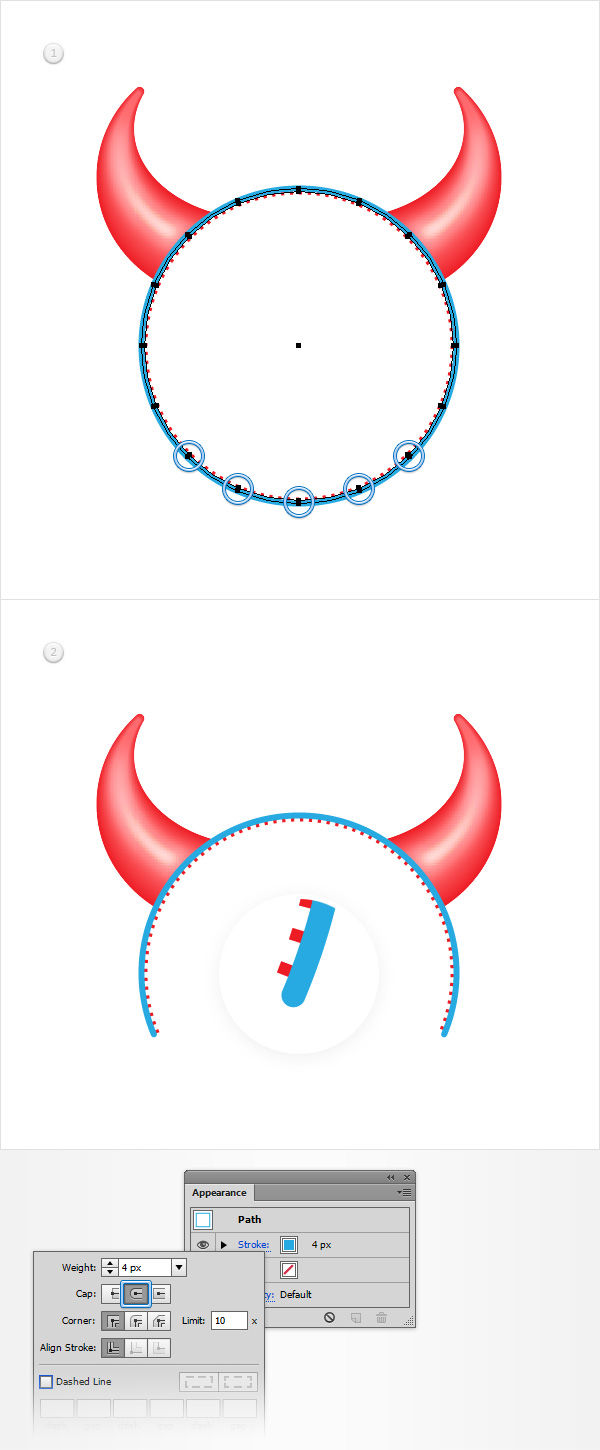
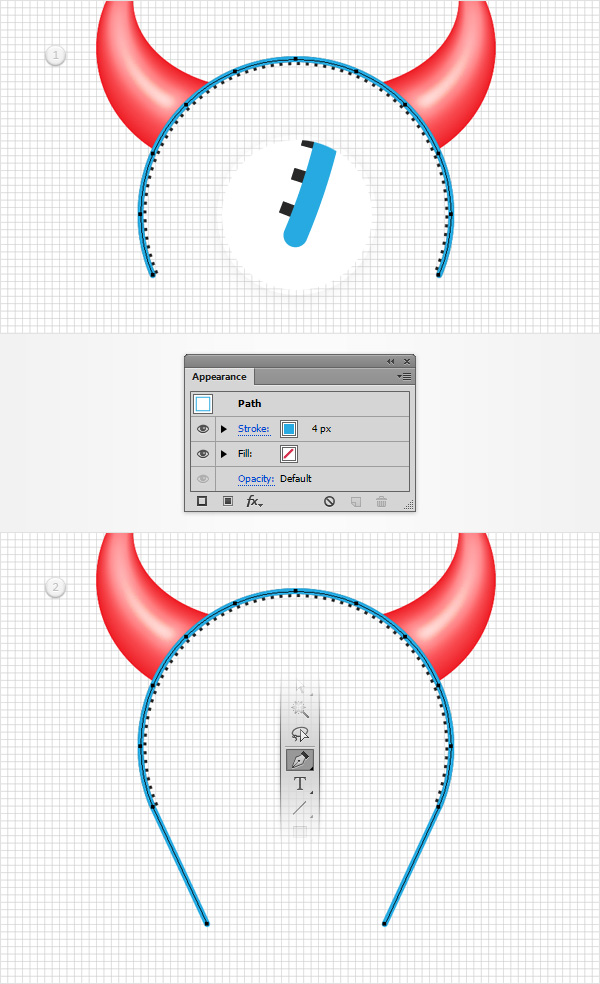
Step 18
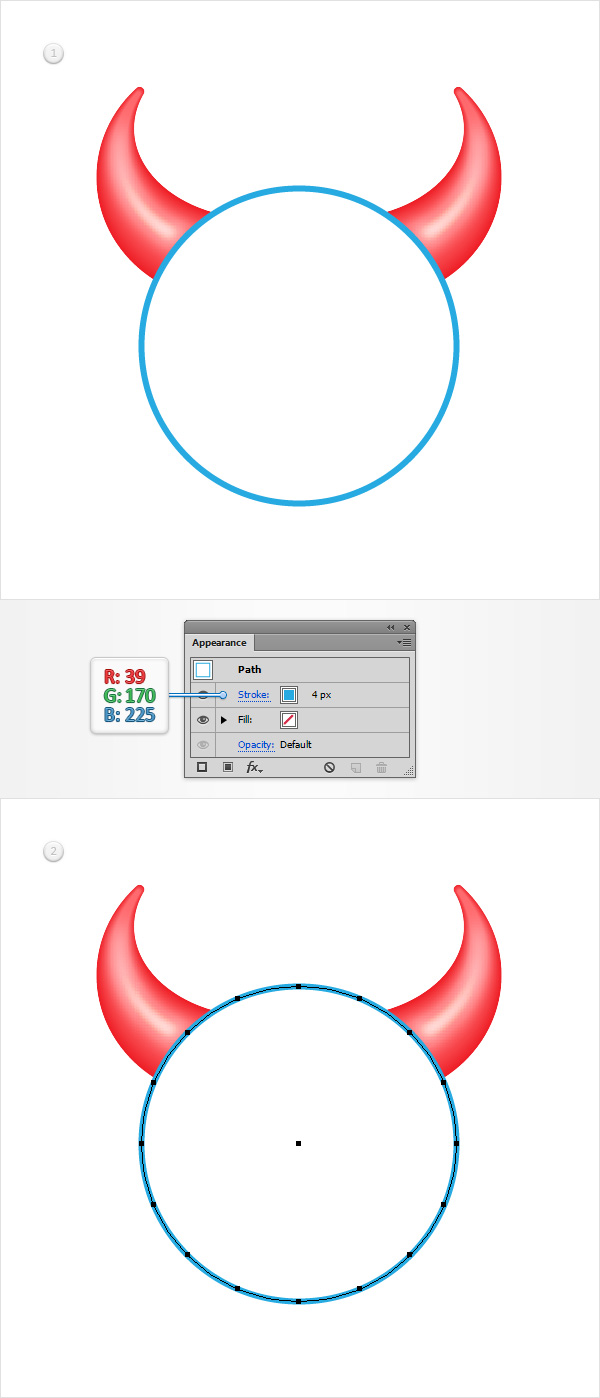
Select your circle and focus on the Appearance panel. Remove the color from the fill then select the stroke. Make it 4px wide and set the color to R=39 G=170 B=225. Make sure that your circle stays selected and go to Object > Path > Add Anchor Points twice.
Step 19
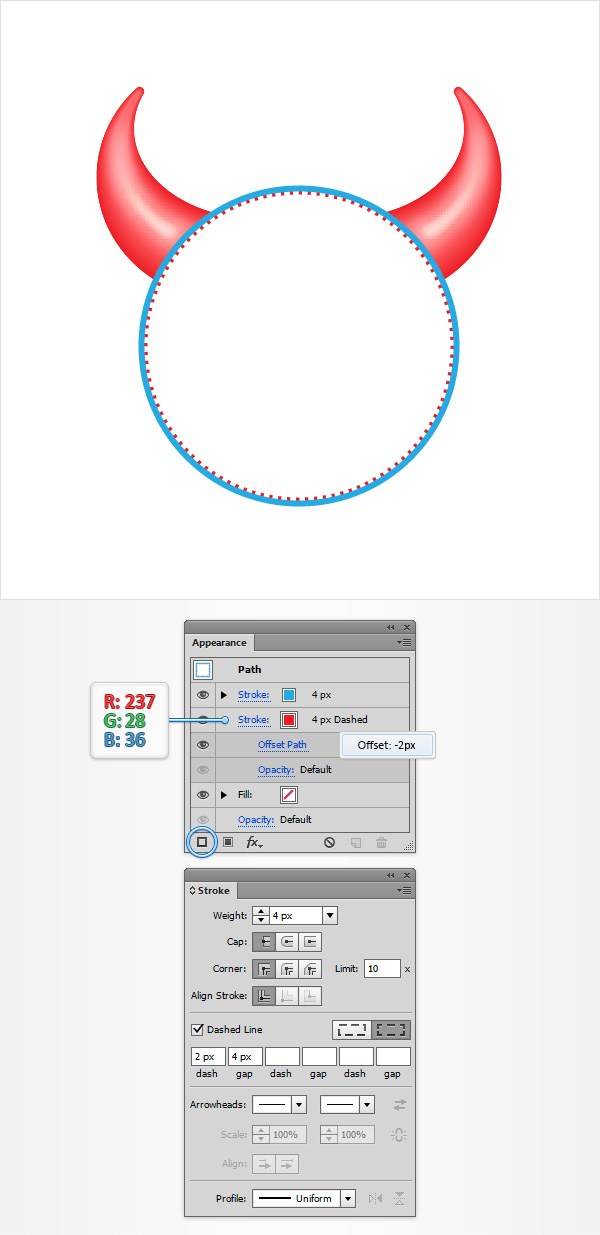
Make sure that your circle stays selected, keep focusing on the Appearance panel and add a second stroke using the Add New Stroke button.
Select the new stroke, drag it below the existing one, set its color to R=237 G=28 B=36 then open the Stroke panel (Window > Stroke). Make sure that the Width is set to 4px then check the Dashed Linebox. Enter 2px in the first dash box and 4px in the first gap box.
Return to the Appearance panel. Make sure that your red stroke is still selected and go to Effect > Path > Offset Path. Enter a -2px Offset and click OK.
Step 20
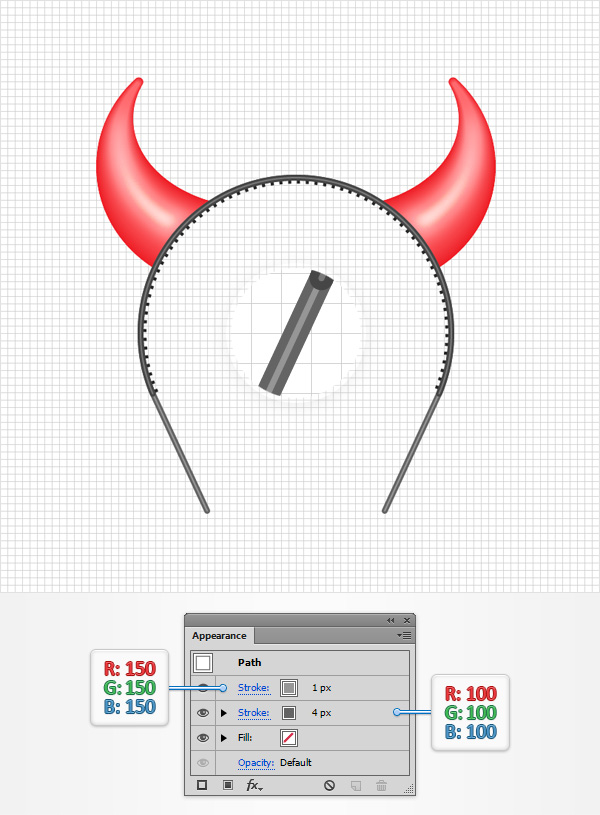
Reselect your circle and go to Object > Expand Appearance. Ungroup the resulting group of shapes (Shift + Control + G) and you will end up with two separate circles, one with the blue stroke and the other with the red, dashed stroke.
Grab the Direct Selection Tool (A), select the anchor points highlighted in the first image and hit the Delete button from your keyboard.
Select your blue path, make sure that the stroke is selected and check the Round Cap button from the Stroke panel. In the end things should look like in the second image.
레이어 패널로 이동 하여 파란색 패스의 이름을 두 번 클릭하고 이름을 " Top "으로 지정한 다음 파선으로 경로에 포커스를두고 " Grid "로 이름을 변경합니다 .
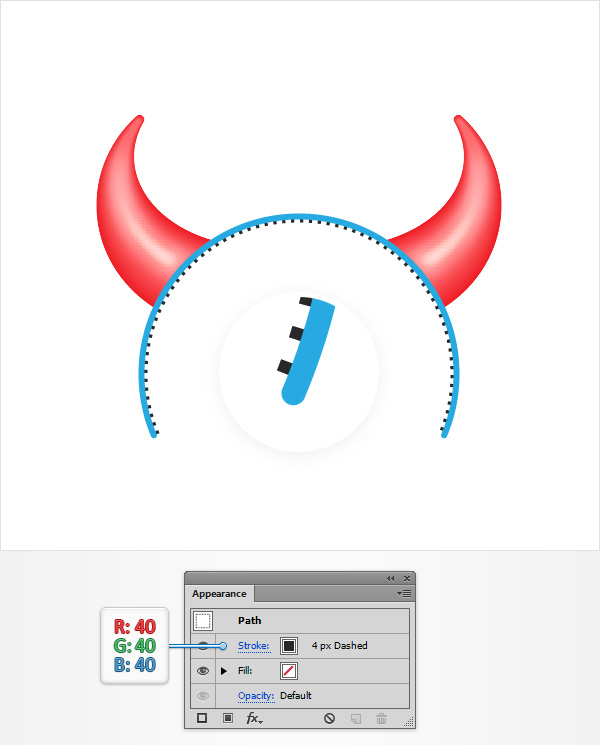
21 단계
" 그리드 "경로를 선택 하고 모양 패널을 강조 표시 하고 기존 획 색상을 R = 40 G = 40 B = 40으로 바꿉니다 .
22 단계
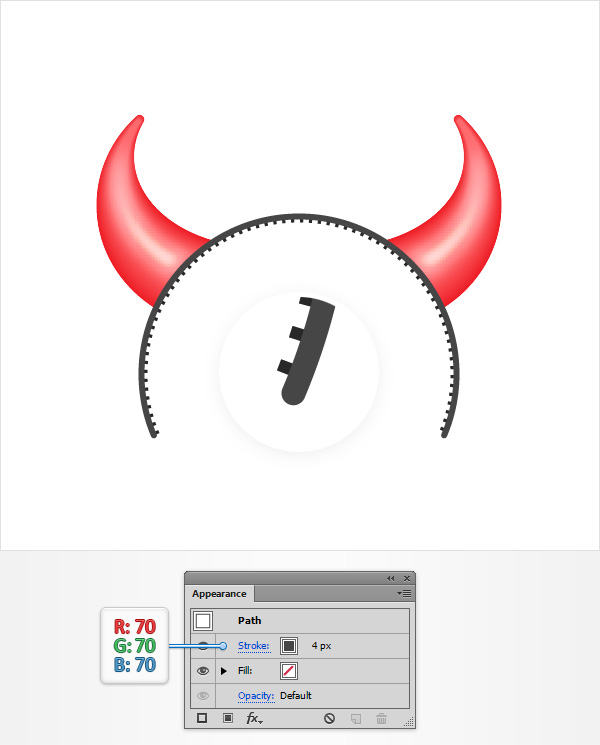
" Top "경로를 선택 하고 [ 모양] 패널을 강조 표시 하고 기존 획 색상을 R = 70 G = 70 B = 70으로 바꿉니다 .
23 단계
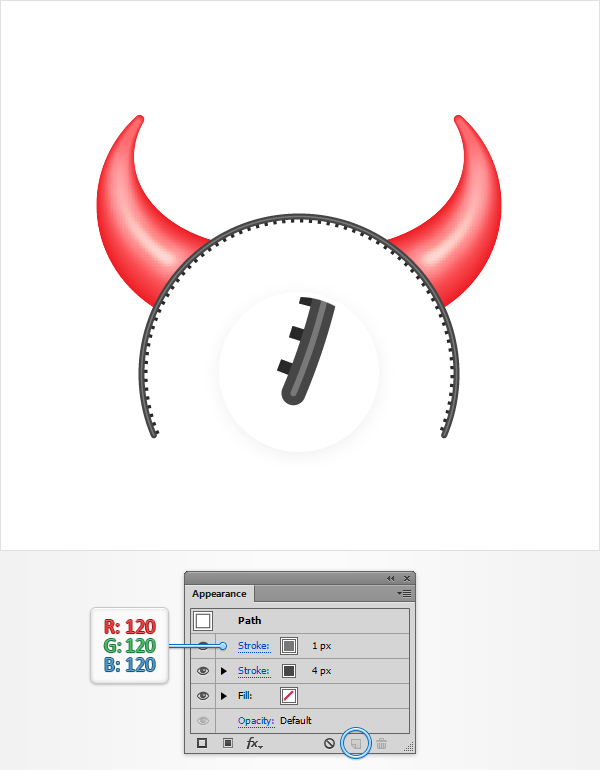
Make sure that your "Top" path stays selected, focus on the Appearance panel, select the existing stroke andduplicate it using the Duplicate Selected Item button.
Select the new stroke, replace the existing stroke color with R=120 G=120 B=120 and set the Weightat 1px.
Step 24
Reselect your "Top" path and make a copy in front (Control + C > Control + F). Select this copy and focus on the Appearance panel. Remove the 1px stroke then select the remaining stroke and replace the existing stroke color with R=39 G=170 B=225.
Make sure that this blue path stays selected and grab the Pen Tool (P). Focus on the bottom, right anchor point, click on it then extend your path by adding a new anchor point as shown in the second image.
Deselect your path then select it again. Make sure that the Pen Tool (P) is still active, focus on the bottom, left anchor point, click on it then add a new anchor point and place it as shown in the second image.
Move to the Layers panel, find the shape made in this step and rename it "Main".
Step 25
Make sure that your "Main" path stays selected and focus on the Appearance panel. Select the existing stroke, replace the existing stroke color with R=100 G=100 B=100 and then duplicate it.
Select the new stroke, replace the existing stroke color with R=120 G=120 B=120 and set the Weightat 1px. Make sure that your "Main" path is still selected and hit Shift + Control + [ to send it to back.
Step 26
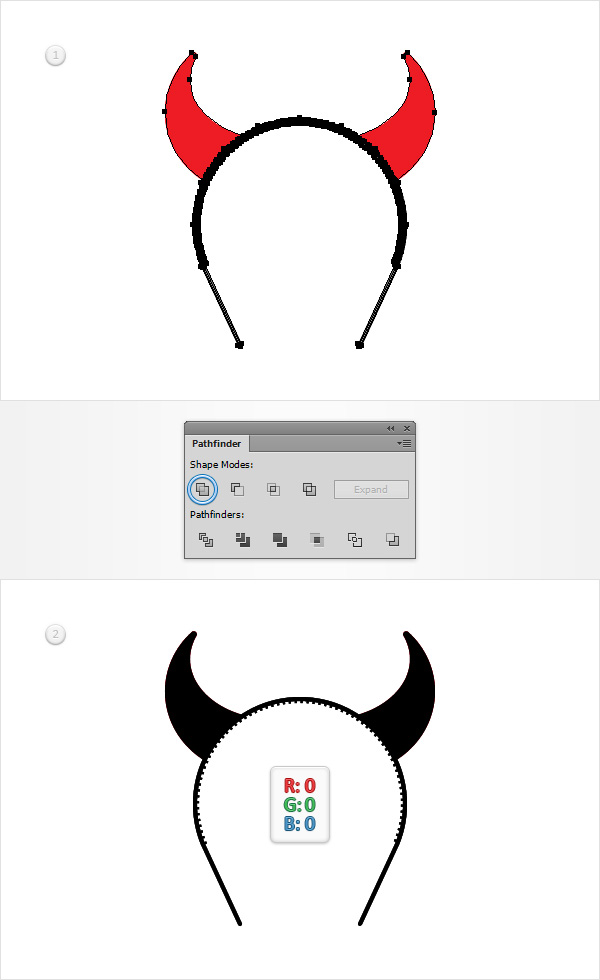
Focus on the Layers panel and duplicate the largest, red shapes that make up the horns. Select these copies and drag them to the top of the Layers panel.
Keep focusing on the Layers panel, select you "Top", "Grid" and "Main" paths and make copies in front (Control + C > Control + F). Select only these copies and go to Object > Path > Outline Stroke twice.
Step 27
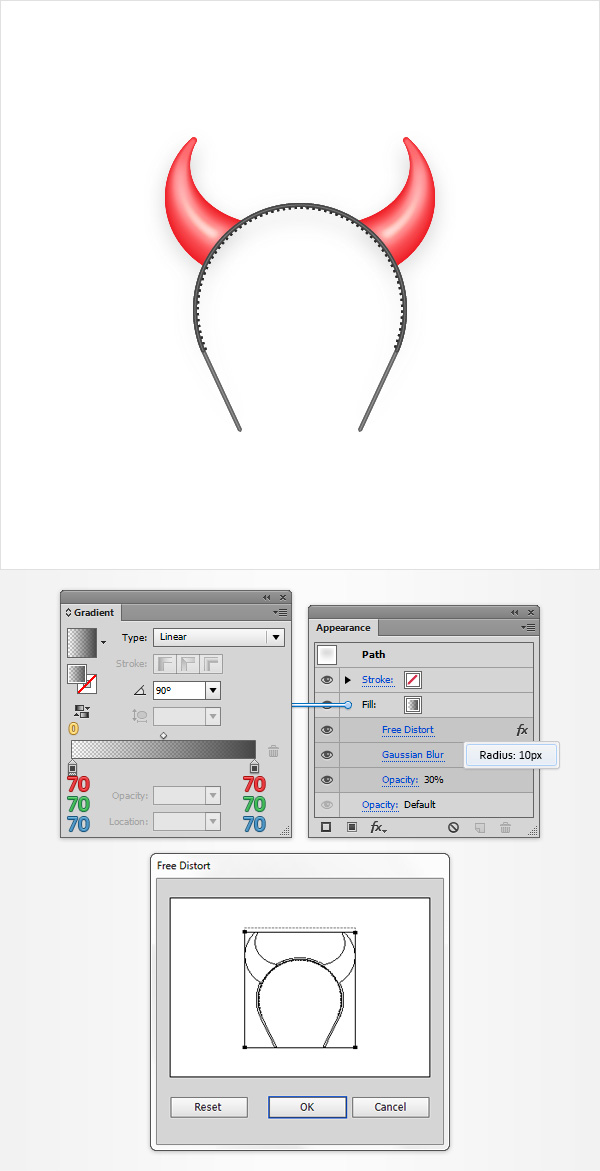
Reselect all the shapes made in the previous step and click the Unite button from the Pathfinder panel. Fill the resulting shape with a simple black (R=0 G=0 B=0) then move to the Layers panel and rename it "Shadow".
Step 28
Make sure that your "Shadow" shape stays selected, send it to back (Shift + Control + [ ) and focus on the Appearance panel. Select the existing fill, lower its Opacity to 30% then open the Gradient panel (Window > Gradient) and click on the gradient thumbnail to add the default black to white linear gradient.
Keep focusing on your Gradient panel, set the angle to 90 degrees then move to the gradient colors. Select the right slider and set its color to R=70 G=70 B=70 then select the left slider, add the same color and lower its Opacity to 0%.
[ 모양] 패널로 돌아가서 기존 채우기가 선택된 상태로 유지되어 있는지 확인한 다음 [ 효과]> [왜곡 및 변형]> [왜곡]으로 이동하십시오 . 다음 이미지에 표시된대로이 점들을 대략 드래그 한 다음 효과> 흐리게하기> 가우시안 흐림으로 이동하십시오 . 10px 반경을 입력하고 확인을 클릭하십시오 .
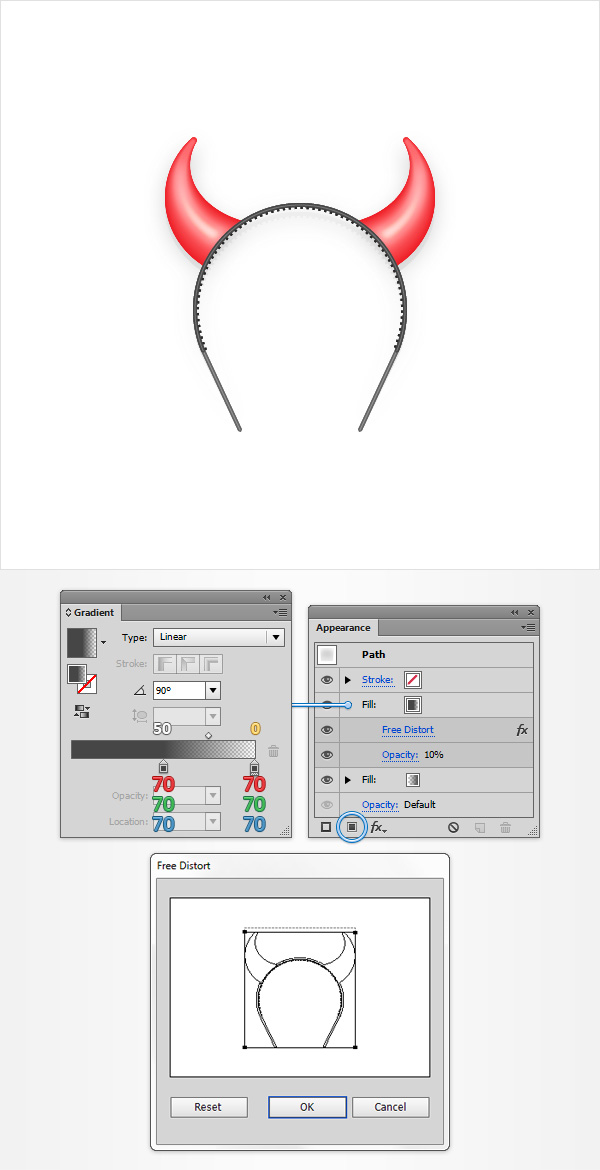
29 단계
" 그림자 "모양이 선택되어 있는지 확인한 다음 모양 패널 에 계속 초점을 맞추고 같은 새 항목 추가 버튼을 사용하여 두 번째 채우기를 추가 합니다.
이 새 채우기를 선택하고 불투명도 를 10 %로 낮추고 다음 이미지에 표시된 선형 그래디언트를 추가 한 다음 효과> 왜곡 및 변형> 자유 왜곡으로 이동하십시오 . 다음 이미지에 표시된대로 대략 점을 드래그하고 확인을 클릭 하면 완료됩니다.
그리고 우리는 완료되었습니다!
여기 그것이 어떻게 보일 것입니다. 이 튜토리얼을 마음껏 즐기시고 앞으로의 프로젝트에서 이러한 기술을 적용 해 주시길 바랍니다.
'디자인 > 무료 디자인 자습서' 카테고리의 다른 글
| [일러스트] 편집 가능한 3D 텍스트 효과를 만드는 방법 (0) | 2018.06.08 |
|---|---|
| [일러스트] 아침식사 달걀과 소시지 일러스트 그리기 (0) | 2018.06.08 |
| [일러스트] 벡터 해적 만화 캐릭터 그리기 (0) | 2018.06.07 |
| [일러스트] Fire Text 효과를 만드는 방법 (0) | 2018.06.07 |
| [일러스트] 컴퓨터 마우스를 그리는 방법 (0) | 2018.06.06 |
| [일러스트] 맛있는 피자 일러스트 만드는 방법 (0) | 2018.06.06 |
| [일러스트] 칠판 메뉴판 그리기 (0) | 2018.06.06 |
| [일러스트] 귀여운 유니콘을 그리는 방법 (0) | 2018.06.05 |


댓글