
다음의 일러스트 레이터 자습서에서는 벚꽃과 함께 초콜릿과 크림 설탕 프로스팅으로 맛있는 컵 케이크를 만드는 법을 배웁니다!
몇 가지 기본 도형으로 시작한 다음 색상, 질감, 음영 및 하이라이트를 추가하여 맛있는 컵 케이크를 만듭니다.
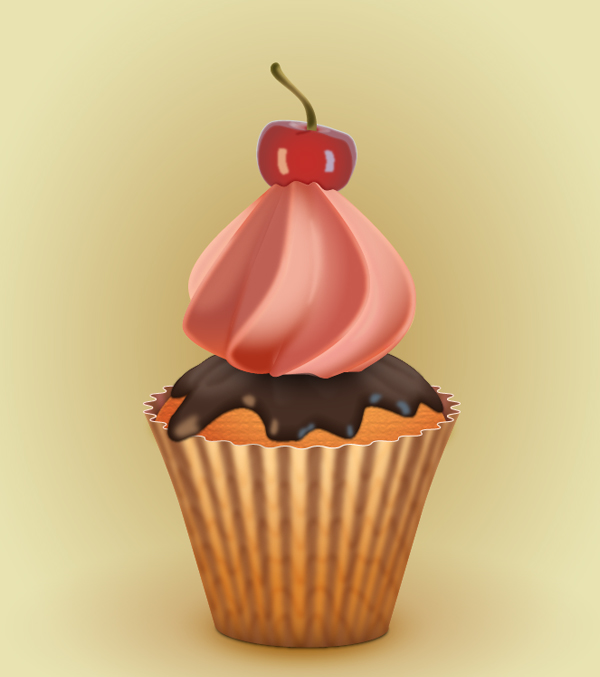
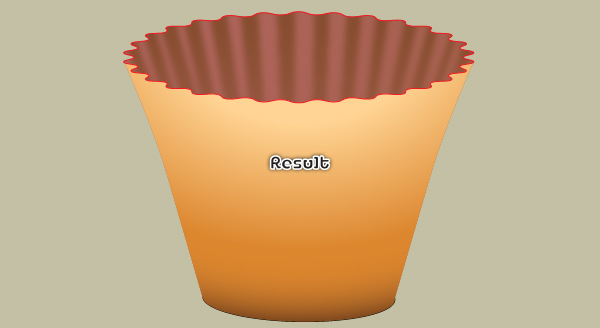
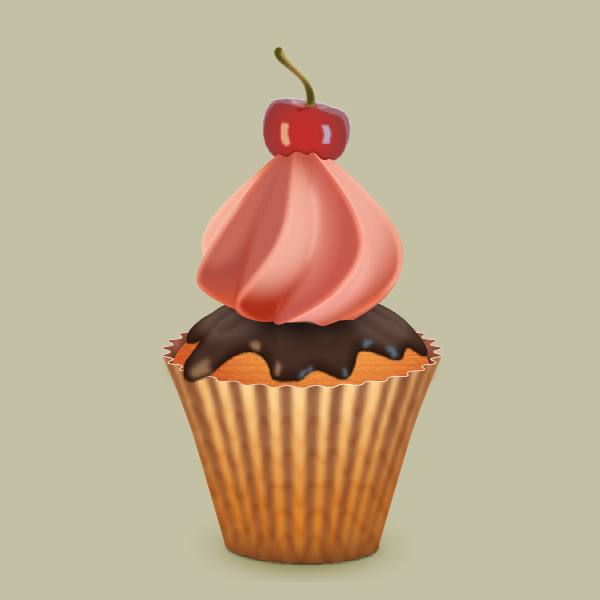
최종 이미지
언제나처럼, 이것이 우리가 만들게 될 최종 이미지입니다.
자습서 세부 정보
- 프로그램 : Adobe Illustrator CS6
- 예상 완료 시간 : 120 분
- 난이도 : 초급 - 중급
1 단계
Illustrator를 실행 한 다음 (Ctrl + N )을 눌러 새 문서 를 만듭니다 .
단위 드롭 다운 메뉴 에서 픽셀 을 선택 하고 너비 상자에 690 을 입력 하고 높이 상자에 780 을 입력 한 다음 고급 단추 를 클릭하십시오 .
RGB , Screen (72ppi)을 선택 하고 [ OK] 를 클릭하기 전에 [ 픽셀 격자에 새 객체 정렬] 상자가 선택 해제 되어 있는지 확인하십시오 .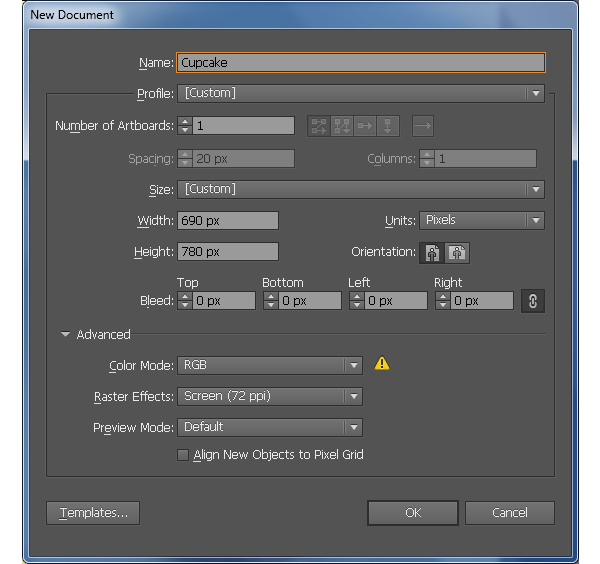
2 단계
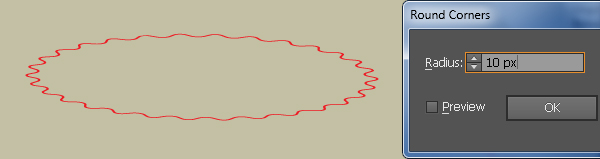
우선 컵을 만듭니다. 도구 팔레트 에서 별 도구 를 선택하고 아래 그림과 같이 대지를 클릭 한 다음 확인 을 클릭하십시오 .
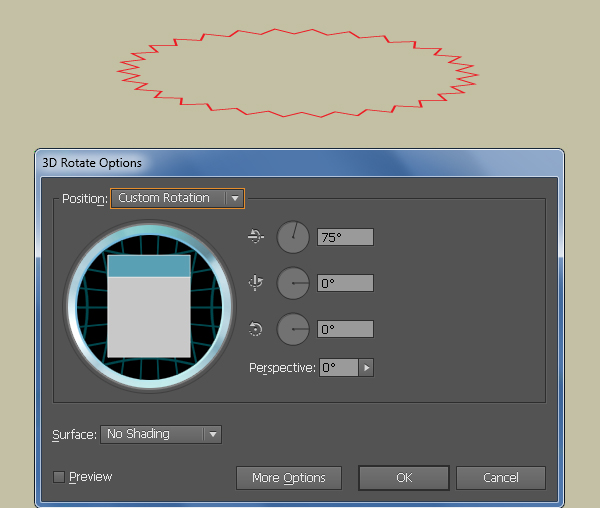
새로 생성 된 객체를 선택하고 Effect> 3D> Rotate 로 이동 합니다. 두 번째 이미지에서 볼 수있는대로 데이터를 따른 다음 OK를 클릭 합니다.
이동 ...> 스타일 화> 둥근 모서리에 영향을 Enter를 누르 10px 반경을 클릭 OK .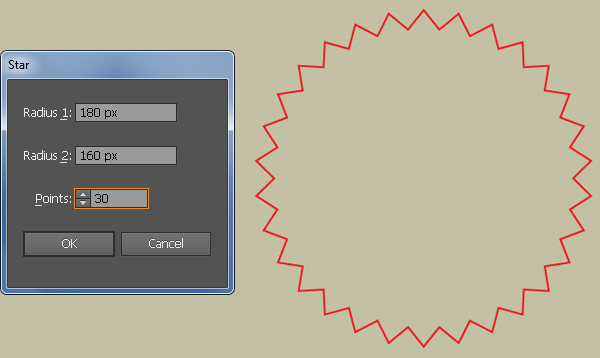
3 단계
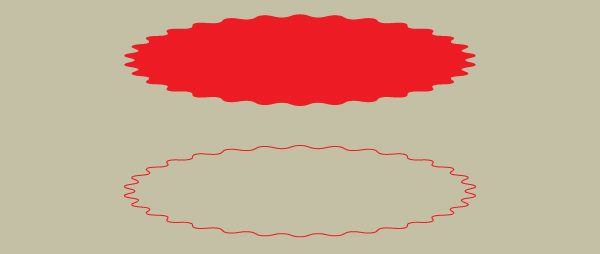
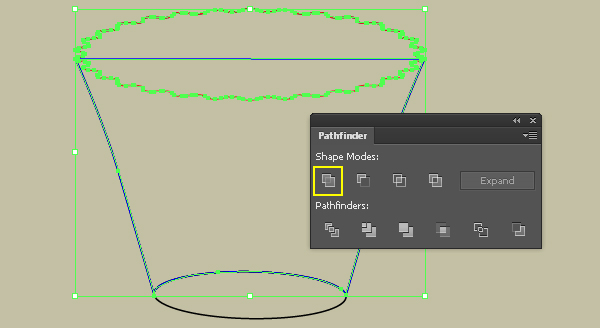
빨간색 개체가 선택되어 있는지 확인한 다음 개체> 모양 확장으로 이동 한 다음 ( Ctrl + Shift + G )를 눌러 결과 그룹을 그룹 해제합니다.
다음으로 Object> Clipping Mask> Release (Ctrl + Alt + 7)로 이동하십시오 . 첫 번째 이미지에서 보듯 클리핑 마스크 (채우기 또는 획이없는 사각형)를 선택하고 제거합니다.
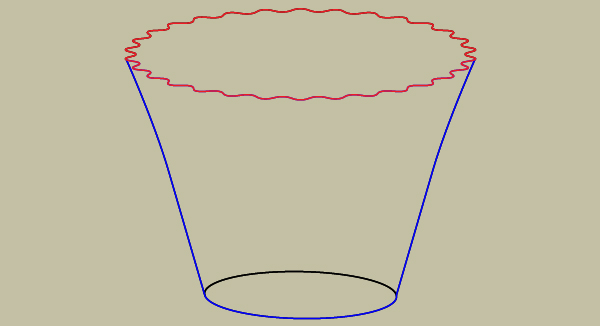
이제 나머지 그룹을 다시 선택하고 그룹을 해제 한 다음 Object> Compound Path> Release로 이동하십시오 . 이렇게하면 복합 경로가 두 개의 빨간색 모양이됩니다 (세 번째 이미지에서 보았 듯이).
더 작은 빨간 모양을 선택하고 제거하십시오. 다음으로 나머지 빨간색 모양을 다시 선택하고 채우기 색상을 제거한 다음 1px 빨간색 획 을 추가합니다 .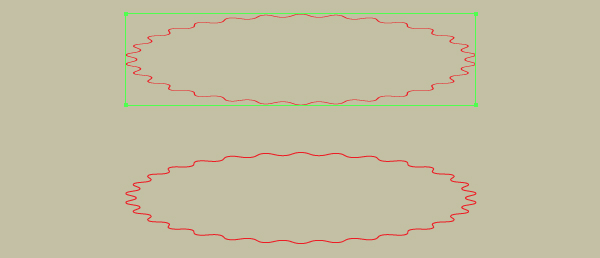
4 단계
으로 타원 도구 (L) 크리에이트 190px 190을 타원.
새로 만든 타원이 선택되어 있는지 확인하고 효과> 3D> 회전 ... 으로 이동합니다. 두 번째 이미지에서 볼 수있는대로 데이터를 따른 다음 확인을 클릭 합니다.
마지막 으로이 검은 타원에 대해 3 단계 와 동일한 과정을 반복하십시오 .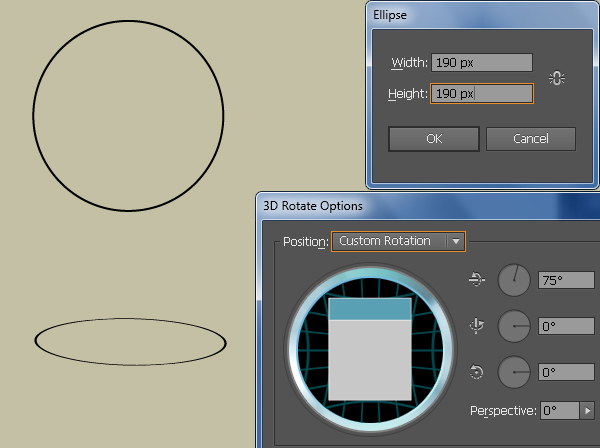
5 단계
Select the two newly created objects, open the Align palette (Window > Align) and click on the Vertical Align Center button, then click on the Horizontal Align Center button.
Next reselect the black ellipse and move it 240px down.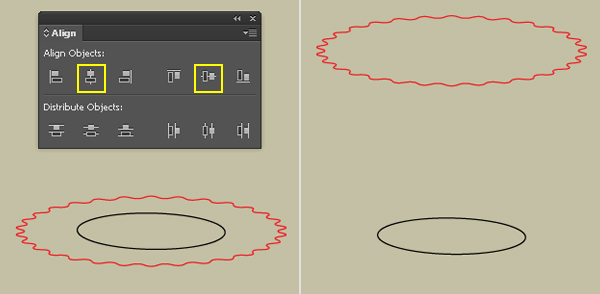
Step 6
With the help of the Pen Tool (P) create a blue curved path as shown below.
Once your path is drawn, reselect it and go to Object > Transform > Reflect… Set the Axis to Verticaland then click Copy.
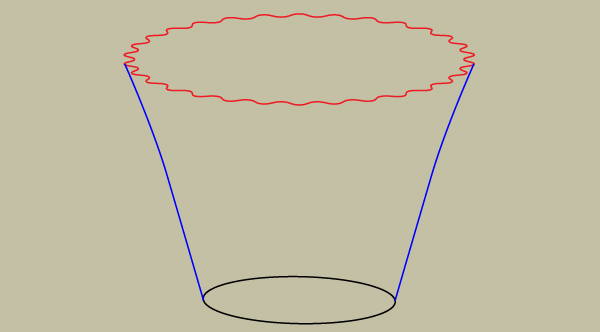
Drag the copy we have just created to the right. Don’t forget to hold the Shift key on the keyboard for straight dragging.
Now reselect the two blue paths, then right-click on the artboard and select the Join section from the drop-down menu. Do this again to connect these two paths and become a closed path as you see in the third image.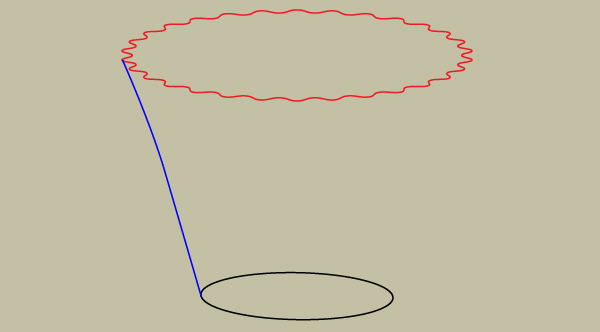
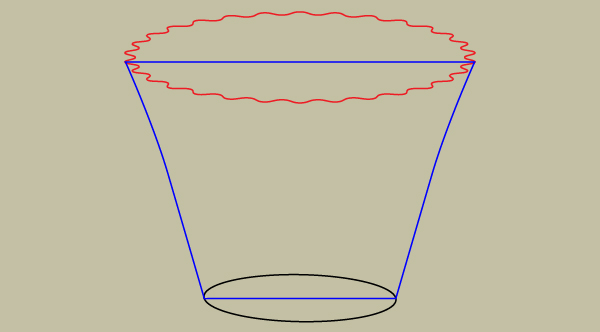
Step 7
Select the red object and the black ellipse, then make a copy (Ctrl +C, Ctrl +F) of them and hide the copies (Ctrl +3).
Now reselect the three objects created from the beginning of step 2 to this time and make a copy of them.
Select a blue object and a black ellipse, then open the Pathfinder palette (Window > Pathfinder) and click on the Minus Back button.
Keep the resulting object selected, hold down the Shift key and click on a red object, then click on the Unite button from the Pathfinder palette.
Next replace the existing stroke color of the resulting object with black and then send it to back (Ctrl +Shift +Left Square Bracket).
Step 8
Select the remaining blue object and the remaining red object, then click on the Minus Back button from the Palette palette.
Make sure that the resulting shape is still selected, hold down the Shift key and click on the remaining black ellipse, then click on the Unite button.
Now press (Ctrl +Alt +3) to show the two objects hidden in step 7.
Next select the red object and bring it to front (Ctrl +Shift +Right Square Bracket).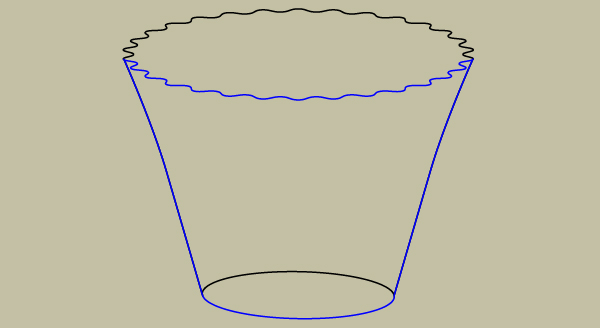
Step 9
Fill the black object created in step 7 with the linear gradient shown below.
Next fill the blue object created in step 8 with the radial gradient as you see in the second image.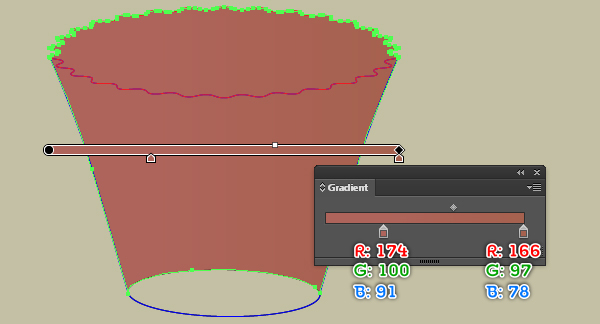

Step 10
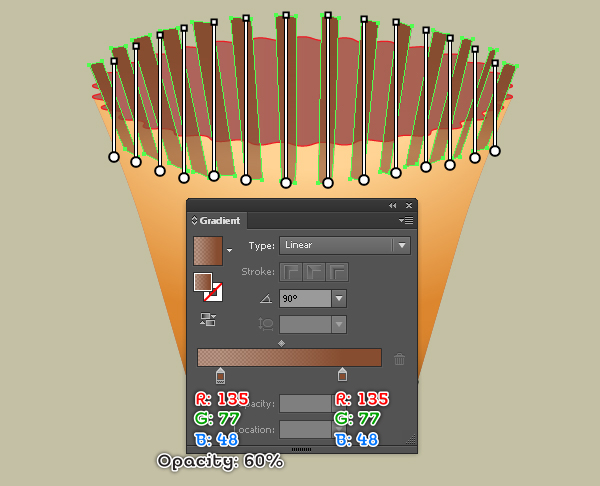
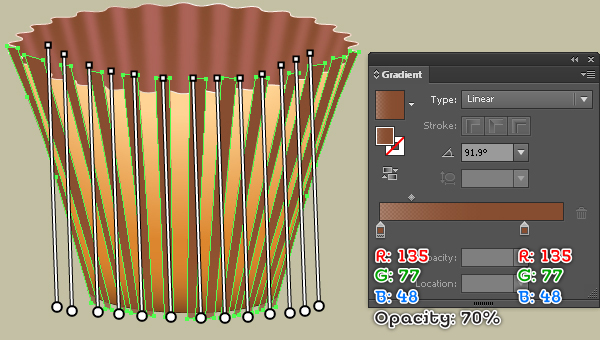
Now we use the Pen tool (P) to create some stripes as in the image below. Once your stripes are drawn, fill them with the linear gradient shown in the second image.
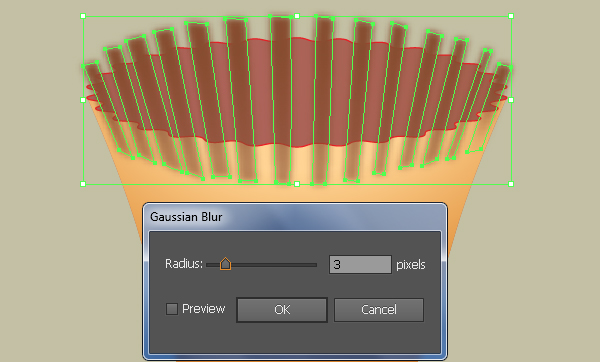
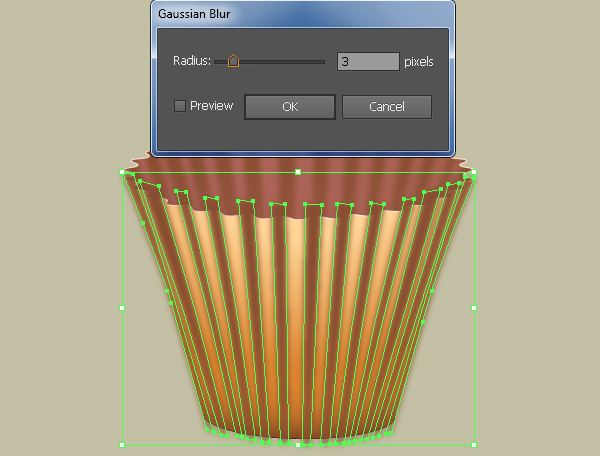
Keep the resulting shapes selected and go to Effect > Blur > Gaussian Blur… Enter a 3px Radius and click OK, then press (Ctrl +G) to group the resulting shapes.
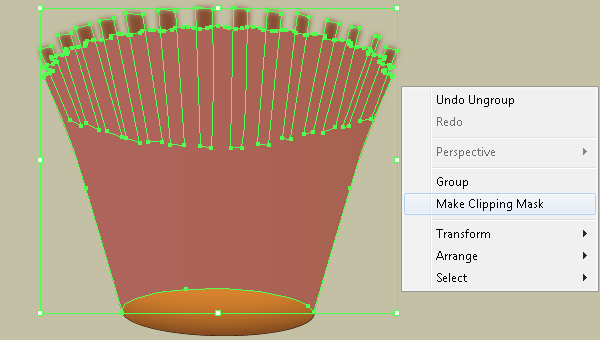
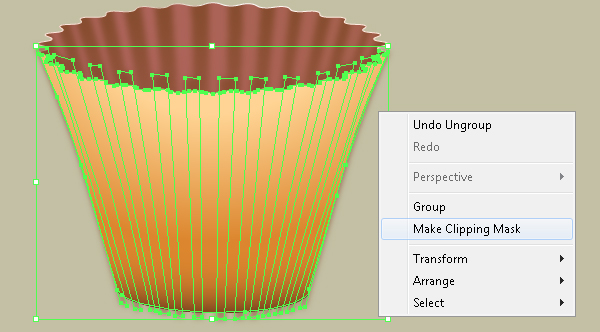
Now select the first shape created in step 9 and make a copy of it, then bring the copy to front.
Having this copy selected, hold down the Shift key and click on the new group created in this step, then go to Object > Clipping Mask > Make (Ctrl +7).
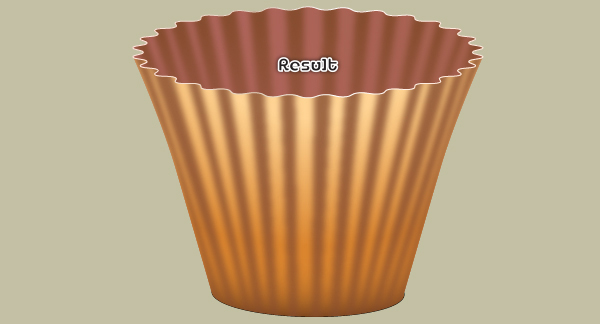
Finally hide the clipping set behind the front of the cup.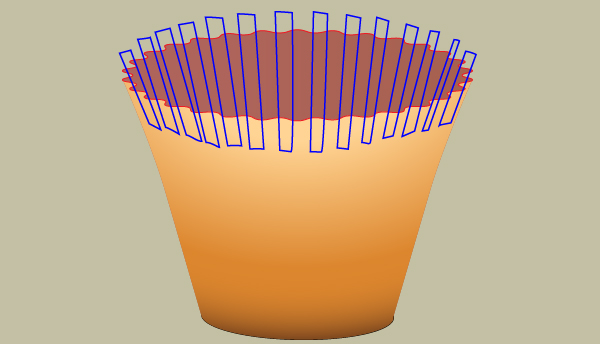
Step 11
Select the red object and replace the existing stroke color with the linear gradient within stroke as shown below.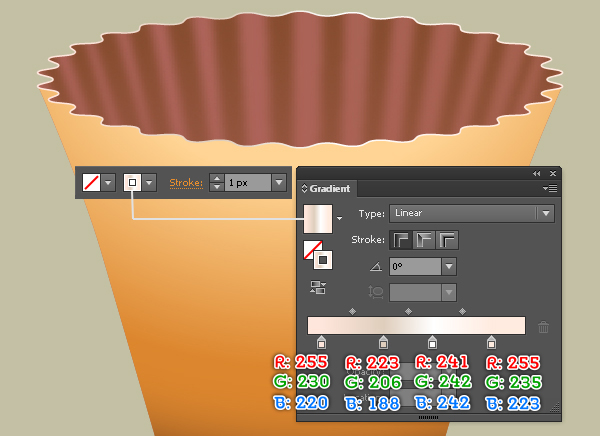
Step 12
Now we will create some stripes for the front of the cup.
With the Pen Tool (P) create some blue objects as in the image below.
Once your objects are drawn, fill them with the linear gradient as shown in the second image, then apply a 3px Gaussian Blur effect for the resulting shapes.
Before you continue, select all shapes with blur effect applied in this step and group (Ctrl +G) them.
Now select the second shape created in step 9 and make a copy of it, then bring the copy to front.
Having this copy selected, hold down the Shift key and click on the new group created in this step, then go to the Object > Clipping Mask > Make (Ctrl +7).
Step 13
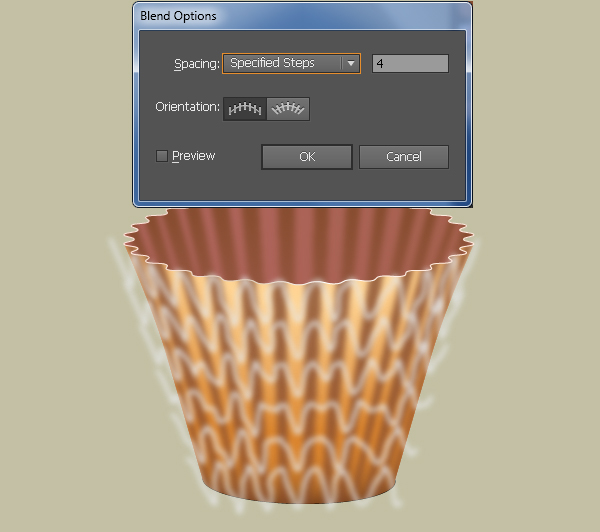
To add some details for the front of the cup, first draw two curved paths using the Pencil Tool (N) as in the image.
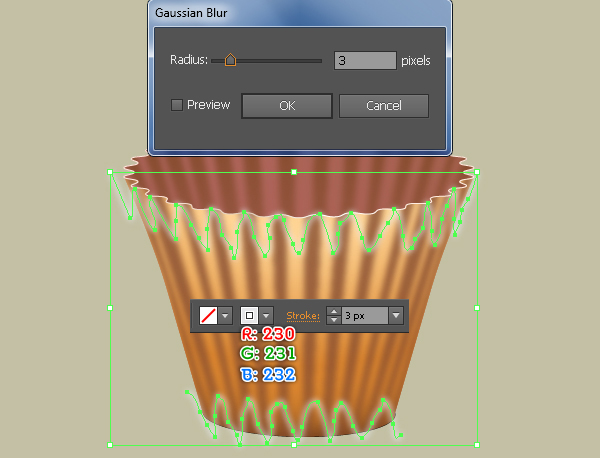
Once your paths are drawn, change their stroke weight to 3px and replace the existing stroke color with R=230, G=231, B=232, then apply a 3px Gaussian Blur effect to the resulting paths.
Make sure that these paths are still selected and go to Object > Blend > Blend Options… In the Blend Options dialog box, follow the data as you see in the third image and click OK.
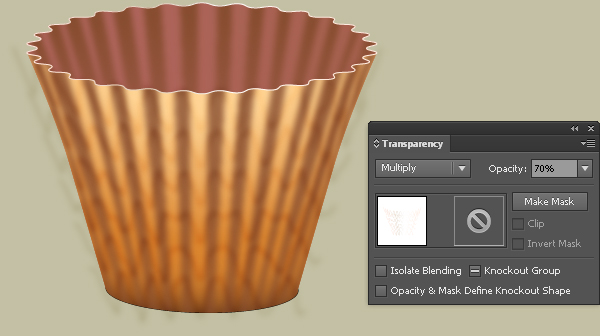
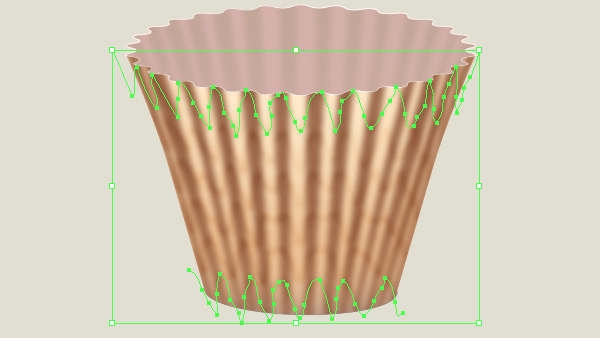
로 이동 (Ctrl + Alt + B)를>> 혼합 객체하십시오 . 그런 다음 블렌드 된 오브젝트 의 혼합 모드 를 곱하기로 설정 하고 불투명도 를 70 %로 낮 춥니 다 .
이 블렌드 오브젝트를 선택하고 ( Ctrl + X ) 눌러 잘라냅니다.
그런 다음 선택 도구 (V)를 선택 하고 12 단계 에서 만든 클리핑 세트를 두 번 클릭 한 다음 ( Ctrl + F )을 눌러이 단계에서 잘라낸 블렌드 된 오브젝트를 붙여 넣습니다.
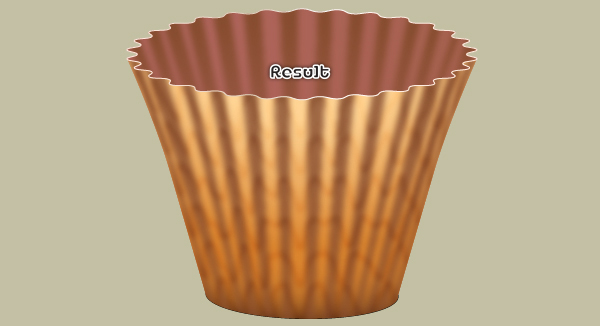
마지막으로 클리핑 세트 외부의 아무 곳이나 두 번 클릭합니다.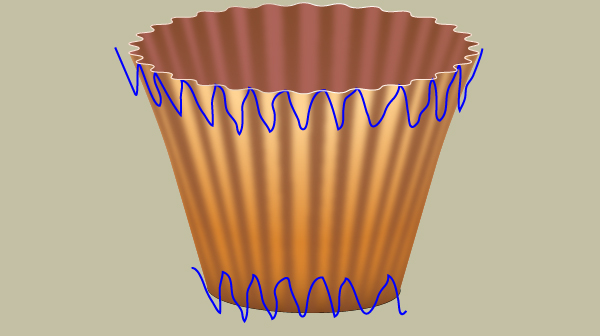
14 단계
우리는 잔을 마친다. 지금 머핀을 먹을 때입니다.
펜 도구 (P)를 선택하고 아래와 같이 개체를 만듭니다.
Once your object is drawn, reselect it and duplicate (Ctrl +C, Ctrl +F) it once.
Replace the existing stroke color of the copy with red, then select the top anchor point of this copy and move it 25px up.
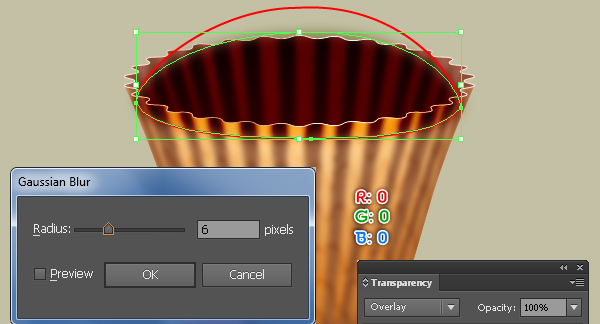
Now fill the black object with R=0, G=0, B=0, then apply a 6px Gaussian Blur effect to the resulting shape and set the Blending Mode to Overlay.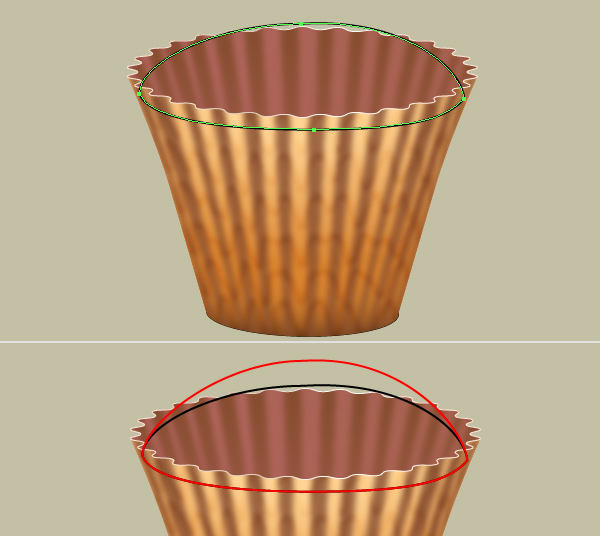
Step 15
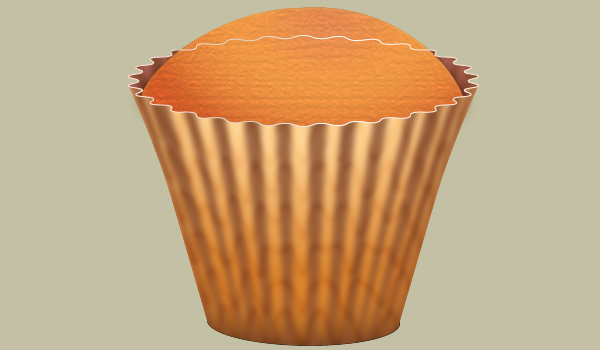
Fill the red object with the radial gradient shown below.
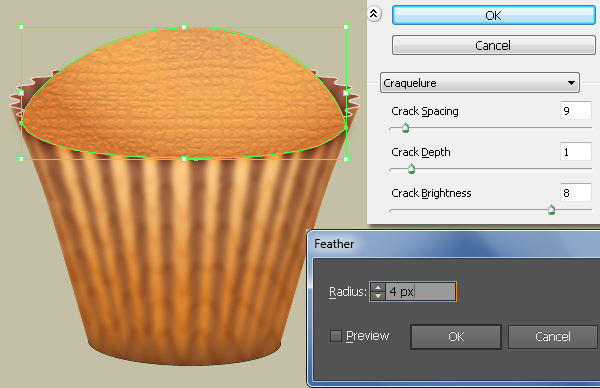
Make sure that the resulting shape is still selected, make a copy (Ctrl +C, Ctrl +F) of it and then go to Effect > Texture > Craquelure… Follow the data as you see in the second image and click OK.
Apply a 4px Feather effect to the resulting shape.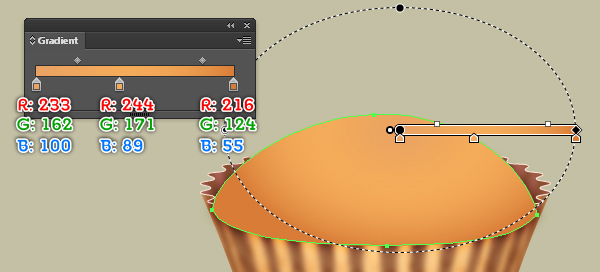
Step 16
Make a copy of the shape with feather effect applied in step 15 and then replace the existing color of the copy with a new radial gradient as shown below.
Keep the resulting shape selected, open the Appearance palette (Window > Appearance) and click on the Craquelure section. Follow the data as you see in the image below and click OK.
Reduce the Opacity of the resulting shape to 50%.
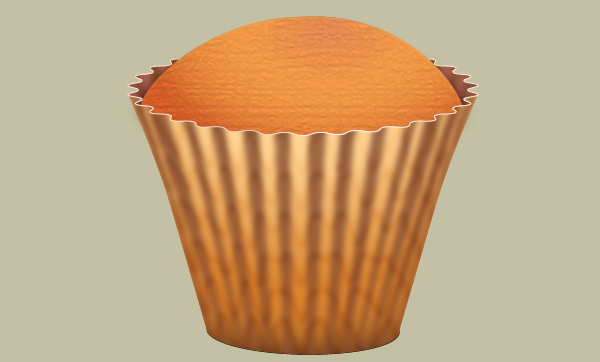
Now select and group (Ctrl +G) all four shapes created from the beginning of step 14 to this time, then hide this group behind the front of the cup.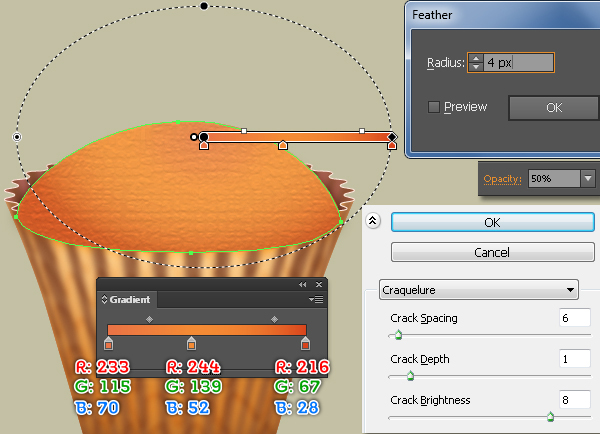
Step 17
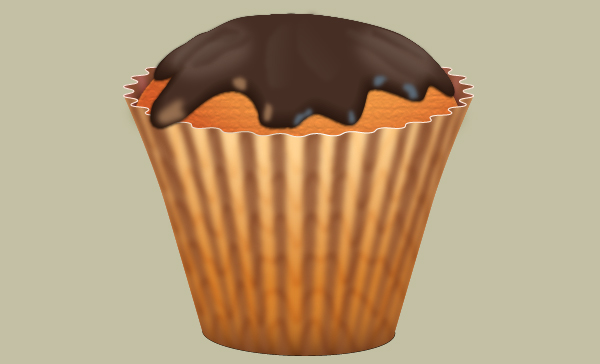
Focus on the white object created in step 11, using the Add Anchor Point Tool (+) and click on the two points highlighted with black.
Reselect the two newly created anchor points and click on the "Cut path at selected anchor points" button from the Properties bar. This makes the white object become two paths.
Next select the upper path and remove it. At this point the muffin is done and looks like the final image below.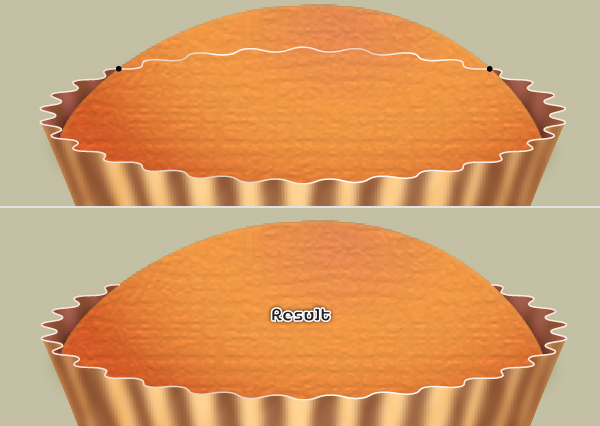
Step 18
It is the time for our chocolate coating.
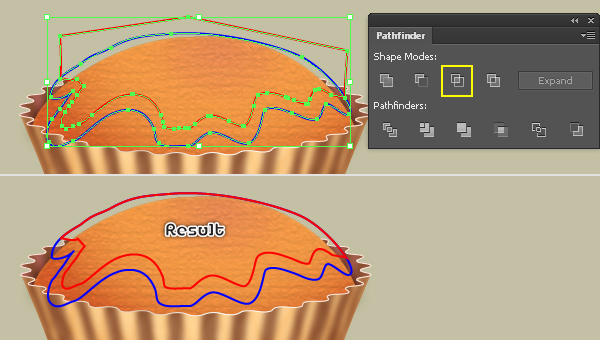
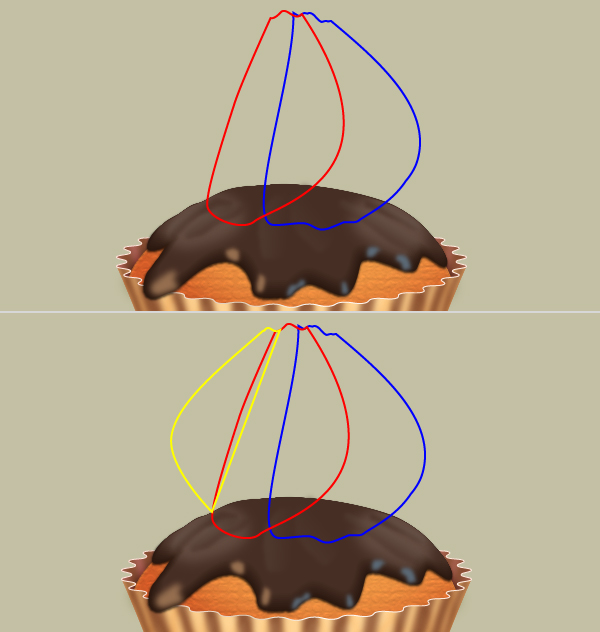
With the help of the Pen Tool (P) or the Pencil Tool (N), create two objects as shown below.
Once your objects are drawn, reselect the blue object and make a copy of it. Keep this copy selected, hold down the Shift key and click on the red object.
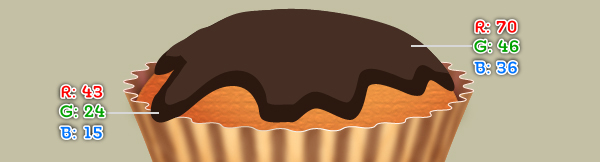
Open the Pathfinder palette (Window > Pathfinder) and click on the Intersect button. Fill the resulting object with R=70, G=46, B=36 and then fill the remaining blue object with R=43, G=24, B=15.
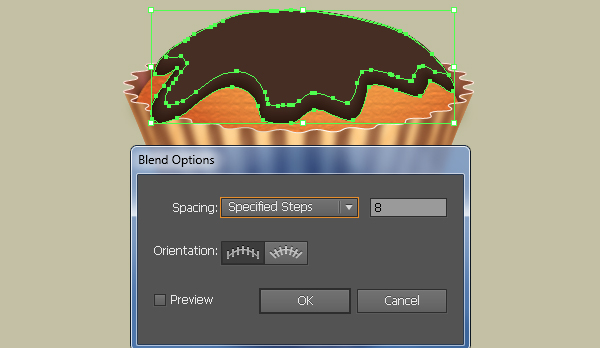
Now reselect the two newly created shapes and go to Object > Blend > Blend Options… In the Blend Options dialog box, follow the data as you see in the sixth image and click OK.
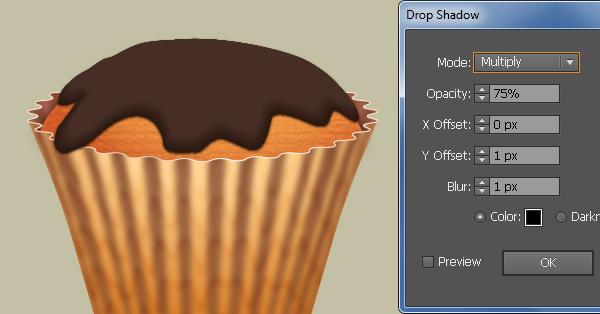
Go to Object > Blend > Make (Ctrl +Alt +B). Make sure that the blended object is still selected and go to Effect > Stylize > Drop Shadow… Follow the data as shown in the final image and then click OK.
Step 19
We are going to start making highlights for the chocolate coating to give it more of a 3D look.
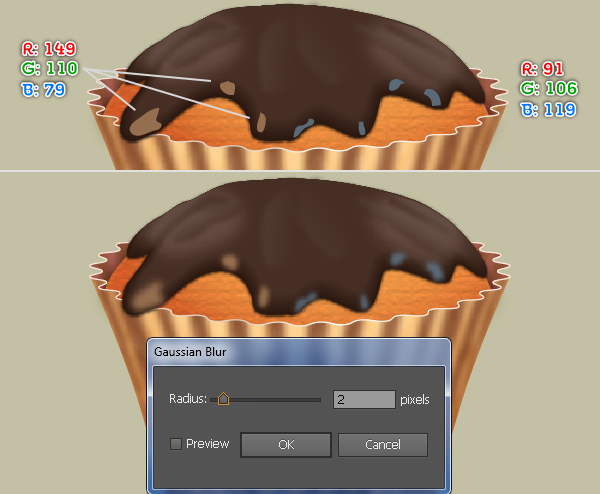
First create two red object as shown below, then fill them with R=188, G=190, B=192 and apply a 6px Gaussian Blur effect to the resulting shapes.
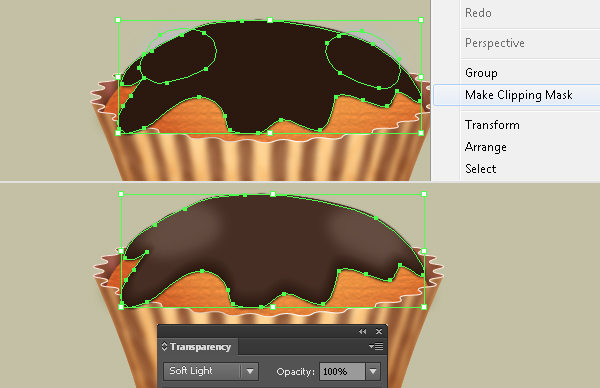
Now pick the Selection Tool (V) and double-click on the blended object created in step 18. Select the bigger shape and make a copy of it, then press (Ctrl +X) to cut it.
Next double-click anywhere outside of the blended object and press (Ctrl +F) to paste the shape that was cut in this step.
Keep this shape selected, hold down the Shift key and click on the two shapes with the blur effect applied in this step, then go to Object > Clipping Mask > Make (Ctrl +7).
Finally set the Blending Mode of the clipping set to Soft Light.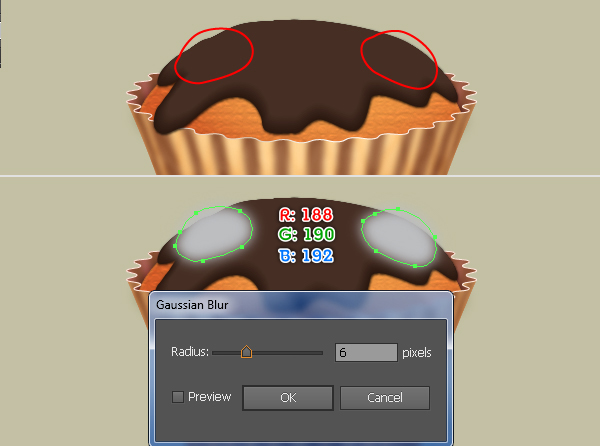
Step 20
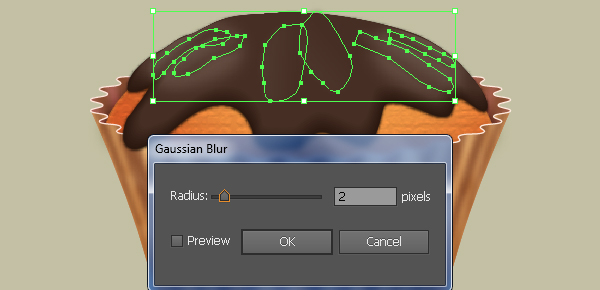
이제 일련의 이미지를 따라 아래에 표시된 것과 비슷한 다른 하이라이트를 그립니다. 결국 컵 케잌은 대략 최종 이미지처럼 보일 것입니다.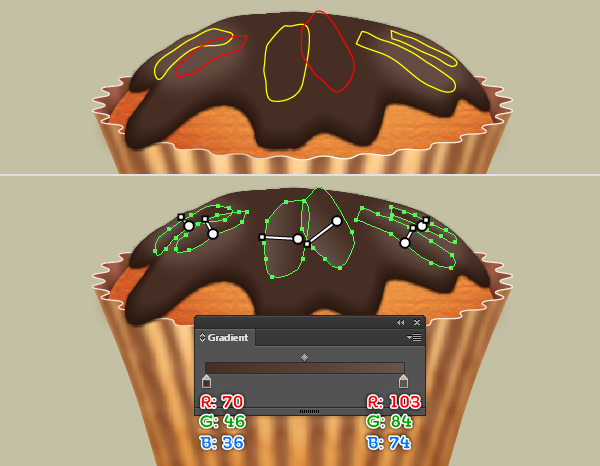
21 단계
다음에 크림을 가져와.
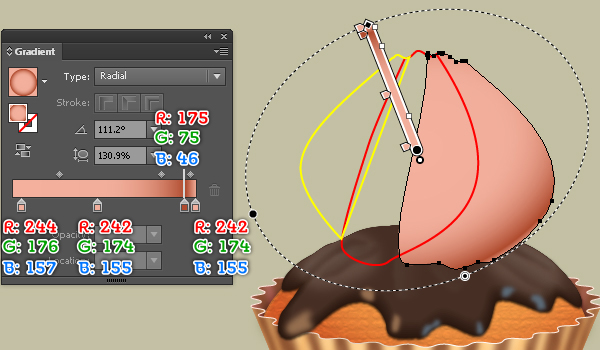
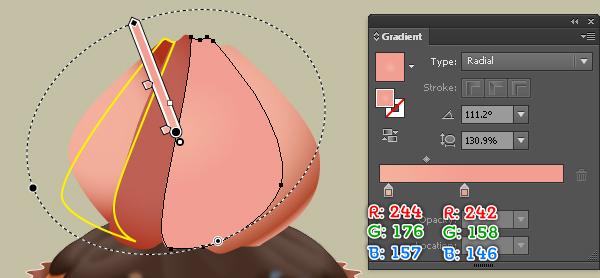
로 펜 도구 (P) 다음과 같이 세 개의 오브젝트를 생성한다.
오브젝트가 그려지면 네 번째 이미지에서 볼 수 있듯이 파란색 오브젝트를 방사형 그래디언트로 채 웁니다.
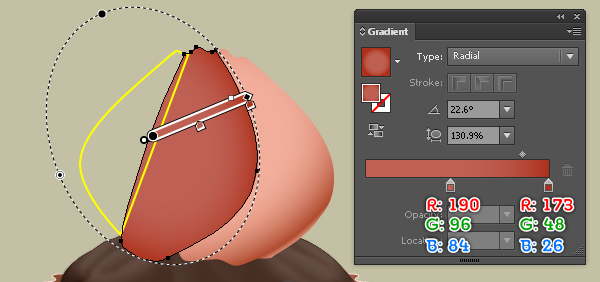
다음으로 다섯 번째 이미지와 같이 방사형 그라디언트로 빨간색 물체를 채운 다음이 단계에서 생성 된 첫 번째 모양 뒤에 결과 모양을 숨 깁니다.
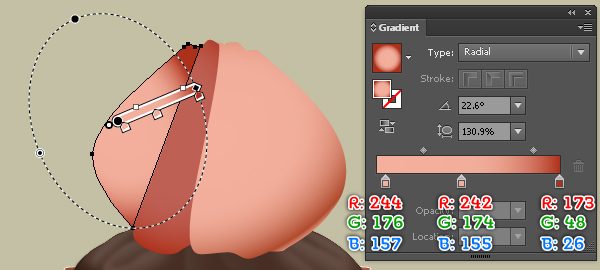
마지막으로 여섯 번째 이미지에 표시된 방사형 그라디언트로 나머지 오브젝트를 채운 다음이 단계에서 생성 된 두 번째 모양 뒤에 결과 모양을 숨 깁니다.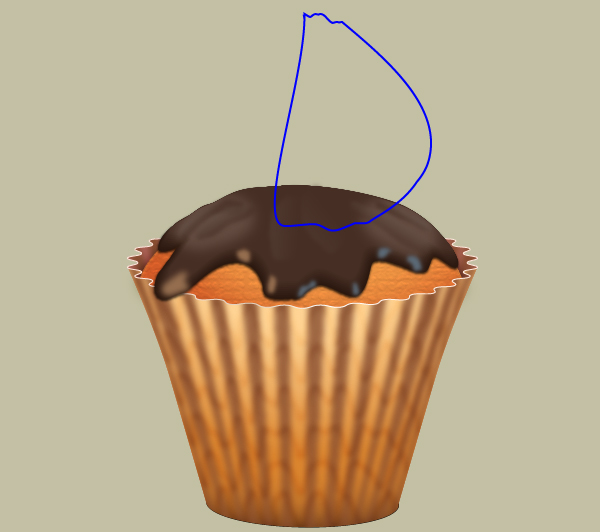
22 단계
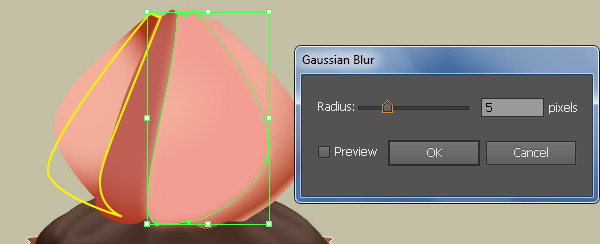
펜 도구 (P)를 계속 진행하면 아래와 같이 두 개의 객체가 생성됩니다.
Once your objects are drawn, reselect the green object and fill it with the radial gradient as you see in the second image.
Apply a 5px Gaussian Blur effect to the resulting shape.
Next fill the remaining object with the radial gradient as shown in the final image.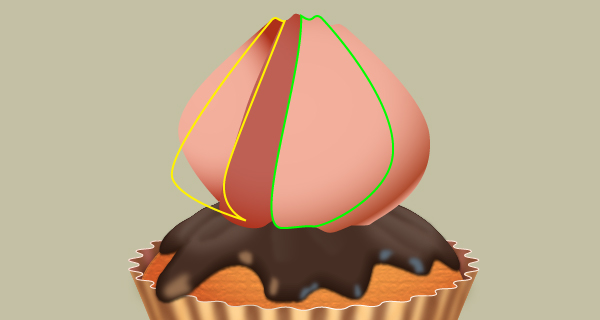
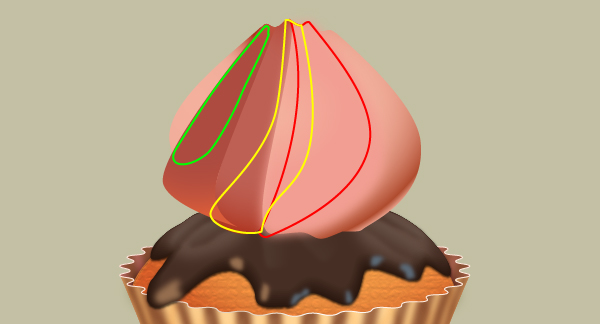
Step 23
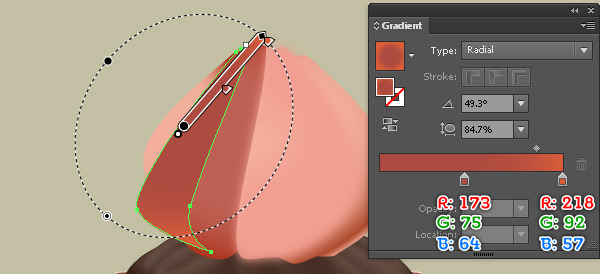
Keep working with the Pen Tool (P) create three objects as shown below.
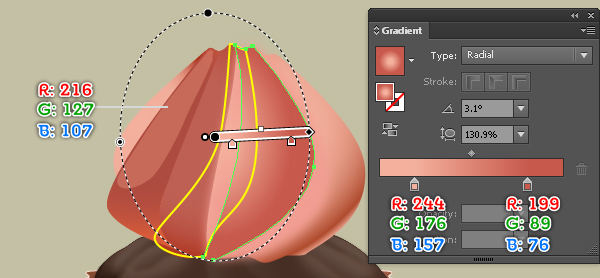
Next fill the green shape with R=216, G=127, B=107.
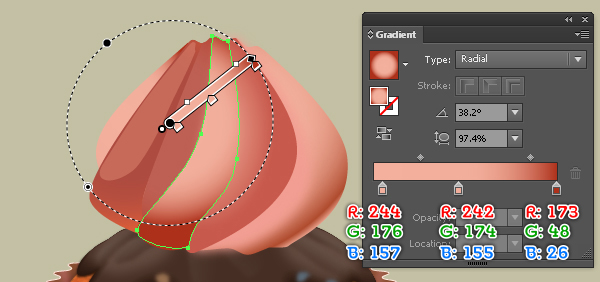
Fill the red object with the radial gradient as you see in the third image.
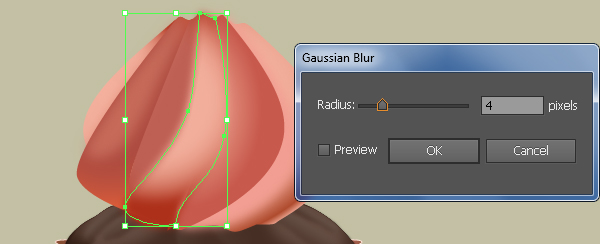
Finally fill the remaining object with the radial gradient as shown in the fourth image and then apply a 4px Gaussian Blur effect to the resulting shape.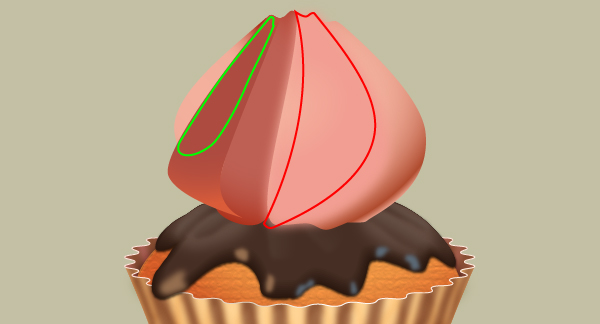
Step 24
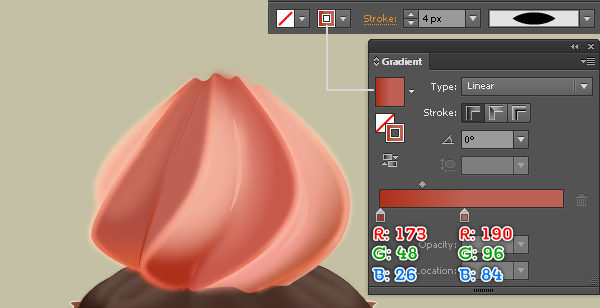
With the help of the Pen Tool (P) create five curved paths as shown below.
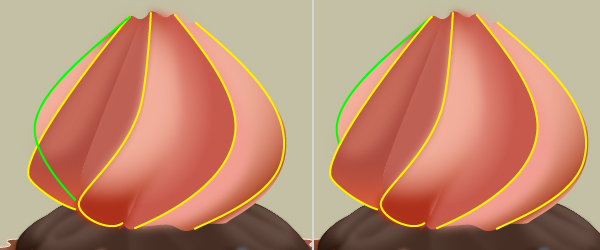
Once your paths are drawn, select the green path and hide it behind the cream shapes.
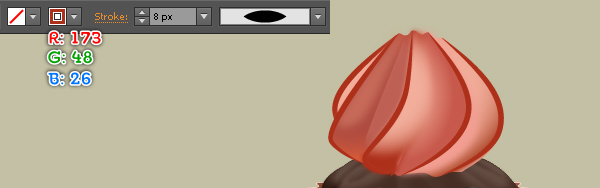
Now reselect all five paths created in this step, change their stroke weight to 8px and replace the existing stroke color with R=173, G=48, B=26.
Apply the Width Profile 1 to the resulting paths.
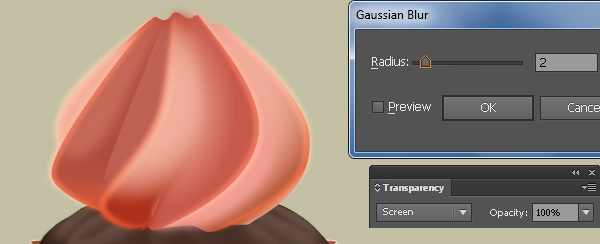
Keep these paths selected and apply a 2px Gaussian Blur effect to them, then set the Blending Mode to Screen.
결과 경로를 선택하고 복사 ( Ctrl + C, Ctrl + F ) 한 다음 사본의 획 두께를 4px 로 변경 하고 여섯 번째 이미지에서와 같이 획을 따라 선형 획을 대체합니다.
마지막으로 결과 경로 의 혼합 모드 를 밝게 변경하십시오 .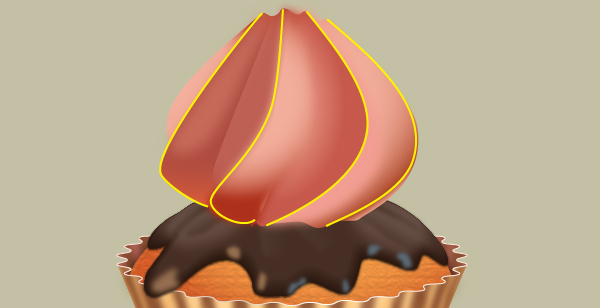

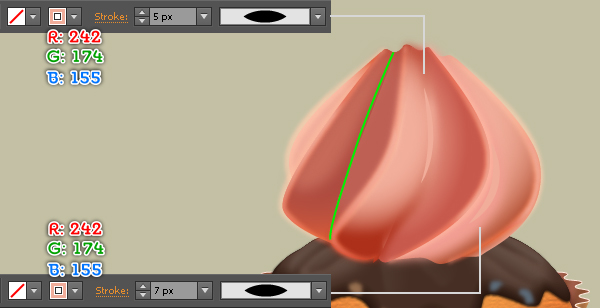
25 단계
세부 정보를 추가하려면 먼저 이미지에서와 같이 펜 도구 (P) 를 사용하여 세 개의 곡선 경로를 만듭니다 .
두 개의 노란색 경로를 선택하고 5px 획을 추가합니다 ( R = 242, G = 174, B = 155 ).
폭 프로파일 1 을 결과 경로에 적용하십시오 .
다음으로 남은 경로를 선택하고 4px 스트로크를 추가합니다 (스트로크 내에서 선형 그래디언트 적용).
결과 경로에 너비 프로파일 1 을 적용하십시오 .
마지막으로이 단계에서 만든 세 개의 경로를 다시 선택하고 두 개의 가우시안 블러 효과를 적용합니다.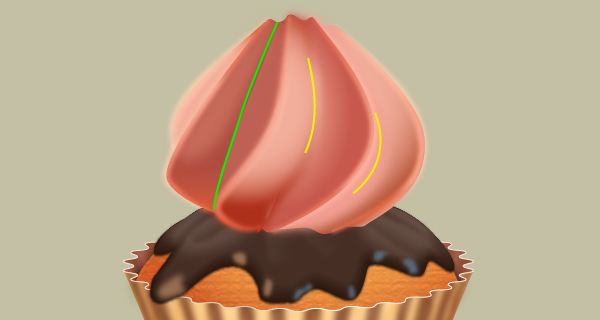
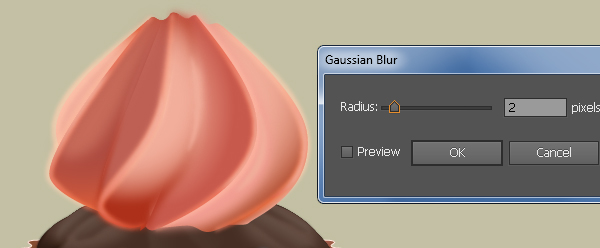
26 단계
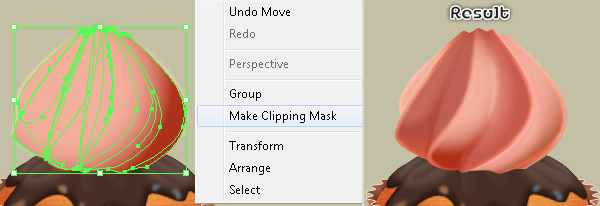
에서 만든 크림의 모든 주요 형태 선택 단계 21 , 22 단계 와 23 단계를 그들의 복사본을 만듭니다.
이 사본을 선택된 상태로 유지하고 패스 파인더 팔레트 ( 창> 패스 파인더 )를 열고 유니트 버튼을 클릭 한 다음 최종 모양을 앞으로 가져옵니다.
Now select all objects of the cream created from the beginning step 21 to this time and then go to Object > Clipping Mask > Make (Ctrl +7).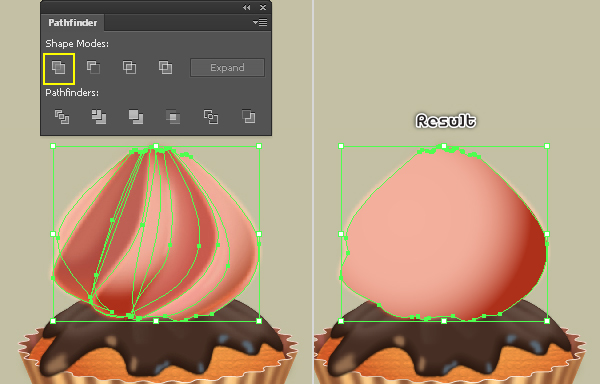
Step 27
To give a more realistic look I’m going to be adding a shadow for the cream.
Start by drawing an ellipse using the Ellipse Tool (L) as in the image.
Fill this ellipse with R=0, G=0, B=0 and apply a 14px Gaussian Blur effect to the resulting ellipse, then hide it behind the cream. The cream is ready and looks like the final image.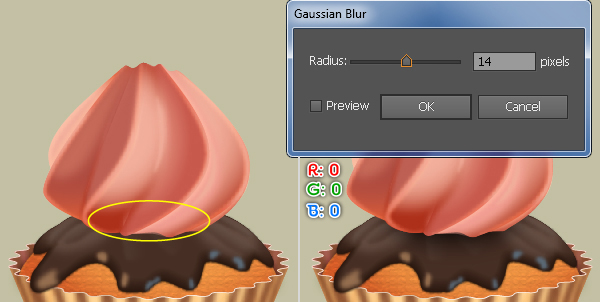
Step 28
Time for the sweet cherry!
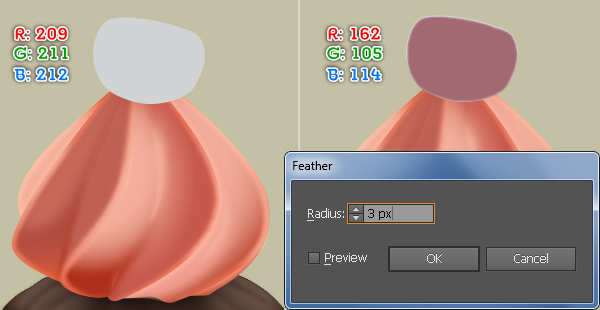
With the help of the Pen Tool (P) create a red object as shown below.
Once your object is drawn, fill it with R=209, G=211, B=212.
Make a copy (Ctrl +C, Ctrl +F) of the new shape, then replace the existing color of the copy with R=162, G=105, B=114 and apply a 3px Feather effect to the resulting shape.
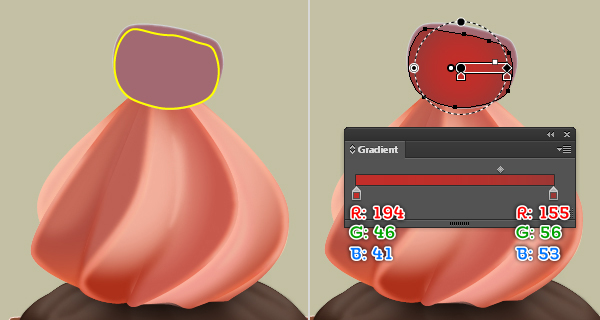
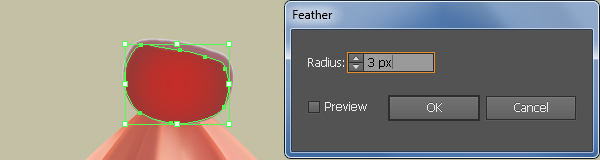
Create another object and then fill it with the radial gradient as shown in the fourth and the fifth images.
Finally apply a 3px Feather effect to the new shape.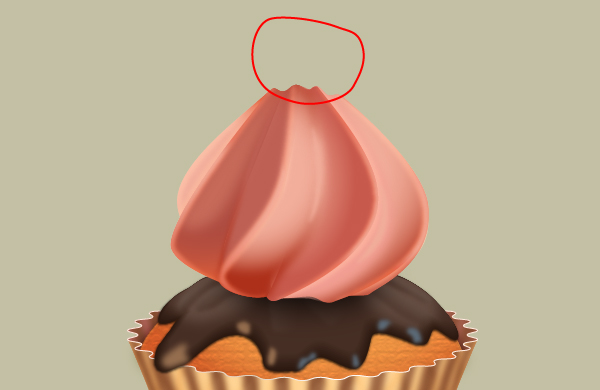
Step 29
To add some details to your cherry, first create two objects as shown below.
Fill the yellow object with R=228, G=162, B=126 and then fill the remaining object with R=187, G=167, B=189.
Next reselect the two newly created shapes and apply a 1px Gaussian Blur effect to them.
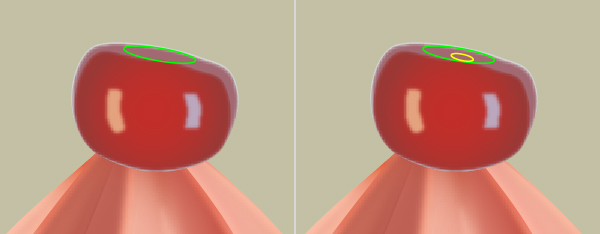
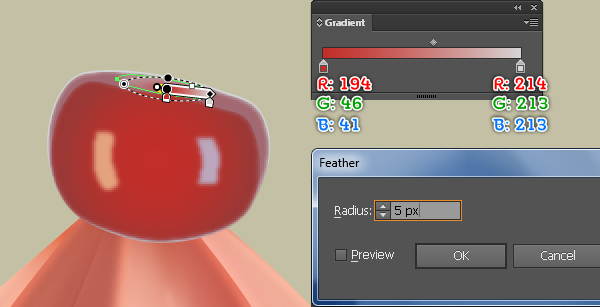
Continue with the Ellipse Tool (L) and create two ellipses as shown in the third and the fourth images.
Once your ellipses are drawn, fill the bigger ellipse with the radial gradient as you see in the fifth image and then apply a 5px Feather effect to the resulting ellipse.
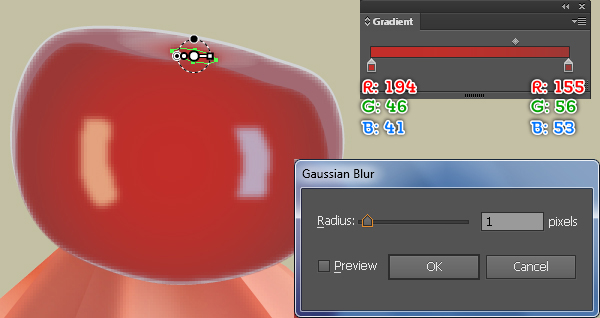
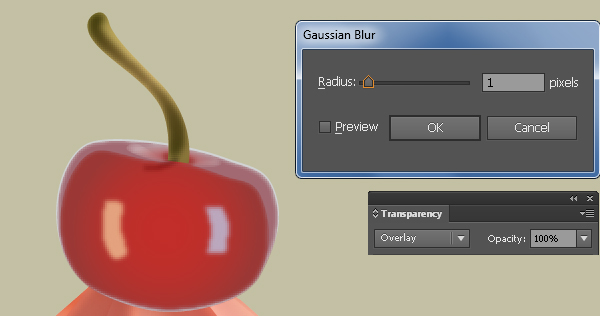
Finally fill the remaining ellipse with the radial gradient as shown in the sixth image and then apply a 1px Gaussian Blur effect to the resulting ellipse.
Step 30
Now we will create the cherry stem.
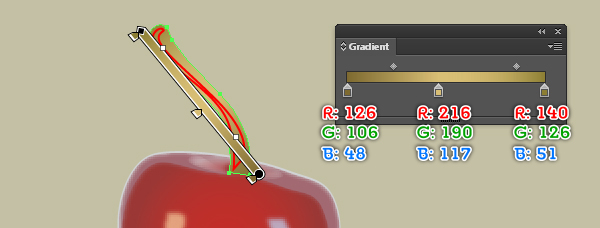
Using the Pen Tool (P) create two objects as shown in the image below.
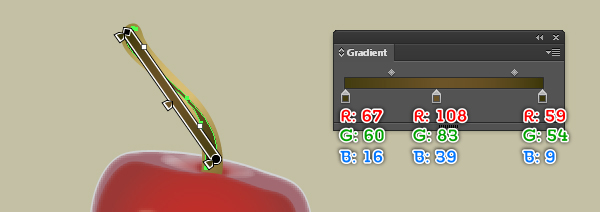
Once your objects are drawn, fill them with the linear gradient as you see in the third and the fourth images.
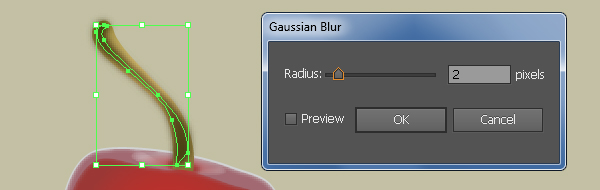
다음으로 작은 모양을 다시 선택하고 2px Gaussian Blur 효과를 적용합니다.
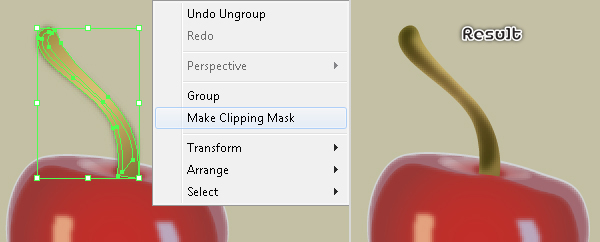
이제이 단계에서 생성 된 더 큰 모양을 선택하고 복사본을 만든 다음 사본을 앞으로 가져옵니다.
복사본을 선택한 상태에서 Shift 키를 누른 상태에서이 단계에서 흐림 효과가 적용된 도형을 클릭 한 다음 [ 오브젝트]> [클리핑 마스크]> [만들기 (Ctrl + 7)]로 이동합니다.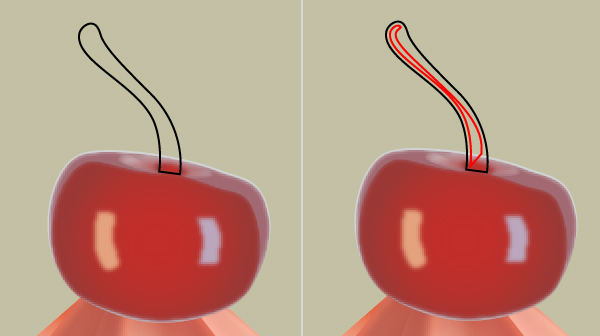
31 단계
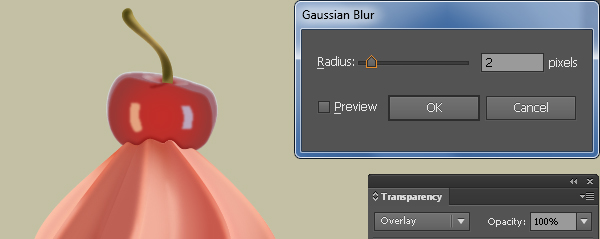
체리 줄기의 그림자를 만들려면 먼저 2px 획 ( R = 65, G = 64, B = 66 )과 채우기가없는 곡선 경로를 만듭니다 .
다음 으로이 경로에 1px Gaussian Blur 효과를 적용한 다음 Blending Mode 를 Overlay 로 설정하십시오 .
32 단계
Before you continue, select and group (Ctrl +G) all objects created from the beginning of step 28 to this time, then name this group "Cherry".
Next hide the group "Cherry" behind the cream.
Now we will add the shadow for the cherry.
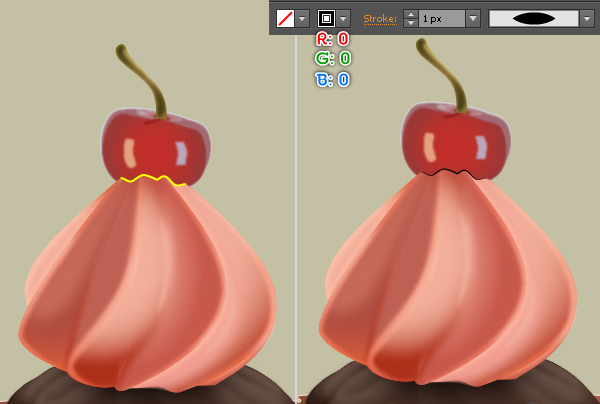
Using the Pencil Tool (N) create a curved path as shown in the second image.
Fill this path with none and add a 1px stroke (R=0, G=0, B=0).
Apply Width Profile 1 for the resulting path.
Next apply a 2px Gaussian Blur effect to this path and set the Blending Mode to Overlay.
Finally hide the resulting path behind the cream.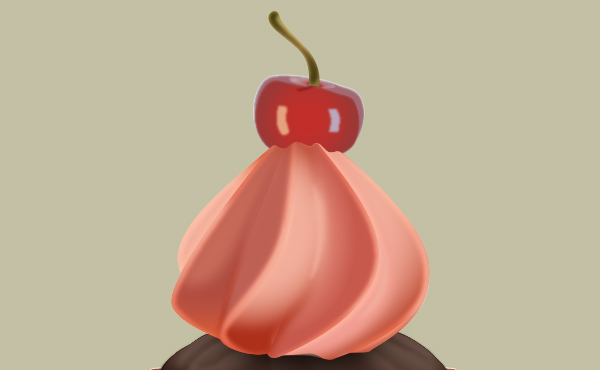
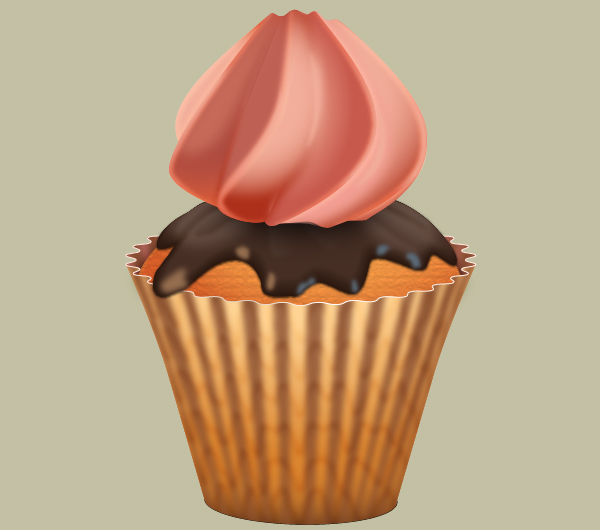
Step 33
We are done with the cupcake for the moment. This is how it should look at this stage.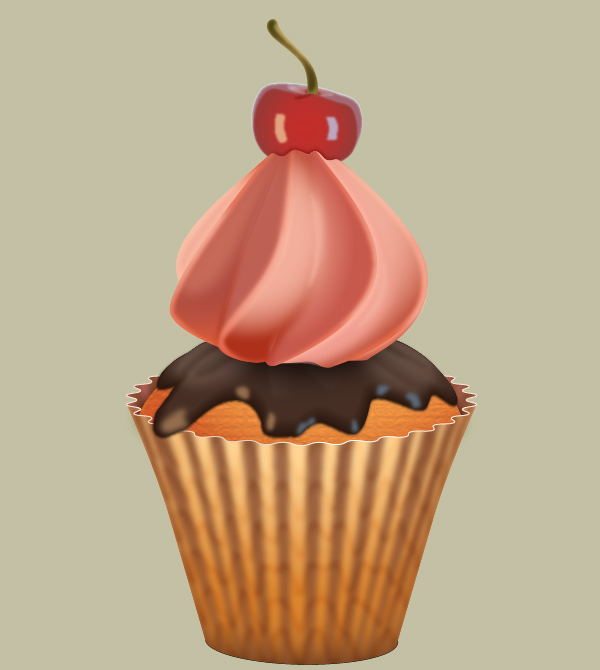
Step 34
We will add some shadow that comes from the cupcake.
Reselect the black ellipse at the bottom of the cup and bring it to front, then go to Object > Transform > Scale… Check Non-Uniform, enter 98 in the Horizontal box and enter 88 in the Vertical box, then click OK.
Fill the newly created ellipse with R=0, G=0, B=0, then apply a 2px Gaussian Blur effect to the resulting ellipse and set the Blending Mode to Darken.
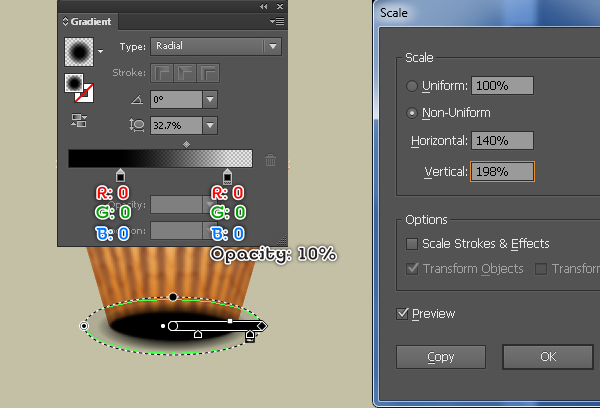
Keep the resulting ellipse selected and go to Object > Transform > Scale… Check Non-Uniform, enter 140 in the Horizontal box and enter 198 in the Vertical box, then click Copy.
Replace the existing color of the newly created ellipse with the radial gradient as you see in the second image and then change the Blending Mode of the resulting ellipse to Overlay.
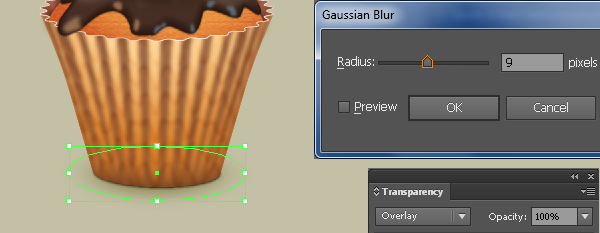
Make sure that the resulting ellipse is still selected, open the Appearance palette (Window > Appearance) and click on the Gaussian Blur section.
에서 가우시안 블러 대화 박스, 입력 9px 반경을 클릭 OK .
다음은이 단계에서 생성 된 두 개의 타원을 다시 선택하고 컵 케잌 뒤에 숨 깁니다. 결국 컵케익은 최종 이미지처럼 보입니다.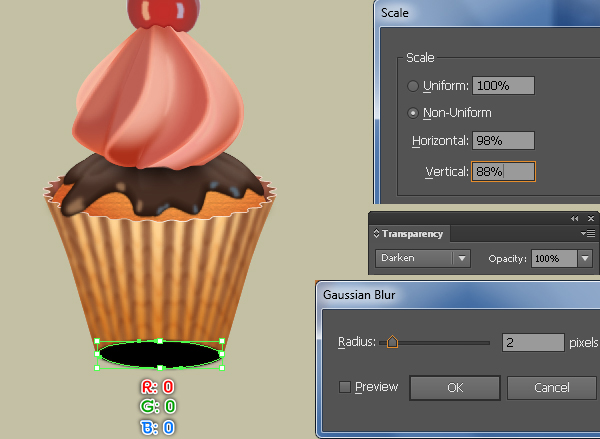
35 단계
최종 디자인을위한 배경을 설정합시다.
픽 직사각형 도구 (M)을 하고 생성 776px 의해 685 사각형 아래와 같이 다음 방사형 그라데이션을 채운다.
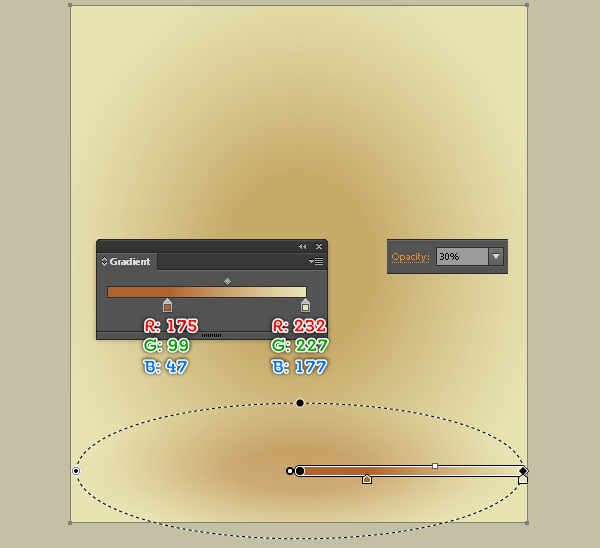
새로 만든 사각형을 복사 한 다음 복사본 의 불투명도 를 30 % 로 줄이고 두 번째 이미지에서 볼 수 있듯이 기존 색상을 새로운 방사형 그래디언트로 바꿉니다.
마지막으로 할 일은 새로 만든 배경에 먹거리를 넣는 것입니다.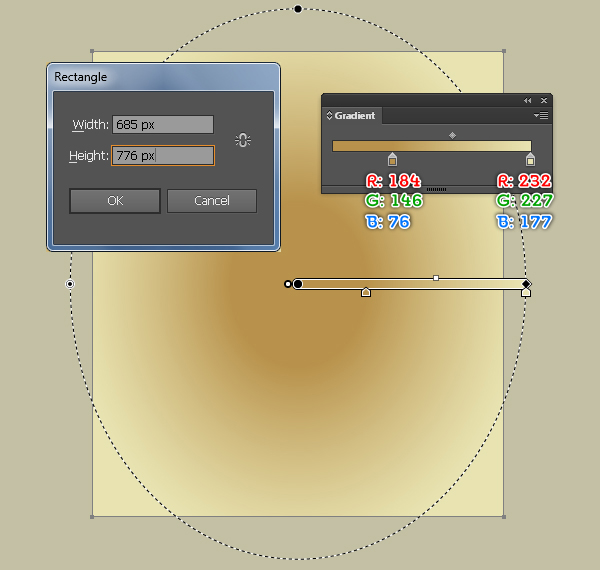
그리고 우리는 완료되었습니다!
'디자인 > 무료 디자인 자습서' 카테고리의 다른 글
| [일러스트] 도넛 형 글꼴 스타일을 만드는 방법 (0) | 2018.06.10 |
|---|---|
| [일러스트] 벡터 햄버거 만드는 방법 (0) | 2018.06.09 |
| [일러스트] 달 이모티콘 아이콘을 만드는 방법 (0) | 2018.06.09 |
| [일러스트] 초콜렛 묻힌 딸기 벡터 그리는 방법 (0) | 2018.06.09 |
| [일러스트] 편집 가능한 3D 텍스트 효과를 만드는 방법 (0) | 2018.06.08 |
| [일러스트] 아침식사 달걀과 소시지 일러스트 그리기 (0) | 2018.06.08 |
| [일러스트] 벡터 해적 만화 캐릭터 그리기 (0) | 2018.06.07 |
| [일러스트] Fire Text 효과를 만드는 방법 (0) | 2018.06.07 |


댓글